• Skip to main content
  • Skip to primary sidebar

Makeup and Beauty Blog | Makeup Reviews, Swatches and How-To MakeupMakeup and Beauty Blog | Makeup Reviews, Swatches and How-To Makeup

A beauty blog blooming with fresh makeup reviews, swatches and beauty tips from your friendly neighborhood beauty addict

  • Home
  • About
    • About
    • Contact
    • FAQ (Frequently Asked Questions)
    • Advertising & Media
  • Categories
    • Product Reviews
    • Makeup
    • Skincare & Fragrance
    • Style & Fashion
    • Hair
    • Nails
    • Tips & Tutorials
    • Just for Fun
  • Brands
  • Store

MAC Tips and Tricks Part 3 – Brows

March 5th, 2007 by Karen Leave a Comment

Here’s the last of the tips and tricks from my technique binder.

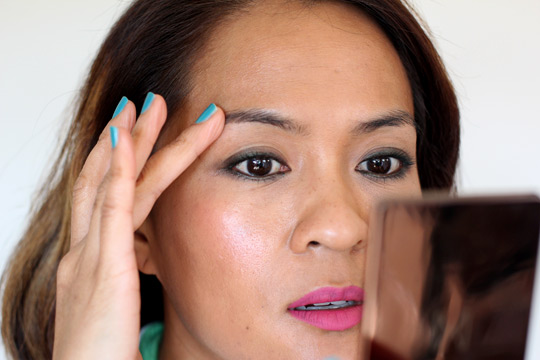
  1. When tweezing your own eyebrows, it’s helpful to map out the hairs to be tweezed by covering them with a light application of concealer or a light-colored pencil.
  2. When applying color to the brows, try focusing the application in the arch, rather than the inner portion near the nose, for a more natural-looking brow. A well-balanced eyebrow tends to be more dense in the arch.
  3. Don’t underestimate the effect of brushing your brows. First brush against the hair growth to separate, then up and back toward the ear to shape.
  4. For the look of bleached eyebrows, use Brow Set in a shade one or two shades lighter than your own brows. First brush the wand against the hair growth to cover the brow, and then dip the wand back into the tube and brush with the growth of hair.
  5. If using both a brow pencil and Brow Set, try using a darker pencil and a lighter Brow Set for more dimension.
  6. Fluid Line in an appropriate shade, like Dipdown with the 208 brush, is great to cover any scars or open areas in the eyebrow.
  7. A light powder eye shadow color like Shroom, Rice Paper or Arena placed under the arch of the brow highlights and defines the shape.
  8. After applying a powder or pencil color o the brow, brush through with the 206 brush to soften. Set with an application of clear or Tinted Brow Set.
  9. Clean up any stray brush or pencil strokes with a little concealer and a 194 brush, sharpening edges as needed.
  10. In a pinch, Tinted Brow Set can be used to touch up the roots of the scalp as well.
  11. Guys can use Tinted Brow Set in their side burns to make them look thicker.
  12. Mix clear Brow Set with any desired shade of MAC Pigment for a streak of color in the hair.
Leave the first comment on this post.

Categories: MAC Makeup, Makeup Tips/How To

MAC Tips and Tricks, Part 2: Lash Tips

March 2nd, 2007 by Karen Leave a Comment

More handy dandy tips from the Barbie Loves MAC Seminar!

Tips and Tricks: Lashes

  • When curling the lashes, squeeze twice: once closer to the lid and the next a little further toward the tip to give a longer lasting, more natural looking curl.
  • To thicken the lashes, apply two coats of Prep + Prime Lash. Let dry between coats for maximum effect.
  • For maximum deposit of mascara, “wiggle” the brush from root to tip during the application or apply from side-to-side rather than up and out.
  • To open and “lift” the eye, apply mascara to the top lashes only.
  • For a light coating of mascara, transfer some mascara to a 204 brush and apply.
  • To help make the eye appear rounder, focus mascara application on the center lashes both top and bottom.
  • To elongate the eye, focus mascara application on the outer corners of the eye. Be sure to get the little lashes that tend to hide in the outer corner.
  • To separate the lashes and assist in achieving a soft, feathery appearance, brush through the lashes with the 206 brush while still wet with mascara.
  • For the appearance of thicker, richer lashes try a technique called “backing the lashes.” Line the eye from under the top lashes with a 259 brush or 266 brush dipped into Fluid Line.
  • Experiment with layering formulas to achieve a desired effect. Try Fiber Rich lash over Zoom Lash for thick, rich lass without the spider effect.
  • For quick eye lining, run the tips of a 266 brush along the mascara wand and apply when needed.
  • Try color on lashes. Navy blue mascara is great for brightening the eye without looking like major color. Violet mascara adds interest and enhances the appearance of green eyes.

Your friendly neighborhood beauty addict,

Karen

Leave the first comment on this post.

Categories: MAC Makeup, Makeup Tips/How To

MAC Tips and Tricks: Brushes

March 1st, 2007 by Karen Leave a Comment

I’m getting so much mileage from the Barbie Loves MAC Seminar I went to a few weeks ago. I finally rifled through the technique folder they gave us and found some cool tips and tricks pages. Here are the best tips from the page for brushes:

Tips and Tricks: Brushes

When choosing brushes consider the following…

  1. Firmer fibers tend to deliver a faster application than softer fibers.
  2. Softer fibers tend to offer greater control of color application.
  3. Try applying skincare with brushes for a luxurious experience.
  4. The 190 brush works well for applying masks and moisturizers.
  5. The 194 brush words well with eye cream.
  6. The 180 brush works well to lather shave cream on the face or body.
  7. When dipping brushes into pressed powder products, like eye shadows, do not mash the brush into the pan. This causes breakage of the fibers. It’s better for the brush and more effective to either swipe from side to side or run the brush around in a circle to gather powder.
  8. Try using two brushes for some of those tricky applications, like smokey eyes. Use one brush to pick up and apply the color and the other brush to blend.
  9. When applying makeup, try holding the brush further away from the hair bundle, almost like holding chopsticks. This allows for greater control in application. Not to mention, with the hands out of the way, greater visibility!
  10. Brushes for personal use should be cleaned about once a week. For emollient-based product on the brush use cleanse off oil to emulsify and then brush cleanser to clean and condition.
  11. If after makeup application you find it necessary to throw your brushes in the bag before cleaning, be sure to store the brushes you used for liquid or cream products separately from the ones used for powder products, to avoid the cream dirtying the other brushes. And if using the same bag for both, try wrapping the brushes for cream products in plastic wrap or a tissue before tossing them in the bag. 🙂

Your friendly neighborhood beauty addict,

Karen

Leave the first comment on this post.

Categories: MAC Makeup, Makeup Tips/How To, Makeup Tools, Skin Care

Drug Store Skin Care – Three Cheap, Affordable Sunscreens

February 28th, 2007 by Karen 1 Comment

Three Drugstore Suncreens That Rock

The American Academy of Dermatology suggests applying the amount equivalent to one shot glass (1 oz.) to exposed skin every day. That’s a lot of sunscreen, and you can end up spending a hefty chunk of change if you’re using high-end brands.

If you’re living on a budget then buying a 3 oz tube of $40 Skinceuticals sunscreen may not be a cost effective way to get your sun protection. So what’s a girl to do? Hit the drug store, of course!

I’ve tried many drug store sunscreens and found three that work well: Oil of Olay Complete for Sensitive Skin, Neutrogena Ultra Sheer Dry Touch Sunblock and Alba Botanica Sea Moss Moisturizer. Here’s the skinny on each of these fab sun blockers.

Oil of Olay Complete for Sensitive Skin SPF 15
Price: $8.99 for 6 fl oz.
Makeup and Beauty Blog Rating: A-

A dermatologist recommended this sunscreen to me and I’ve been using it for over ten years.

Pros: Subtle light scent, sinks into your skin easily (but you’ll still want to let it sit for about 10 minutes before putting on your makeup), provides great every day skin protection.

Cons: When I tan and get darker, I notice that this lotion casts a slight white sheen on my skin. During the coldest and windiest winter days it doesn’t provide enough moisture. I can’t wear it when I work out, because when sweat runs down my face this lotion goes into my eyes and makes them hurt. Ouch!

Neutrogena Ultra Sheer Dry Touch Sunblock SPF 30
Price: $9.00 for 3 fl oz.
Makeup and Beauty Blog Rating: A

I don’t like having a sticky neck, so I use this sunblock on my neck, shoulders and arms.

Pros: Light scent, leaves your skin feeling dry, absorbs easily. This has excellent sun protection. I went through two bottles of this a week before before my wedding day last July (I didn’t want to be too tan for the pictures) and I didn’t get too dark, even after days of surfing and swimming. I also always wear it when I run, bike or hike outside because doesn’t hurt when it runs into my yes.

Cons: Not very moisturizing, and can leave a slight greasy (yet not sticky) film on your skin after you apply it.

Alba Botanica Sea Moss Moisturizer SPF 15
Price: $14.99 for 2 fl oz
Makeup and Beauty Blog Rating: B

This sunscreen has a strong smell — you’ll either love it or hate it. I like it, and I think the bottle is cute, too.

Pros: Smells good, non-greasy, very moisturizing.

Cons: Ample sun protection, but not as effective as Oil of Olay and Neutrogena sunscreens.

When you’re searching for your drug store sunscreens, look for ingredients which provide broad-spectrum protection like benzophenones (oxybenzone), cinnamates (octylmethyl cinnamate and cinoxate), sulisobenzone, salicylates, titanium dioxide, zinc oxide, and avobenzone (Parsol 1789.)

And always remember to apply your sunscreens 15-30 minutes BEFORE going outdoors.

I go through sunscreen quickly because I slather a lot of it on — while I’m rubbing what seems like a ridiculous amount on I just think of all the wrinkles I’m preventing. I’ve been using sunscreen since my teens and I’m starting to now really appreciate what it can do for your skin. I’m 31 and I still get carded. =)

There's 1 comment on this post. Leave yours.

Categories: Drugstore Beauty Finds, Skin Care

MAC Face Brush Review – 182 Buffer Brush

February 27th, 2007 by Karen 2 Comments

Do you love MAC brushes as much as I do?

mac-182-buffer-brushProduct: MAC 182 Buffer Brush
Use: For application of loose powder, pressed powder and pigment
Price: $45.00
Makeup and Beauty Blog Rating: B+

I know, I know — $45 for one stinkin’ brush? For $45 dollars at the MAC counter you can get 3 eye shadows, or 3 Lipglasses or even 15 pencil sharpeners! If you wear powder every day, then consider investing in this brush. Save your pennies, wait until you get a gift card, or even ask a friend who is a MAC artist buy one for you and then pay her/him back, because this brush will become a staple in your collection.

I was lucky enough to get the 182 Buffer Brush as a Christmas gift from my beautiful and talented sister-in-law, who is a MAC makeup artist. The brush has a short, fat handle and a full dome made out of goat hair bristles.

And who knew that goat hair could feel so soft? The 182 bristles feel silky and dense, and when you apply product the brush feels like velvet on your skin. You can use this brush to apply loose powder, pressed powder and pigments, and I’ve found it to be pretty much a fool-proof brush. Even if I mistakenly overload it with powder, as long as I dilute the powder (by either tapping the brush or blowing off the excess) the 182 gives smooth, even application.

I use the 182 Buffer Brush with MAC Select Sheer Loose Powder in NC 30, MAC Couture Sheer Mystery Pressed Powder in Dark and MAC Blot Pressed Powder in Medium Dark.

If I use Select Sheer Loose Powder, I open up the powder jar, tap some powder onto the lid, gently dip the 182 brush into the powder on the lid, and either tap brush handle on the side of the powder jar or blow on the brush to dilute excess powder.

If I use it with Couture Sheer Mystery Pressed Powder or Blot Pressed Powder, I gently swirl the 182 in the compact, and then tap the handle or blow off the excess powder.

I like powder to look light and sheer, so I use a light touch as I apply the powdered 182 brush to my face in a circular, buffing motion.

If it weren’t for the steep price I’d give this brush an A. Plus, if you keep your brushes in a brush roll, you may have to store the 182 in a separate cosmetic case when you travel because of the short handle.

There are 2 comments on this post. Leave yours.

Categories: MAC Makeup, Makeup Tips/How To, Makeup Tools, Product Reviews

MAC Eye Makeup Review: Club Eye Shadow

February 26th, 2007 by Karen 1 Comment

mac-club-eyeshadow

Product: MAC Club Eye Shadow
Use: Eye shadow and liner
Price: $14.00 for a pan
Makeup and Beauty Blog Rating: A+

Oh, boy! I could write odes, sonnets and volumes upon volumes on the wonders of Club, one of my holy grail MAC eye shadows, but I’ll spare ya and get down to business.

Club eye shadow came into my MAC collection as one of the shadows in the Holiday 2006 Smoked Eyes Palette. At first glance, it’s kind of dirty looking and scary. It reminded me of oily puddles in the middle of the road on a rainy day — black, gray, green and blue at the same time. I didn’t think I’d be able to wear it at all.

Once I got it on my eyes, though? Wow. Club shows up on my lids as a brown with flashes of green and blue. Pretty, multi-dimensional and versatile.

I wear it toned down during the day by using it in the crease with MAC’s 224 Blending Brush, or on the lid with MAC’s 252 Large Shader Brush. For nights out, I get a sultrier look by wetting the 252 brush and packing the color down on the lid or using it as a liner with a wet 266 Small Angle Brush, and I’ll often pair it with MAC Ricepaper, Vex, Malt and Soba eye shadows.

Club is a must for any MAC addict who loves smokey eyes!

P.S. This was one of the very first posts ever on Makeup and Beauty Blog. It’s from back in Feb. of 2007, so it’s quite old, but I still like Club just as much now (Feb. 2014) as I did back then.

There's 1 comment on this post. Leave yours.

Categories: MAC Makeup, Makeup Tips/How To, Product Reviews

MAC Green Gel Cleanser

February 26th, 2007 by Karen Leave a Comment

MAC Green Gel Cleanser

Product: MAC Green Gel Cleanser
Use: Facial cleanser
Price: $21.00 for 5 oz.
Makeup and Beauty Blog Rating: B (Update as of 3/1/07: I’m changing this rating to a “C” because I accidentally got some cleanser in my eyes, and it hurt like hell! Not ideal for sensitive eyes.)

This morning I tried one of the samples I received from the Barbie Loves MAC seminar last week, MAC’s Green Gel Cleanser.

The website describes it as a foaming, soap-free, hydrating cleanser with extracts of cucumber and algae.

This cleanser smells good! — light and fresh like cut grass in the summer. The texture is nice too. It’s thin without being too sticky.

I did feel like I had to use a lot of it to get a foamy consistency. And after I dried my face, my skin felt a little tight, but that could be also due to the fact that it’s been very cold and windy, so my skin is drier than usual. I think my oily skin would like this cleanser during the warmer summer months though.

Green Gel Cleanser reminds me of Dermalogica’s Special Cleansing Gel, so if you are a fan of that cleanser, you might like this too.

Leave the first comment on this post.

Categories: MAC Makeup, Product Reviews, Skin Care

A Makeup Tip From the Barbie Loves MAC Seminar — Choosing the Right MAC Concealer

February 22nd, 2007 by Karen 2 Comments

mac-concealer-pics

mac-concealer-chart
One tip I learned from attending a recent Barbie Loves MAC seminar:

When choosing a concealer, pick one with pink or peach tones, even if your skin is yellow or neutral toned. The MAC instructor at the seminar informed my class that 99% of the population should wear a NW color for their under-eye concealer. She said that even if you normally wear NC foundation, you should choose a NW concealer because layering yellow-toned concealers over dark circles can create a grayish color.

MAC’s system of labeling is different than most makeup lines. They base their system on the color wheel, so what you may normally think of as cool tones (pinks) and warm tones (yellows) are labeled differently in their foundation, concealer and powder lines.

MAC foundations, concealers and powders with the NC label stand for neutral cool and are for girls — or boys — with yellow undertones in their skin. Products labeled NW are neutral warm for those with pink tones.

I have some serious dark circles so I never leave the house without concealer on. I like to rotate between several brands including MAC’s Select Cover-Up concealer. It’s a liquid concealer that comes in a nice tube. Because I have oily skin, I don’t like cream or stick concealers – they feel heavy and tend to just slide off. I mix Select Cover-Up with MAC’s Fast Response Eye Cream before applying it underneath and in the inner corners of my eyes with the 217 Blending Brush. This Friday (my day off, woo-hoo!) I’m going to stop by the counter and pick up a NW concealer color. I’ll report afterwards if it makes my dreaded under-eye circles less grey.

There are 2 comments on this post. Leave yours.

Categories: MAC Makeup, Makeup Tips/How To, Product Reviews

  • « Go to Previous Page
  • Go to page 1
  • Interim pages omitted …
  • Go to page 1909
  • Go to page 1910
  • Go to page 1911
  • Go to page 1912
  • Go to Next Page »

Primary Sidebar

Welcome to Makeup and Beauty Blog

Welcome to Makeup and Beauty Blog! My name is Karen, and I’m a freelance writer obsessed with makeup.

Makeup and Beauty Blog features daily product reviews, makeup tips and beauty news — like an interactive version of a monthly print magazine, except with occasional pictures of my cat.

Recent Posts

Sundays With Tabs the Cat, Makeup and Beauty Blog Mascot, Vol. 878

Makeup and Beauty Blog Monday Poll, Vol. 894

Makeup and Beauty Blog Monday Poll, Vol. 893

Makeup and Beauty Blog Monday Poll, Vol. 892

Makeup and Beauty Blog Monday Poll, Vol. 891

/* real people should not fill this in and expect good things – do not remove this or risk form bot signups */

Social

  • Facebook
  • Instagram
  • Pinterest
  • Twitter
  • YouTube

Featured Posts

Sundays With Tabs the Cat, Makeup and Beauty Blog Mascot, Vol. 771

Lady Unicorn

Weird Things I Like to Do

brows fill out beforehand

Before You Pluck or Wax Your Brows, You Must Do This

current bare skin status

What’s One Thing That Drastically Changed Your Skin for the Better?

Copyright © 2025 Makeup and Beauty Blog. Get in touch.