• Skip to main content
  • Skip to primary sidebar

Makeup and Beauty Blog | Makeup Reviews, Swatches and How-To MakeupMakeup and Beauty Blog | Makeup Reviews, Swatches and How-To Makeup

A beauty blog blooming with fresh makeup reviews, swatches and beauty tips from your friendly neighborhood beauty addict

  • Home
  • About
    • About
    • Contact
    • FAQ (Frequently Asked Questions)
    • Advertising & Media
  • Categories
    • Product Reviews
    • Makeup
    • Skincare & Fragrance
    • Style & Fashion
    • Hair
    • Nails
    • Tips & Tutorials
    • Just for Fun
  • Brands
  • Store

Makeup

Product Reviews – MAC Smoke Signals and Cargo PlantLove Lipsticks; Dear Makeup and Beauty Blog, the Upper Lip Hair Edition; Weekend Beauty Round-up

August 31st, 2007 by Karen 9 Comments

When I was 14 my mom bought me my first tube of lipstick. I cherished that Clinique tube of silver sophistication, and whenever I put it on I felt like an elegant world traveler was staring back at me in the mirror. My actual reflection, of course, was of an awkward teenager with braces, big, unruly hair and weird clothing (it was hard to be haute couture in the East Bay in the early 90s, and try as I might I could never quite get it right.) But that tube made me feel like I was the person I was meant to be — put-together, sophisticated, beautiful.

There’s something special about a great tube of lipstick. Don’t get me wrong … I loves me some gloss. Gloss is sexy, youthful and fun. But lipstick always reminds me of different steps in my life that led me to become a woman: that first Clinique lipstick, countless tubes of MAC Paramount I wore throughout college, and the first Chanel lipstick I bought when I finally got a “real job” in the city.

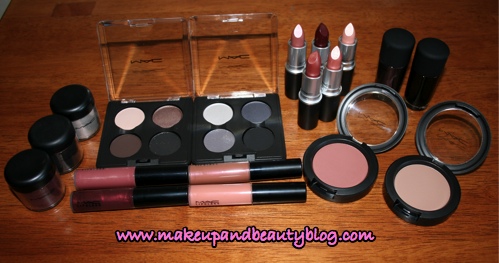
And just like Justin brought sexy back, the beauty powers-that-be declared this the year of the return of lipstick. Huzzah, sound the trumpets! If you’re not ready for a full-on dark, pigmented mouth (and I’ll have to admit that I am not quite ready for it either), you don’t have to go all the way. These fall lipsticks from MAC’s Smoke Signals line and Cargo’s PlantLove line have enough gloss to make your Lipglasses jealous, but enough thickness and color punch for an air of sophistication.

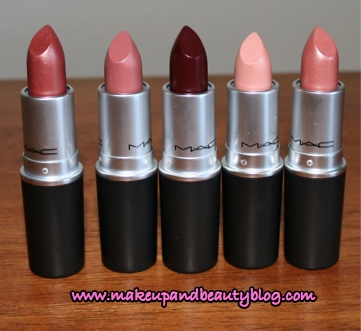
Product Review — MAC Smoke Signals Lipsticks — Sparks Can Fly, Barely Lit, Mellow Flame, Burnin’

Smoke Signals madness continues! MAC released five different colors that are very natural and for the most part, user friendly. Yesterday I rocked the Brew, so let’s check out the other four!
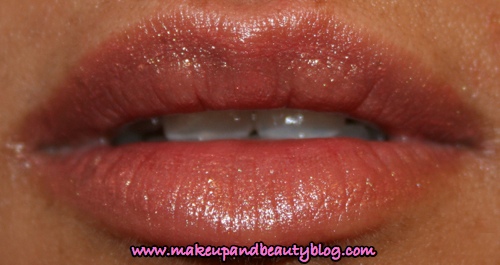
mac-smoke-signals-barely-lit
Barely Lit
Price: $14.00 for a tube
Makeup and Beauty Blog Rating: A

I am sucker for the MAC’s lustre formulas, because they give just enough color without feeling heavy. I also like that they feel very moisturizing on my lips. Barely Lit is a pink sand with a gold pearl. The color is pretty, natural and really warms up my skin. This picture shows it with two coats applied carefully with the 316 lip brush. However, it also looks great when you are in a hurry (story of my life) and need to apply it straight from the tube. I like this for an easy day look paired with curled lashes and filled in brows. It’s also very pretty for night, too, and for you single ladies (and lads) oh-so-very date friendly. Your crush will not fear giving you a big ole’ fatty of a kiss with this light beauty on your lips!
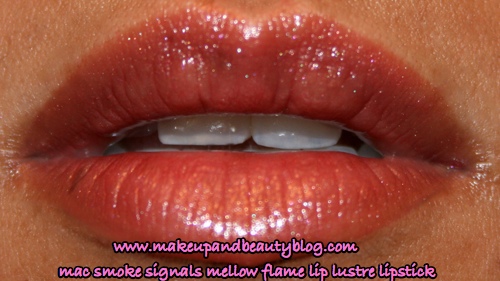
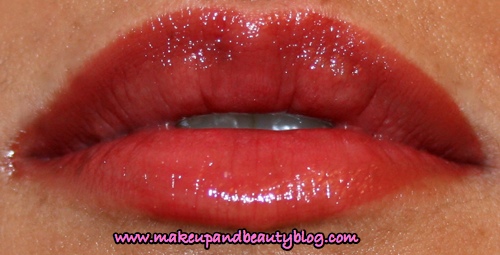
mac-smoke-signals-mellow-flame
Mellow Flame
Price: $14.00 for a tube
Makeup and Beauty Blog Rating: A+

Mellow flame is another lustre in the Smoke Signals lipstick series, a warm coral pink with red pearl. I love coral colors, and MAC really hit it out of the park with this one based on color alone. Even though the color is brighter in comparison to Barely Lit it is still natural-looking without being overwhelming. It’s warm and wearable, and if you wanted to really make it sexified you could pop a coat of Lipglass over it and woo-hoo-va-va-voom! Call the fire department cause there’s a hottie in the house!
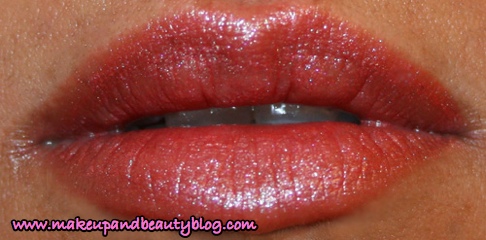
mac-smoke-sparks-can-fly
Sparks Can Fly
Price: $14.00 for a tube
Makeup and Beauty Blog Rating: D

Um, sparks were so not flying. This creamy rose frost just does not work on me when I use it by itself. There’s something about the coloring that makes my lips look blue-grey, like a lovely zombie bride with frostbite. I’m so not kidding. I think I’ll have to pair it with a warmer Lipglass in order to make it work. Ugh. Don’t do it, ya’ll.
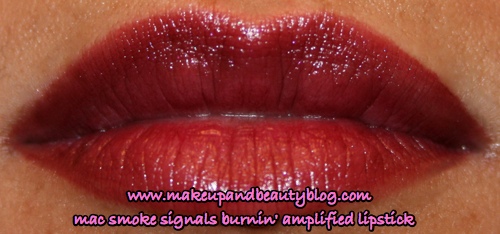
mac-smoke-signals-burning
Burnin’
Price: $14.00 for a tube
Makeup and Beauty Blog Rating: B

Talk about a kick back to the past. This dark, wine-colored lipstick takes me back to my formative years in East Bay (which coincidentally, is the word “beast” in pig latin). So when you grow up in the East Bay, you end up having so many types of friends because it’s such a melting pot of races and colors. Burnin’ reminds of my friend Monica from algebra class, who wore tight jeans, thick black liner, and was in a Latina gang. She wore dark, wine-colored lipstick like it was nobody’s business. Even though she was tough and could beat the beejebus out of anyone who crossed her, she was very sweet. We’d go on for hours and hours about the merits of Wet & Wild versus Cover Girl.

So my first reaction when I saw this color was “OHHHHHH. Monica would rock this, but could I?.”

I was surprisingly pleased with Burnin’. This was my first time using MAC’s amplified texture, which is slightly glossy and very color-rich. It’s dramatic yet surprisingly wearable, and I didn’t feel like a vampire when I had it on. The biggest drawback about Burnin’ is that applying the deep color takes time and patience, two things that I don’t always have. I also would not give this color to my 14-year old cousin. The color is too mature and too sexy.

If you’re in the mood for a dramatic change then this is worth a go. While not exactly kissable, it would be fab for a sophisticated night out in a little black dress.

Product Review — Cargo PlantLove Lipsticks — Muir Woods, Joshua Tree, Gamba

cargo-plant-love-all-three

Cargo PlantLove Lipsticks
Price: $20 for a tube
Makeup and Beauty Blog Rating: A

Cargo’s line of eco-friendly lipsticks called PlantLove recently fell into my hot little hands. One look at the super cute packaging and I was hooked. And would you believe that the tube is made entirely out of corn?!?!

cargo-plant-love-cuties

Cute, yah?

cargo-plant-love-colors
PlantLove, Gamba
cargo-gamba

PlantLove, Muir Woods
cargo-muir-woods

PlantLove, Joshua Tree
cargo-joshua-tree

fussy-tabby-flowers

The lipstick comes in an outer carton made out of biodegrable paper with flower seeds embedded in it. You wet the carton, pop it in some dirt, and bam, purty flowers just for you. Satisfy your lipstick lust and your inner botanist in one fell swoop!

All three colors have a similar texture that feels halfway between a lipstick and a gloss. They’re sheer, easy to apply and build up nicely. If you are new to lipstick (or just hella lazy like yours truly) then Gamba is a good gateway product to the big guns, lol. Oh, and if you’re a mom looking for colors for your teenager you’ll like colors like Muir Woods and Joshua Tree, which are natural-looking, not too over the top and perfect for girls who are interested in exploring makeup.

And to top it off Cargo is donating two dollars from every sale of every shade to St. Jude Children’s Research Hospital, yay.

Lol, don’t you wish
c-bale-plant-love


Dear Makeup and Beauty Blog: the Upper Lip Hair Edition

dear-mbb
Friday means it’s time for your weekly dose of tough love from Dear Makeup and Beauty Blog. Got a beauty question but afraid to go there? Never fear. We’re hear to break it down for ya.

Dear Makeup and Beauty Blog,

I’ve got dark upper lip hair. I’m not the bearded lady or anything, but it’s pretty obvious. I am terrified of waxing it off because I’m afraid it will hurt. I’ve been thinking about buying some hair bleach at the drugstore to make it lighter. Do you think this is a good idea?

Cheers,

Hairy in Hartford

Dear Hairy,

Don’t go running off to join the circus to just yet. Many women deal with upper lip issues in different ways, but we don’t always like to talk about our ‘stache hair in casual company (so not sexy). Not to fear. You’ve got many options.

There are so many people who either don’t like to wax or just can’t do it for various reasons. I had a roommate who always broke out in bumps after she got waxed so she eventually developed a method of bleaching first and then using small cuticle scissors to cut off the bleached hairs.

Before I started waxing, I would cut the hairs down as much as I could using curved cuticle tweezers. I’d then go to town on the remaining hairs with some fine-tipped tweezers. For me, tweezing isn’t painful, so I don’t mind. I eventually quit this method just because it takes forever and rarely did I ever get truly hair free.

fussy-tabby-orange-stache

I don’t recommend using the bleach alone ‘cause girrrrrrl…you ain’t fooling nobody. Step away from the bleach unless you just want to look like you’ve got an orange caterpillar growing underneath your mose.

I know you mentioned that you are afraid of waxing — I used to be too – but I find that it is the most cost effective and best method of hair removal. I do my own waxing with an at home kit; it’s cheap, easy and fast.

I used a transition method to help me go from wax newbie to wax pro:

1. I first went to a professional salon and had my ‘stache waxed about 4 times over a 12 week period. Where I live you can get an upper lip wax for 8-10 bucks, so it’s not too expensive. Think of it as a small investment in your hair-free future. If your budget is tight try to get it done at least once or twice. My reasoning behind this was to get me used to the sensation of how it feels to have the hair ripped out. I figured I’d then know what to expect once I started doing it myself.

2. After the four waxing sessions, I bought a wax strip kit at the drugstore called Sally Hansen Hair Remover Wax Strip Kit for Face, Brows & Bikini. It’s about $8.00. I only use this for the upper lip. I’ve tried it for body hair and it just doesn’t work well for coarser, thicker hair. There are small, medium and large strip sizes. You can use the small strips for your upper lip, and when you run out of them you can just cut the medium and large strips down to size. One box lasts me at least 5 months, and I wax every three weeks. It averages out to a little over a $1.00 per wax, saving me lots of time and money.

3. Okay. Now to the hard part! First I warm the wax strips in my hands. Some people recommend giving the strip a quick shot with a blow dryer, but I never do that because I’m afraid of heating up the wax too much and burning myself. I then place the strip on half of my ‘stache, pushing it down in the direction of the hair growth. I then take a deep breath (seriously, this is important), and with one hand, pull my skin in the direction of the hair growth, and then use my other hand to pull the wax strip in the opposite direction. I do this quickly! Right as I pull the wax strip off I exhale. It doesn’t really hurt, but the breathing helps to lesson the shock to my system. Right after I pull the strip off I place a finger on the area and gently apply pressure to reduce any sting.

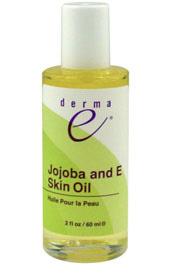
4. The kit comes with azulene oil, which I then use to remove any remaining wax. Sometimes I use Jojoba oil too, which works just as well.

5. I found out that timing was important during those first few sessions. I would take two painkillers at least an hour before and I would never wax right before my period (which is when I become very sensitive to pain.)

6. Voila! No more bearded lady!

I hope this helps! Good luck. Stay smooth.

Your friendly neighborhood beauty addict,

Karen


Weekend Beauty Roundup

Beauty Blog Network Badge

Beauty Reading is Fundamental! To start your long weekend off right here’s a round up of the best posts from the lovely ladies at the Beauty Blog Network!

15 Minute Beauty Fanatic does a Bioelements Review Series
A Touch of Blusher wants to know if you’d like some samples
All Lacquered Up reviews the China Glaze X collection for fall
Beauty and Fashion Tech looks at Neutrogena lip products
Beauty and Personality Grooming gives natural remedies for undereye dark circles
Beautynomics unwrinkles your eyes with Venom
DivaShop reviews e.l.f. cosmetics
Elke Von Freudenberg checks out the newn ShopVogue.tv
Hello Dollface reviews SuperSmile Toothbrush
Kiss and Makeup reviews Clinique Superbalm Moisturizing Gloss
Lipstick, Powder n’ Paint shares a blast from the past on last year’s Tarte cosmetics
Life of a Ladybug shares her list of beauty bargains

And in case you missed it (oh no you didn’t!), www.makeupandbeautyblog.com’s The Best of San Francisco Fashion Week 2007: Super-secret makeup tricks from 5 backstage MAC artists, Runway Videos and MORE!

Can you believe that summer is over and that it’s Labor Day weekend already? Will you be going to few barbeques and doing fun outdoor stuff? I hope so! I’ll be busy this weekend writing a story on Hawaiian heirloom jewelry. Somehow, someway, I will squeeze in some time for some relaxing fun.

Have a fantastic weekend, wear your sunscreen and work that bikini, girl!

Your friendly neighborhood beauty addict,

Karen

hearts1-dont-you

There are 9 comments on this post. Leave yours.

Categories: Beauty Tips, Drugstore Beauty Finds, Just For Fun, MAC Makeup, Makeup, News, Product Reviews

MAC Smoke Signals Pictures

August 29th, 2007 by Karen 11 Comments

All dressed up and nowhere to go
smokesignals-dressed

..and after a few drinks
smokesignals-undressed

Sexy ladies
smokesignals-sexyladies

fussy-tabby-was-it-good-for-you

There are 11 comments on this post. Leave yours.

Categories: MAC Makeup, Makeup

Videos – Backstage at San Francisco Fashion Week, Friday Montage

August 25th, 2007 by Karen Leave a Comment

A video of Friday Night Backstage at San Francisco Fashion Week


Getting the models ready in the MAC tent…

Leave the first comment on this post.

Categories: Beauty Tips, Just For Fun, MAC Makeup, Makeup, Product Reviews

Product Review – Rimmel Light Beam After Dark Lip Gloss

August 3rd, 2007 by Karen 3 Comments

rimmel-lightbeam-1

I don’t know if I’m just easily amused, but the light in the cap of Rimmel’s Light Beam After Dark Lip Gloss is the shizz! Got a dark, enclosed, space where you need to look cute (if perchance, you’re stuck in an elevator with Christian Bale, hello)? Light Beam to the rescue. Stuck on the dance floor with a gross guy with too much gel in his hair? Signal SOS (three short bursts, three long, three short) to your girls across the dance floor to rescue your ass, and Light Beam saves the day yet AGAIN. The possibilities are truly endless, ya’ll.
rimmel-lightbeam-2
Lightbeam is designed to be used by lip gloss loving club ladies who don’t want to bother heading to the loo to put on some gloss. I don’t know about you but I am never without a tube of lip gloss while I’m on the dance floor. In addition to the light in the cap there’s even a handy mirror on the side of the gloss to help you beautify yourself with accuracy. And hey, that mirror might even come in handy when you’re sick of being stuck on that desert island paradise with Christian Bale and need to signal planes for help because you miss surfing the Internets. You never know.
cbale-lipgloss-popping
What I liked about it
The color, Spotlight, looks a little scary in the tube because it’s hot pink and very, very sparkly. However, I was pleasantly surprised once I got it on my lips because the color looked natural and pretty. The consistency of the gloss is thin and lightweight, which I liked.

mysterious-fruit

What I didn’t like about it
This product is designed to be taken out to the club, but the square packaging is entirely too bulky. I don’t like to dance with a purse and thus usually stick my lipgloss in the pocket of my jeans. I wish it was round, so it didn’t look as obvious. Staying power was average, but that’s expected for a lighter and thinner gloss. There’s also a weird smell and taste that’s mysteriously fruity. I’m not crazy about it, but it goes away after a while.

The final word
If you’re strictly a MAC Lipglass kinda girl you might not like the texture of this product. It’s not heavy or sticky, but that’s a big plus in my book. This is built more for club girls who carry purses because of the bulky square packaging, but on the plus side, at least you get a lot of product. Overall, a Makeup and Beauty Blog winner.

Yesterday I went to Spinning class at the gym for the first time in months. Sweet jeabus, I am way out of cardio shape. I barely made it through the first half of the class! To top it all off the cardio room is surrounded by mirrors from all angles, so if you so desire, you can watch yourself jiggle, huff and puff from all angles. Oh joy. I am now embarking on a 30 day mission to get back in cardio shape, and I need an end goal to work toward. I’m thinking about this super cute Lauren Merkin bag as motivation:

lauren-mer-reward
What do you think?

Anyway, I hope that your Friday is going great and that you have a fabulous weekend!

Your friendly neighborhood beauty addict,

Karen

P.S. I just found out that my friend Naaman just asked his girl to marry him. WOO HOO! Congrats Naaman and FINALLY!
naaman-finally

There are 3 comments on this post. Leave yours.

Categories: Drugstore Beauty Finds, Makeup, Product Reviews

Makeup Events – The American Beauty Tour Opens in San Francisco

July 24th, 2007 by Karen 5 Comments

amer-beauty-group-pic
The American Beauty Tour kicked off on Sunday, July 22, 2007 in San Francisco at the W Hotel

This past Sunday, July 22, I got up at the crack o’ dawn and headed over to San Francisco for the opening session of The American Beauty Tour.

The speaker, celebrity makeup artist Billy B., offered tips on making it in the competitive world of the makeup industry, makeup application and life in general. Cheesy as it sounds, I was actually really inspired. [Continue reading…]

There are 5 comments on this post. Leave yours.

Categories: Beauty Tips, Makeup, Makeup Tips/How To, News

Great Products for Your Next Summer Vacation

July 11th, 2007 by Karen 4 Comments

I’m back from vacation! I’m still jet lagged and exhausted but I’m glad to be home in one piece. The hubby and I did a ton of fun stuff during our visit to Hawaii. This visit was all about outdoor fun in the sun. We snorkeled at Shark’s Cove, took surf lessons and swam with dolphins. We were pretty busy every day of the week, so even though I brought my usual travel makeup I only had time (and energy) to put on a few essentials. Here are the products I used that stood up to the heat and humidity and didn’t require lot of effort:
biotherm-concealer-skitch
Biotherm Forget It Concealer
Being relaxed and tan on vacation is the ultimate under eye dark circle remover, but sometimes a girl needs a little help. I love this stuff because I don’t have to use a lot of it (just the tiniest drop) yet it covers thoroughly and is easy to apply with or without a brush. It doesn’t feel heavy or cakey and once I put it on it barely budges. I have this in the color “30.” The only drawback is the color selection — there are only three shades to choose from. $14.00 for a tube. [Continue reading…]

There are 4 comments on this post. Leave yours.

Categories: Drugstore Beauty Finds, MAC Makeup, Makeup, Product Reviews

A Quick Makeup Removal Tip

April 18th, 2007 by Karen 2 Comments

Derma E Jojoba and E Skin Oil

derma e Jojoba and E Skin Oil – A Versatile Product and Your New Best Friend

I’m right handed, so I hold brushes in my right hand and use the back of my left hand as a palette. I put cream or liquid products like MAC Paint, tinted moisturizer, concealer, etc. on the back of my hand before applying with a makeup sponge or brush. I also use the back of my hand to get rid of excess color. Instead of blowing on a brush to remove excess eyeshadow, blush or powder, I’ll swipe the brush head against the back of my hand.

This leaves me with all sorts of makeup on the back of my hand, which can take a long time to remove with bar soap or liquid hand wash. To get rid of makeup quickly and easily I keep a bottle of derma e Jojoba and E Skin Oil in my medicine cabinet. I drop the smallest drop on the leftover makeup on the back of my hand and then give it a quick rub and voila – it’s all gone. I’ll rinse with water and then just rub the leftover Jojoba oil in for some quick moisture.

Jojoba and E Skin Oil is one my favorite workhorse products because I use it for so many different things. When my hair feels dry, I put a rub a few drops between my palms and then work the oil through the ends to condition it. After a shower, I use it as a body moisturizer. You can also use it as a massage oil as well. It’s $9.50 for a 2 fl oz bottle, and a little bit of the product goes a long way. Derma e products aren’t tested on animals, have no parabens and are 100% vegetarian, too. Yay for your skin, and yay for the bunnies.

There are 2 comments on this post. Leave yours.

Categories: Beauty Tips, Drugstore Beauty Finds, Makeup, Makeup Tips/How To, Skin Care

Foundation Quest 2007, or, Laura Mercier Flawless Face Products Oil-Free Foundation Primer, Oil-Free Foundation, Silk Creme Foundation, Oil-Free Tinted Moisturizer and Translucent Loose Setting Powder

March 26th, 2007 by Karen 7 Comments

karen-laura-mercier-oilfee-foundation

Foundation Quest – 17 years and counting
After 17 years of makeup wearing, I’m still trying to find a foundation that works for me. I’ve spent a good chunk o’ change on my quest to find the perfect foundation (aka Foundation Quest) and unfortunately much of it was spent on foundations that were too dark, too yellow or too pimple-causing. Is it too much to hope for a miracle foundation that evens out my skin tone, doesn’t feel cake-y after a few hours and keeps me zit-free?

Why I keep trying to find the perfect foundation
Despite all of the disappointing attempts, I’m determined to find something that works because the perfect foundation does so much in achieving the look of a “finished” face. These days, I’m especially eager because I’ve noticed that as I’m getting older my skin is changing it’s less oily, uneven in color, and I have fine lines and freckles. The minimal amount of makeup I can get away with on a day-to-day basis is changing, so I’m a woman on a mission!

Why I don’t wear MAC Foundations
You might be wondering why this self-professed MAC junkie isn’t using foundation from her favorite makeup line. I’ve used MAC foundations in the past – Select SPF 15 and Select Tint 15 – and they just don’t work for me. They’re too yellow and they break me out. Select SPF 15 gave me cystic acne along my jawline, which took almost a year to get rid of, and Select Tint felt heavy and oily on my skin. You can see why I don’t like to go there any more.

What happened during my last failed Foundation Quest attempt
The last time I bought foundation was during a trip to Disneyland in August, when I went makeup crazy at the Sephora in Downtown Disney because they carried the Paul & Joe line. The Sephora closest to me in SF doesn’t carry Paul & Joe, and I was totally suckered in by the cute packaging. The Sephora makeup artist matched me with Protective Fluid Foundation in the 05 Fonce color, which I happily purchased along with the Protective Foundation Primer SPF 30. When I made it back home after the trip and tried out the products, I was really disappointed because the primer cast an ashy tint on my skin and the foundation was too yellow in natural light. I don’t know what happened. I think my need to believe that this foundation was THE ONE sent me into a Paul & Joe makeup induced trance! I threw the products into the Makeup-I’ll-Never-Use pile and decided to do more research when the itch to go on Foundation Quest hit again.

Makeup artist tips I found digging around the web…
This time around I did a bit more preliminary research. I found that many makeup artists suggest that you should try to get away with as sheer coverage as possible, and the formula you choose should vary with your skin type and age. I knew I wanted to find a sheer-to-medium formula that I could build up for more coverage if I had to take pictures. After some more digging, I zeroed in on two lines: Georgio Armani and Laura Mercier. Since there isn’t a Georgio Armani counter nearby, I decided to head up to the Nordstrom in Corte Madera to hit the Laura Mercier counter.

I was really interested in trying Laura Mercier’s Oil-Free Foundation because a few years ago it was rated as one of InStyle’s beauty favorites. And after checking out the website, I became really excited about the type of makeup looks that were shown. The makeup pictures showed pretty, sophisticated and modern makeup — great looking skin, with tasteful use of color on the eyes, lips and cheeks. It wasn’t as basic as Bobbi Brown (which bores me) yet not as “out there” as MAC can be sometimes.

laura-mercier-eyeswide-large

A Look From Laura Mercier Eyes Wide Collection

laura-mercier-starstruck

A Look From Laura Mercier Starstruck Collection

What’s the big deal with Laura Mercier foundation

Laura Mercier pioneered the look of the flawless face which, uses multiple products to create the look of beautiful skin. So what is the Laura Mercier flawless face? The website says:

Laura Mercier believes that a beautiful look begins with great looking skin, and has developed key products for the face that allows every woman to achieve an incredibly even, smooth – yet natural-looking complexion.

“Before applying any colour, I always create a fresh canvas – a flawless finish. Making your skin look perfect is the first and most important thing you can do to achieve a truly great look. The key is to enhance your natural beauty – whether you use all products together one day, or just a little Secret Camouflage and Setting Powder when you are on the go.”
– Laura Mercier

laura-mercier-flawless-face-large
These are the products that her line uses to get this look:

Step 1: Foundation Primer
Step 2: Foundation
Step 3: Secret Brightener
Step 4: Concealers
Step 5: Secret brightening Powder
Step 6: Setting Powder
Step 7: Secret Finish

Well, I know myself pretty well and I there’s no way for me to have enough time in the day to do all of these steps, so I decided to go try the foundation primer, foundation and the powder.

What my counter visit was like and my plan of attack
I got to the counter early on a Thursday, wearing minimal eye makeup (filled in brows and concealer) and nothing else. My plan this time around was to tell the salesperson up front what my foundation problems were: nothing too yellow, too heavy or too dark.

What happens when the makeup artist hasn’t had coffee or sleep
I should’ve been alarmed when I realized that I might’ve caught the makeup artist at a bad time. She was very helpful, but was acting forgetful (and slightly crazy), like her coffee hadn’t kicked in or she didn’t have enough sleep. I know how it feels to be ambushed by clients first thing in the morning before your caffeine starts working its magic, so honestly, so I didn’t think it was a big deal. I thought she was nice, but a little out of it.

I told her I wanted to try the Oil Free formulation, and immediately she tried to talk me out of it and said that the Silk Creme formula was the best foundation that they had. The Silk Creme formula comes in a tube. The consistency of the foundation is like a mousse (looks almost like you could eat it!) than a cream. It’s easy to blend, contains no SPF (which is good for picture taking) and offers sheer-to-heavy coverage, depending on how you apply it. She put the color Hazelnut Beige on my chin and had me go to the entrance doors to check out the color in the natural light. I felt like the formula was really great but the color was just slightly off. Because Hazelnut Beige was the darkest Silk Creme formula available, she then pulled out some of the Oil-Free colors, which has a wider selection of colors.

laura-mercier-silkcreme

Silk Creme Foundation

laura-mercier-oilfree-foundation

Oil-Free Foundation

laura-mercier-oilfree-primer

Oil Free Foundation Primer

She cleaned off my face again and added foundation primer, which smelled good and felt cooling on my skin. Laura Mercier makes three versions of the Foundation Primer, Regular, Oil-Free and Hydrating. Foundation primer helps to smooth out your skin so that the foundation adheres to a smooth surface to give your foundation a more finished, even look.

The MA put on the Regular version of the primer on my face, and I didn’t realize that it wasn’t the formula I wanted to buy until I looked closely at the tube, so I made a point to tell her that I wanted to purchase the Oil-Free version. “Oh, sure,” she replied.

She then pulled out three Oil-Free colors and proceeded to put the wrong color foundation on my face. I probably wouldn’t have noticed, but she was halfway done when she stopped and stepped back and said, “Oops, that’s my fault. I put the wrong color on you.” She wiped it all off and we started all over again. She then put on what I think might have been Suntan Beige (it was all a blur of beige foundation stimulus), using a wet sponge to work the foundation into the skin.

(Side note: I hope it doesn’t sound like I’m complaining about experience, but honestly I think the MA was really nice but just really spaced out.)

laura-mercier-loose-powder

Translucent Setting Powder

She then finished with Translucent Setting Powder and applied all over my face it with a large, soft puff in a slight rolling motion. “The powder is made out of fine French cashmere talc,” she explained and is colorless because Laura Mercier believes that the color should come from the foundation, not from powder. I love powders, but I’m not usually a fan of translucent powders, because on me they rarely are translucent, and deposit a white/grey cast on my skin.

But when she had me check out the results in the natural light my previous ideas about translucent powders changed because my skin looked great. This powder gives a soft-focus quality to my skin and I didn’t notice a grey cast at all. Plus, the color of the foundation looked just right. I happily handed over my credit card and then went skipping off with what I thought was the Oil-Free Foundation Primer, the Oil-Free Foundation, the Translucent Setting Powder and a sample of the Silk Crème Foundation in Hazelnut Beige (I liked the formulation so much wanted to try the color again in other light situations.) When I got in the car I checked out the results in the rearview mirror was really happy.

What happened when I got home

Immediately when I got home I took a picture:

karen-laura-mercier-oilfree-foundation

Me wearing the Foundation Primer, Oil-Free Foundation and Translucent Loose Setting Powder

After I took this pic I opened up my Nordstrom bag to open up my goodies and realized that she had totally given me the wrong products. I ended up with the Regular version of the Foundation Primer and an Oil-Free Foundation that was at least 2 shades to light for me. I thought, hmmm… Well, maybe this is the color that she intended to give me. I had to rush off to work, so I didn’t really think about it again until I checked my makeup at the end of the day. The color she put on me changed — it looked like it was darker than it was in the morning, and there was a significant difference between the color of my face and the color of my neck. I wasn’t as sold on it as I was earlier in the day.

Later on that night I tried the lighter color to see if it was indeed the color she intended to give me. The texture made it hard to blend and work with. It has a gel-like consistency, and you really have to work it in with a damp sponge to get it to blend. Just for fun I built it up see if it still looked good with heavier coverage. When I saw the results in the mirror I knew that she had definitely given me the wrong color – my skin looked ashy and grey. Sigh. Well, it’s a good thing I like to go to the mall, because I didn’t really mind going back to return the stuff.

What happened upon my return
When I returned the next morning there was another makeup artist there, and she took one look at the color of the foundation and said, “Uh, this is the wrong color. The makeup artist you worked with yesterday is really good. I can’t imagine her giving you this color on purpose. Did she mix it with another color? Or add a bronzer? There’s no way that this is your color.

She kept asking me what color I may have originally been matched with and for the life of me I couldn’t remember. After trying two more Oil-Free shades. Golden Beige (too yellow and light) and Sunset Beige (too dark) she convinced me to try the Oil-Free Tinted Moisturizer. She matched me with Almond shade. When I looked at the color in the natural light it looked pretty good, and she said that if I wanted lighter coverage I could apply it with a dry sponge and if I wanted to build up the coverage I could use my fingers. At least it will be easier to work than the Oil Free, and on days when I’m in a hurry I can just slap a quick layer on. I ended up getting the Almond Shade and a tube of the Oil-Free Foundation Primer, and I took this picture when I got home:

Karen-Short-Hair

Me wearing Oil-Free Foundation Primer, Oil-Free Tinted Moisturizer and Translucent Loose Setting Powder

Week-long test
This week I tried both the Oil-Free Tinted Moisturizer in Almond and the Silk Creme sample in Hazelnut Beige on alternating days. The Tinted Moisturizer is really easy to get to apply — I used both the MAC 190 Foundation brush and Rite Aid makeup wedges. After, I used my MAC 180 Buffer Brush to apply the Translucent setting powder.

Pros and cons of the Tinted Moisturizer

I’ve noticed that if I put too much TM on my skin, the products start to feel too heavy on my skin after a few hours. I also still feel like Almond shade is a touch too dark and too pink when I build it up. It’s probably not currently noticeable to anyone else but me (in fact, I got a few complements this weekend from friends), but I’m still not 100% sold on it. I’m going to keep trying it for the next few days, to see if it breaks me out and if I can master the application so that it doesn’t feel heavy on my skin. If my skin stays clear may just keep the Almond for summer, when I tend to get more tan because when I’m running around outside.

Pros and cons of the Silk Creme Foundation
I was really surprised to find that I liked the Silk Creme Foundaiton. I initially thought the coverage would be too heavy, but it goes on surprisingly sheer with a wet sponge, and looks really natural. It doesn’t contain any sunscreen, which is actually a plus for me. I currently don’t own a foundation that is appropriate for picture taking, and foundations without sunscreen (Titanium Dioxide) are supposed to be better for photos because they don’t leave a white cast on your skin. Turns out the Silk Creme is closer to my skin tone than I initially thought and I liked how it seemed to cover just enough to even out my color — it also doesn’t feel heavy after a few hours. I’m going to keep trying the sample out for the next few days and if I like still like it when I finish I might also buy a tube!

What I think about the products so far
All in all, despite all of the confusion with the mixed-up products I like this line so far. I like the colors and the textures of the products and they seem to be high quality. And I haven’t broken out (knock on wood), which is a plus. I have realized that I probably won’t ever find a color that will match my skin absolutely perfectly, but I can get pretty close.

Laura Mercier makeup event on Friday!

laura-mercier-peachesandcream

Laura Mercier Peaches and Creme Collection

This Friday, I’ll get to try more Laura Mercier products because I signed up for a free makeup lesson with a Laura Mercier Specially Trained Premier Artist. Laura Mercier is releasing new products under the Peaches and Cremee line, which includes two new Stickgloss shades, one Creme Cheek Colour and a new Peach Mosaic Shimmer Block. I’ve never tried any of these, but I’m especially looking forward to the Stickgloss and the Creme Cheek Color. I’ll probably pick up the tube of Silk Creme foundation then, and probably with a few more goodies. I can’t wait!

There are 7 comments on this post. Leave yours.

Categories: Makeup, Product Reviews

  • « Go to Previous Page
  • Go to page 1
  • Interim pages omitted …
  • Go to page 500
  • Go to page 501
  • Go to page 502

Primary Sidebar

Welcome to Makeup and Beauty Blog

Welcome to Makeup and Beauty Blog! My name is Karen, and I’m a freelance writer obsessed with makeup.

Makeup and Beauty Blog features daily product reviews, makeup tips and beauty news — like an interactive version of a monthly print magazine, except with occasional pictures of my cat.

Recent Posts

Sundays With Tabs the Cat, Makeup and Beauty Blog Mascot, Vol. 878

Makeup and Beauty Blog Monday Poll, Vol. 894

Makeup and Beauty Blog Monday Poll, Vol. 893

Makeup and Beauty Blog Monday Poll, Vol. 892

Makeup and Beauty Blog Monday Poll, Vol. 891

/* real people should not fill this in and expect good things – do not remove this or risk form bot signups */

Social

  • Facebook
  • Instagram
  • Pinterest
  • Twitter
  • YouTube

Featured Posts

Sundays With Tabs the Cat, Makeup and Beauty Blog Mascot, Vol. 771

Lady Unicorn

Weird Things I Like to Do

brows fill out beforehand

Before You Pluck or Wax Your Brows, You Must Do This

current bare skin status

What’s One Thing That Drastically Changed Your Skin for the Better?

Copyright © 2025 Makeup and Beauty Blog. Get in touch.