• Skip to main content
  • Skip to primary sidebar

Makeup and Beauty Blog | Makeup Reviews, Swatches and How-To MakeupMakeup and Beauty Blog | Makeup Reviews, Swatches and How-To Makeup

A beauty blog blooming with fresh makeup reviews, swatches and beauty tips from your friendly neighborhood beauty addict

  • Home
  • About
    • About
    • Contact
    • FAQ (Frequently Asked Questions)
    • Advertising & Media
  • Categories
    • Product Reviews
    • Makeup
    • Skincare & Fragrance
    • Style & Fashion
    • Hair
    • Nails
    • Tips & Tutorials
    • Just for Fun
  • Brands
  • Store

Makeup Tips/How To

Cargo Boogie Nights Eye Pencil Set: Makeup Tips and Tricks

November 13th, 2008 by Karen 17 Comments

Boogie nights! Keep on dancing… keep on dancing. BOOGIE NIGHTS!

Whew. Sorry, I just had to get that out of my system. It’s just that whenever I use the eyeliners from the Cargo Boogie Nights Eye Pencil Set ($18), I can’t help but burst into song (please tell me I’m not the only one who does this).

A limited-edition release for the holidays, the Cargo Boogie Nights set comes with five glittery, mini eyeliners and a sleek case that fits snugly in the palm of my hand.

  • Aqua: shimmery teal with silver glitter
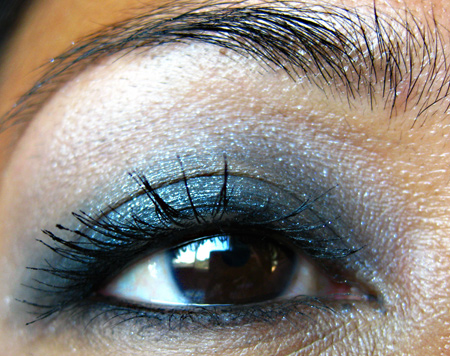
  • Black: shimmery cool blue-black with silver glitter
  • Blue: shimmery royal blue with silver glitter
  • Purple: shimmery dark purple with silver glitter
  • Silver: shimmery silver


[Continue reading…]

There are 17 comments on this post. Leave yours.

Categories: Makeup, Makeup Tips/How To

5 More Makeup and Beauty Tips from Paris Hilton

November 10th, 2008 by Karen 44 Comments

Every successful celebutante has a few secret beauty tips up her sleeve, and Paris Hilton’s no exception. She was in SF today at the Macy’s in Union Square to promote Fairy Dust, her latest fragrance, and dished about her new perfume, her TV show and, of course, makeup.

New Lipgloss Love: Laura Mercier Liquid Crystal Lipgloss in Citrine

When it comes to makeup, Paris loves lipgloss. This time last year she was all about Chanel Glossimer in Astral. Before that, it was MAC Lipglass in Prrr, but lately she’s been lovin’ on Laura Mercier Liquid Crystal Lipgloss in Citrine, a bright golden coral.

Homegirl actually busted out a tube from her silver Fendi purse while we talked.

“It’s funky,” she said, turning the tube in the light to show me how the colors changed, and then applied a layer with the doe foot applicator. “It’s like all different colors … green and gold and orange.”

Sounds pretty, right? So I went straight to the Laura Mercier counter after the interview only to find out that the Liquid Crystal glosses had been retired six months ago. SHOOT!

But I did some digging and found a slightly softer alternative to Citrine, Bellini Lip Glace ($22), a shimmery coral-gold.

5 of Paris Hilton’s Favorite Makeup and Beauty Products

1. MAC Studio Fix
She can’t live without it!

2. Cle de Peau Concealer

3. CoverGirl LashBlast
Okay, that settles it. Paris and I don’t have the same taste in mascara. Last year she mentioned Maybelline Great Lash (I never understood the hype), and this year it’s CoverGirl’s LashBlast. Seriously?

I almost gave her my tube of Chanel Exceptionnel mascara … but who gives away Chanel??

4. Wet ‘n’ Wild Nail Polish
LOL, I wonder if she tries on polish while she’s standing in front of the display in the store. I know you do this too, ladies. Don’t lie!

5. Kate Somerville products
Paris highly recommends Kate’s cleanser, eye cream and toner.

Some of Her Favorite Makeup Looks

She’s photographed wearing a lot of smokey eyes and nude lips, but today she wore a shimmery silver and green-gray eye, pink cheeks and coral lips, which nicely complimented her seafoam green and silver Alexander Wang dress, L.A.M.B cardigan and white Dior sunglasses.


[Continue reading…]

There are 44 comments on this post. Leave yours.

Categories: Fragrance, Makeup Tips/How To, News

Aussie Opposites Attract Shampoo Does Double Duty as a Fast, Cheap Brush Cleaner

November 7th, 2008 by Karen 28 Comments


Happy Friday! Guess what? Last night I found my new favorite way to clean my makeup brushes.

Normally, I use MAC Brush Cleanser ($11) because it works fast, thoroughly removing all the gunk from the brush head and rinsing out quickly. But last night my bottle ran out when I was halfway through cleaning my brushes. I really wanted to finish before 30 Rock came on the telly (lovin’ ya, Tina Fey!), so I reached into the tub and randomly grabbed a bottle of Aussie Opposites Attract Protect + Soften Shampoo ($3) to complete the job.


Oh, Tina Fey, I’m totally not worthy.

I wasn’t sure what to expect. Although I love this stuff for my hair, I’ve used shampoos like Johnson’s Baby Shampoo to clean brushes in the past but never liked the results. Even after a thorough brush cleaning, they would leave bits of foundation or concealer. Plus, the suds took forever to rinse out.

But Aussie Opposites Attract Shampoo worked great! Caked on concealer, dried gel liner, crusty cream shadow (eww) — it removed even the most stubborn makeup, breaking up the product within seconds. And the suds rinsed out quickly, too.

To clean brushes with Aussie Opposites Attract Shampoo, I squeeze a pea sized amount in a cupped palm, add some warm water and swirl the brush head around in the shampoo-and-water mix. If the brush head has a lot of caked makeup on it then I’ll gently work the shampoo directly into the fibers with my fingers. I then rinse out the brush head in running water to remove the makeup and suds. Tada! Less than a minute later, I’ve got a clean brush.

The best part? It costs a WHOPPING THREE BUCKS for a big 13.5-oz bottle, woo hoo! It’s my new favorite fast and cheap way to give brushes a heavy duty cleaning. 🙂

How do you clean your makeup brushes? Do you have a favorite product or a special technique?

Your friendly neighborhood beauty addict,

Karen

There are 28 comments on this post. Leave yours.

Categories: Makeup Tips/How To, Makeup Tools

MAC Smokey Eye Tutorial: Halloween Flashback

November 6th, 2008 by Karen 38 Comments


Hey, ladies! On Halloween some of you asked for a tutorial describing the MAC Smokey Eyes look I wore to dinner.

I was in the mood for MAC today, so I thought I’d give it a try. It’s heavy on MAC products, but you could definitely use similar products from other brands.

Eye Products I Used

  • MAC Nice Vice Paint Pot
  • MAC Smolder Eye Kohl
  • MAC Dark Soul Pigment
  • MAC Smoke Signal Pigment
  • MAC Your Ladyship Pigment
  • MAC Silver Fog Pigment
  • MAC Plushblack Plush Lash Mascara
  • MAC Lashes

Cheek Products I Used

  • MAC Blushbaby Powder Blush

Lip Products I Used

  • Chanel Pretty Pink Lip Definer
  • MAC Modesty Cremesheen lipstick
  • Chanel Astral Glossimer

How I Did the Eyes

First, to improve the staying power of my eye makeup, I prepped my lids with a thin layer of Too Faced Shadow Insurance.

Then, with a MAC 249 synthetic shader brush, I patted a layer of Nice Vice Paint Pot onto the lid and into the crease.

With Smolder Eye Kohl, I drew a very thick line on my lids and along my upper lash and water lines…

…and then along the lower lash and water lines, doing my best to really get the pencil between the root of each lash (darkening the skin between the lashes to enhance the desired effect).

Knowing I was going to smudge pigment on top of the liner, I didn’t worry about messy lines.
[Continue reading…]

There are 38 comments on this post. Leave yours.

Categories: MAC Makeup, Makeup Tips/How To Keywords: halloween

Get the Clinique Blackberry Bloom Look: Purple Smokey Eyes, Berry Lips and Cheeks

October 29th, 2008 by Karen 30 Comments

Everyone loves blackberries. Take Clinique, for example. Next month they’re introducing Blackberry Bloom, a collection of violet and plum eye, lip and cheek makeup for the holidays. The first time I saw the gorgeous model in this promotional picture — her smokey purple eyes, berry lips and cheeks — I about fell over in my chair!

So, I marshaled my courage and attempted the look with some items from the upcoming collection.

It wasn’t the easiest look I’ve ever tried, but it wasn’t the toughest one either. You can definitely do it with the same shades I used or with other ones already in your collection. Here I used the following items from Clinique Blackberry Bloom:

Eye Products You’ll Need

Colour Surge Eye Shadow Super Shimmer ($14)

  • Black Coffee: shimmery cool brown (limited edition)
  • Black Amethyst: shimmery berry (limited edition)
  • Black Smoke: shimmery gray-black (limited edition)

Kohl Shaper for Eyes ($15.50)

  • Black Honey: matte plum (limited edition)

High Impact Mascara ($14)

  • Black Honey: deep berry-brown (limited edition)


From left to right: Black Coffee, Black Amethyst and Black Smoke eyeshadows


Black Coffee Colour Surge Eye Shadow


Black Amethyst Colour Surge Eye Shadow


Black Smoke Colour Surge Eye Shadow
[Continue reading…]

There are 30 comments on this post. Leave yours.

Categories: Makeup, Makeup Tips/How To

5 More Smokin’ Smokey Eye Tips

October 29th, 2008 by Karen 29 Comments

Ladies, when it comes to smoldering smokey eyes, the secret sauce is in the blending. Dark eye makeup looks best when it’s blended really well, and nothing can steal smokey eye thunder like a patchy makeup job that draws attention away from your eyes and onto your makeup. Lawd knows I’ve rushed through my share of smokey eyes. Regrettably, there are few eye makeup looks that can so easily go awry.

But don’t be discouraged! Try one of these tips the next time you’re feelin’ smokey.

1. Fingers Are Built-In Brushes

If you’ve never tried a smokey eye using your fingers before, give it a try. Using fingers can even be easier than using a brush. Start by loading up your ring finger with black shadow. Dab over your lid. Follow the black up with a shimmery gray shadow, and blend with a finger. Add mascara and you’re done! Just be careful you don’t drag shadow out of the lid area or too far into the inner corner of the eye.

2. Use Liner Pencils as a Base for Eyeshadows

Color the entire lid with a dark pencil before applying a lighter coordinating shadow (not necessarily the same color) on top of it. It’s a quick way to add more depth than eyeshadows alone and looks amazing!

3. Black Eyeliner and Eye Gloss Mashup

For uber-easy smokey eyes, use a jet black eyeliner smudged out with a bit of eye gloss. You won’t get a look that lasts forever, but a little loose powder patted over the edges will help prevent smearing. NOTE: don’t rub those eyes!

4. Get to the Root of Things

When lining your waterline with black, cover every nook and cranny. Get as close to the root of the lash as possible, even going in between them, to add as much black to the look as possible. What you don’t want is some of your natural skin tone along the waterline showing through to sabotage all your hard work.

5. Dab a Dot for a Pop of Color

For a pop of color, apply a neutral shadow to the entire lid. Then, smudge a dot of brighter shadow in the center of the lid and thoroughly blend.

Happy Hump Day!

How’s your week coming along? I’ve had better, but we don’t get to choose our days. All we can do is choose how we deal with them.

Have you seen the new holiday palettes for Shu Uemura? They’re called mika shu, and I think they’re adorable! I’ll post thoughts and swatches very soon.

Hang in there this week. This kind of comes out of nowhere … but that’s the kind of week I’m having. I’ve got something big on my mind. Our family’s going through some stuff that I’ll be ready to share with you soon, but for now I just want to thank you all for brightening my days and sharing your time with me.

Your friendly neighborhood beauty addict,

Karen

There are 29 comments on this post. Leave yours.

Categories: Beauty Tips, Makeup Tips/How To

MAC Infatuating Rose: 6 Ways to Wear the 6 Cool Eyes Palette

October 28th, 2008 by Karen 39 Comments

I momentarily set aside my issues with the huge bling-bling jewel on the top of the MAC Infatuating Rose: 6 Cool Eyes palette ($38, part of the Passions of Red collection) today. Sure, the packaging is cheesy enough to pair it with crackers and wine, but I don’t care because the shadows inside this little cheese log more than make up for it.

6 Eye Looks with the 6 Cool Eyes Palette


From left to right: Satisfy, Cavort, Bon Fete, Platonic, Feast, Deep Feelings

1. Pink With Indigo Liner

I tried this subtle pink look with just a touch of indigo liner. It’s a simple way to wear a little daytime color.

  1. First, with a MAC 252 eyeshadow brush, I applied Satisfy onto my entire lid, concentrating color on the lid area and fading up toward the eyebrow.
  2. Then, I swept Bon Fete onto the lid, also with the MAC 252.
  3. Taking a MAC 239 eyeshadow brush, I applied Feast onto the outer third of my lid, blending out the edges with a finger.
  4. Next, with a MAC 266 angled brush wet with a spritz of MAC Fix+, I swept the brush head across the pan of Deep Feelings to grab some color and then lined both the upper and lower lash lines with it.
  5. Finally, to complete the eye look, I layered Feast directly on top of Deep Feelings on the lower lash line with a Sonia Kashuk Angled Eye Shadow Brush.

2. Smokey Purple with Indigo Liner

A purple smokey eye can be a good way to wear some color during at work. It’s vibrant but not necessarily as bold as a bright blue or green. I plan to pair this with MAC Too Swoon For lipstick, a light pink shade, to keep the club kid factor in check.

  1. First, I swept Bon Fete onto my entire eye with a MAC 252 brush.
  2. With the same brush, I applied Platonic onto my lids.
  3. And to complete the look, I lined the upper and lower lash lines with Deep Feelings using a wet MAC 266 brush spritzed with MAC Fix+.

3. Purple Parfait

This three-colored lid is a little out of my usual color comfort zone, but I thought it might be fun to try! I’ll be rocking this one in my living room until I build up the courage to wear it outside.

  1. First, I swept Satisfy onto the brow bone with a MAC 252 eyeshadow brush.
  2. Next, I patted Platonic onto the center of the lid with a MAC 239 brush.
  3. Also with the 239, I applied Cavort onto the inner third of the lid (the side closest to my nose).
  4. To add some smokiness to the eye, I used the 239 again to apply Deep Feelings onto the outer third of the lid. Then, with the edge of the brush, I extended the color along the lower lash line and ran a MAC 217 blending brush gently along the edges of the shades to blend away any harsh lines.

4. Simple Slice of Purple

Here’s another simple one with a pop of color. If you’ve just started wearing color, this could be a nice way to get used to seeing it on your lids!

  1. I started the by applying Cavort onto the lids with a MAC 252 eyeshadow brush and then gently blending out any harsh lines with a finger.
  2. To concentrate the color, I wet a MAC 239 eye shadow brush with MAC Fix+ and then swept it across the pan of Cavort to pick up the product. Then, I patted the wet shadow onto the lid area closest to the lash line, taking care to really concentrate the color by the lashes.

5. Purple with a Pop of Pink


[Continue reading…]

There are 39 comments on this post. Leave yours.

Categories: MAC Makeup, Makeup Tips/How To

Add Red to Your Lipstick Repertoire with these 10 Tips

October 27th, 2008 by Karen 32 Comments

Hi, ladies! Thanks for all your wonderful tips and tricks to wearing red lips. Here’s a list featuring a few of your secrets. 🙂

1. Set Down the Tube and Grab a Brush

My secret to wearing reds like Lancome’s Absolute Rouge is to apply them using a MAC 316 Covered Lip Brush ($19).

With the 316’s firm, pointed tip I can really get in where I need to get, precisely controlling my lines and delivering the right amount of pigment for my look — kinda like drawing with a sharpened pencil versus trying to draw with a stubby crayon. When applying directly from a tube of lipstick, I’ll often end up with uneven color or color breaking outside the lines of the natural shape of my lips. Not cute, ladies!

2. Use a Waxy Lip Liner

Use a very waxy lip liner to keep your color from bleeding; apply very heavily and blot. It helps the color sink in, and, when it begins to fade, your lips will still look pretty and stained.

3. Smooth That Pucker

Bright red looks great on super smooth lips, so consider using a lip exfoliator every other day.

4. Beet Juice, Baby!

Apply beet juice to your lips before you go to sleep. If your lips are darkened from smoking, it’ll correct the problem better than lipstick. It produces a semi-permanent stain that doesn’t rub off. Be careful not to overdo it, though. What you want is a stain very similar to your natural lip color.

5. Line with a Cream Concealer

After you’re done applying a red lipstick, take a cream concealer or foundation and a 266 brush and line just outside your lips; blend any harsh lines into your skin. It cleans up any crooked lip liner you may have, covers red smudges and really makes your lips POP!

6. Ease into Red

To ease your way into wearing red on your lips, don’t jump straight into something bold and bright. Start with cranberry colored lip gloss or a brown based red.

7. Cargo The Reverse Lip Liner

Try using Cargo The Reverse Lip Liner, a flesh colored liner used outside your lip line, and then apply a very thin layer of balm before applying red lipstick.

8. Tone It Down

If you’re unsure about red, consider toning down bright red shades with a darker red like MAC Kirsch Mattene.

9. MAC Russian Red!

Look for MAC Russian Red. It’s the perfect blue-based red for nearly all skin tones, and, instead of going for a full-on red pout, smear on some Chapstick and dab until you’ve got a pretty, stained effect. It lasts all day long and works well if you’re a little shy when it comes to wearing red.

10. Line with a Flesh Toned Pencil

Line and fill in your lips with a flesh toned pencil onto which you apply your red lipstick. The liner helps define and hold the color while helping to prevent blurring and fading around the edges of your lips as your lipstick fades over the course of the day.

Your friendly neighborhood beauty addict,

Karen

There are 32 comments on this post. Leave yours.

Categories: Beauty Tips, Makeup Tips/How To

  • « Go to Previous Page
  • Go to page 1
  • Interim pages omitted …
  • Go to page 82
  • Go to page 83
  • Go to page 84
  • Go to page 85
  • Go to page 86
  • Interim pages omitted …
  • Go to page 93
  • Go to Next Page »

Primary Sidebar

Welcome to Makeup and Beauty Blog

Welcome to Makeup and Beauty Blog! My name is Karen, and I’m a freelance writer obsessed with makeup.

Makeup and Beauty Blog features daily product reviews, makeup tips and beauty news — like an interactive version of a monthly print magazine, except with occasional pictures of my cat.

Recent Posts

Sundays With Tabs the Cat, Makeup and Beauty Blog Mascot, Vol. 878

Makeup and Beauty Blog Monday Poll, Vol. 894

Makeup and Beauty Blog Monday Poll, Vol. 893

Makeup and Beauty Blog Monday Poll, Vol. 892

Makeup and Beauty Blog Monday Poll, Vol. 891

/* real people should not fill this in and expect good things – do not remove this or risk form bot signups */

Social

  • Facebook
  • Instagram
  • Pinterest
  • Twitter
  • YouTube

Featured Posts

Sundays With Tabs the Cat, Makeup and Beauty Blog Mascot, Vol. 771

Lady Unicorn

Weird Things I Like to Do

brows fill out beforehand

Before You Pluck or Wax Your Brows, You Must Do This

current bare skin status

What’s One Thing That Drastically Changed Your Skin for the Better?

Copyright © 2025 Makeup and Beauty Blog. Get in touch.