• Skip to main content
  • Skip to primary sidebar

Makeup and Beauty Blog | Makeup Reviews, Swatches and How-To MakeupMakeup and Beauty Blog | Makeup Reviews, Swatches and How-To Makeup

A beauty blog blooming with fresh makeup reviews, swatches and beauty tips from your friendly neighborhood beauty addict

  • Home
  • About
    • About
    • Contact
    • FAQ (Frequently Asked Questions)
    • Advertising & Media
  • Categories
    • Product Reviews
    • Makeup
    • Skincare & Fragrance
    • Style & Fashion
    • Hair
    • Nails
    • Tips & Tutorials
    • Just for Fun
  • Brands
  • Store

Au Revoir Fashion Week: Thanks for the Super-Blended Eye

February 8th, 2008 by Karen 22 Comments

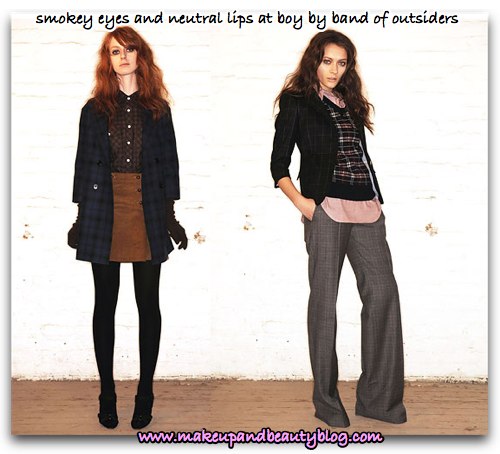
I love NY Fashion Week as much as the next girl, but it feels weird lusting after fall looks in the middle of winter. One look that has warmed my winter heart this year is a variation on a classic.

The NY runway makeup gods have decreed that we all must bask in the glory that is the smokey eye! The variation I’m referring to is called the “super-blended eye,” and, according to MAC VP of Makeup Artistry Gordon Espinet, we should expect to see a lot of it in all our favorite magazines come fall.

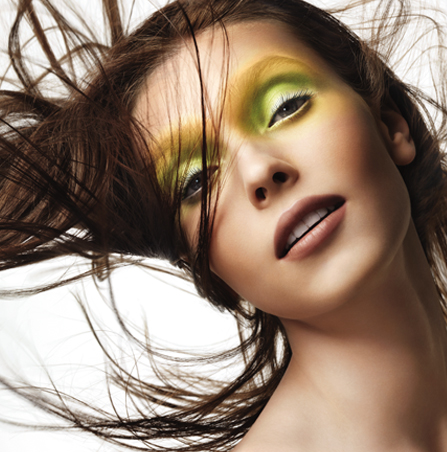
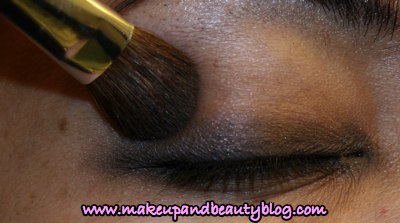
The super-blended eye at the Monique L’huillier Ready-To-Wear show this week

monique.jpg
monique-2.jpg
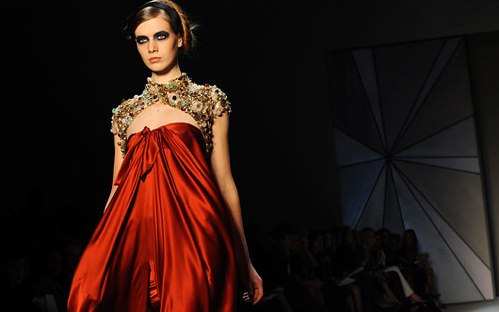
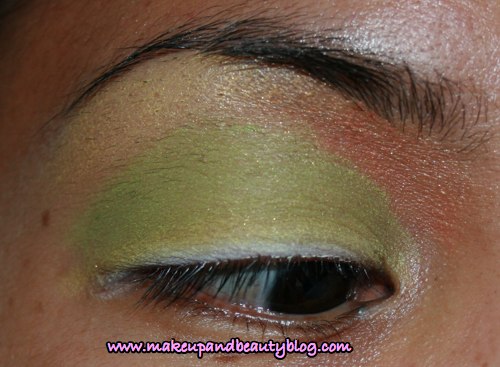
“There hasn’t been a lot of hard lines [on the runway] in terms of how eyes are done,” says Gordon. In a super-blended eye, colors and lines are blended to perfection.

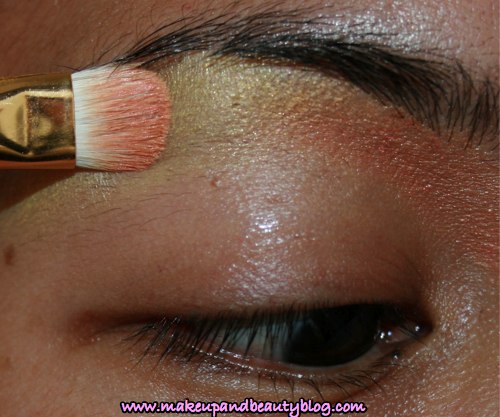
It takes the right brushes to create this layered, seamless look. Gordon suggests MAC’s 219, 224, 252 and 242.

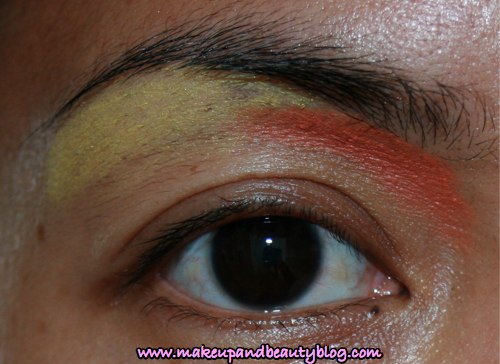
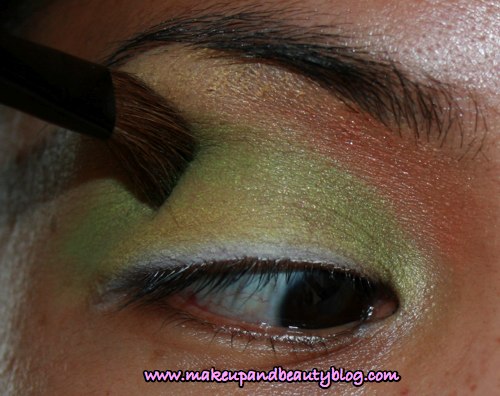
The trick is layering products with different textures. Gordon usually begins by rimming the eyes with a dark pencil, which he then covers with a layer of matte shadow.

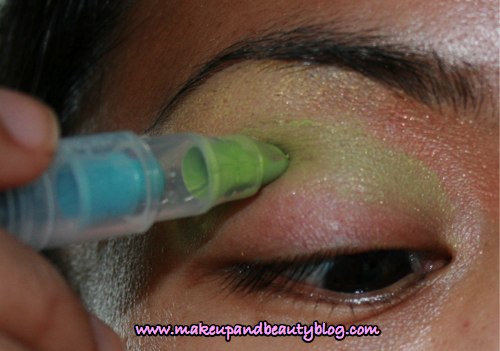
On top of the matte, he adds a product with sheen, like one of MAC’s pigments. “From there you take a soft blending brush like a 242 and blend all the edges all out,” says Gordon. Play with blending and mixing different colors, like navy blue and purple, or maybe purple and brown.

super-blended-eye-final.jpg

Ultimately, what you’re striving for is a smooth transition from one color and texture into the next, like what you’d see in the iridescence of a peacock’s feathers or the coloring on the back of a scarab beetle.

Are you feeling this? Yea or nay? I think it’s pretty.

How has your week been? Are you ready for the weekend? I’m excited about getting my roots done this afternoon. They’ve been tow up for way too long.

Your friendly neighborhood beauty addict,

Karen

There are 22 comments on this post. Leave yours.

Categories: Beauty Tips, MAC Makeup

Paint it Pink, Paint it Black: When Love Leaves You Twisted

February 7th, 2008 by Karen 25 Comments

The past few Paint it Pink, Paint it Black posts have either celebrated the joy or treated the pain of Valentine’s Day, but in life things are rarely that simple. Love can be about extremes — hot passion, cold shoulders, opposites attracting — but it can also be about compromise, sacrifice and shades of gray. Several times in my life I’ve felt a mix of both joy and sadness on the Big V. Truth be told, sometimes you’re caught in the middle! And when you are, you’re painting it pink AND black.

Case in point: several years ago, I wandered into a bookstore a few days before Valentine’s Day to buy myself a pen. At the time, I was fresh out of a long, emotionally draining relationship, and I was angry and very, very sad. Wandering through the store, I managed to end up in the Valentine’s Day card aisle. Hello, emotional breakdown!

I stood there, staring at the beautiful cards with their messages of love, clutching my pen with a death grip. Good thing I was alone in the aisle because I might have stabbed some poor unsuspecting loverboy/girl right then and there. I was just about to start bawling in the aisle when I spotted a card with a picture of a rabbit princess on it (complete with crown and ball room gown) dancing with a frog prince in a joyful scene. Inside the card was one simple line: “I had to kiss a lot of frogs before I met my prince.” It was the most perfect Valentine’s Day card ever, and I didn’t have anyone to give it to.

But I bought it anyway because at that moment I realized that someday I would find someone worthy of receiving it. Even though my heart was filled with sadness, I still felt hope for the future; I was painting it pink AND black that year, yo.

I waited a long time to give that card away — 10 years, as a matter of fact. I finally gave it away last February, the first Valentine’s Day that El Hub and I shared together as man and wife.

This Paint it Pink, Paint it Black post is for my girls who are in the middle this year, painting it both pink and black. Hold on to your hope, baby! It does get better.

If you’re feeling both pink and black this year, get thee to the Lancome counter and treat yourself to a gift that keeps giving way past Valentine’s Day — the Color Design Artist Palette in Stylish Neutrals.

lancome-stylish-neutrals-1-1-1.jpg

When I first opened it, this palette took my breath away. It includes eight beautiful matte and shimmer finish shadows:

  • light pink shimmer
  • bubble gum pink matte
  • mauve shimmer
  • taupe shimmer
  • burgundy matte
  • light stone gray shimmer
  • white shimmer
  • black shimmer

It’s the best shadow kit I’ve seen in a while. Lancome and MAC shadows have similar textures and color payoff, which is probably why I like ’em so much. All of these colors work with my skin tone, and I like that you can combine them to create so many different looks!

So far I’ve already tried these three…

Easy work eye:
Apply the mauve or taupe shadow onto the lid. Concentrate most of the color there, and then slowly fade up into the crease. Curl your lashes, and add two coats of mascara. You’re good to go!

Easy date night eye:
Cover the lid with the pink shimmer shadow, and add definition to the crease with the taupe. Wet a liner brush and apply a thin line of the dark burgundy to the upper lash liner. Finally, curl your lashes and add mascara.

Easy smokey eye:
Rim the upper and lower lashlines with black kohl liner. Then, smudge it with a pencil brush. Apply black shadow or burgundy shadow on top of the liner and blend. Then, apply mauve or taupe shadow on top of the darker color and blend them both together.

The entire palette is $70, which seems expensive at first glance, but it’s really a pretty good deal. Each eyeshadow pan in the palette is about the same size as a $14 MAC shadow, so if you purchased eight similar MAC shadows, a palette purchased that way would cost you $112.

Whatever condition your heart is in this month (broken, mending, fully functional and filled with love to spare), I’m sure it’ll beat a lil’ brighter when you see this palette.

Your friendly neighborhood beauty addict,

Karen

There are 25 comments on this post. Leave yours.

Categories: Makeup, Product Reviews

You Must Choose: The Hump Day Edition

February 6th, 2008 by Karen 37 Comments

“My hump, my hump, my lovely lady lumps.”
— From the lyrical masterpiece, “My Humps,” by the Black Eyed Peas

mac-cosmetics-fergie-makeup-and-beauty-blog-1.jpg

Hmmm, am I the only person on this planet confused by what Fergie’s singing about in this song? She’s talking about her bum, right? Or do these words have a deeper symbolic meaning that only forward-thinking philosophers can truly understand?
camel-final.jpg

The only thing I can say with certainty is Fergie ain’t crooning about 1.) Wednesdays (aka Hump Days) or 2.) dromedaries.

Anyway, in honor of Wednesdays, humps and lumps, here’s today’s edition of YOU MUST CHOOSE!

Would you rather…

1. Have a really great looking bum (it’s so great planets could revolve around it and poets would write odes to it) but have a missing front tooth (which you can’t replace — you’re a straight up jack o’ lantern, yo).

OR

2. Have a really great looking bum (and both your front teeth) but be cursed with a lifetime full of ill-fitting, terribly uncomfortable bras?

YOU MUST CHOOSE!

You know what to do.

Your friendly neighborhood beauty addict,

Karen

There are 37 comments on this post. Leave yours.

Categories: Just For Fun

Kiehl’s Spiced Plum Lotion Is Good Enough to Eat

February 6th, 2008 by Karen 34 Comments

Food-scented lotions don’t always do a lot for my soul. When I slapped a layer of Kiehl’s Spiced Plum Hand and Body Lotion ($19.50) on my arms the other day, I didn’t expect it to make me want to gnaw them off an half hour later. But that it did.

kiehls-spiced-plum.jpg

This lightweight, limited-edition (non-edible) lotion smells like a mix of brown sugar, cinnamon and homemade plum tart. The scent isn’t overly sweet, which is totally key for me. Some foody lotions, like those that smell doughy, can make me nauseous, and I think vanilla scent is used far too often. I don’t like to cruise around smelling like a Rice Krispy treat, ya know? Spiced Plum’s subtle notes blend with its sweeter tones, creating a perfect balance between naughty and nice. Yummy!

If you’re used to Elizabeth Arden 8-Hour Cream’s moisturizing power, this might not be moisturizing enough for you. On my extra-scaly parts (legs and arms), it works reasonably well — a not as great as 8-Hour but better than Vaseline Intensive Care. I like that it isn’t greasy and doesn’t take a lot of effort to work into my skin; that’s very appealing to my slap-it-on-and-get-ready-to-boogie side.

I wore Spiced Plum while writing this entry, by the way, and because of the smell had to refrain from nibbling on my arm, yo!

How ’bout you? Do you like to smell like food (hey, at least it’s calorie-free!)? Or do you prefer your baked goods on a plate?

Your friendly neighborhood beauty addict,

Karen

There are 34 comments on this post. Leave yours.

Categories: Product Reviews, Skin Care

Bay Area Beauty Tip: Free Clarins Facials at Nordstrom

February 5th, 2008 by Karen 13 Comments

For folks living in or visiting the San Francisco Bay Area, did you know that Clarins, a French skin care line, offers complementary facials at Nordstrom stores?

Since the 50s, French brand Clarins was one of the first lines to forgo using animal ingredients in their products. Their entire line is now 100 percent plant-derived.

I’m new to the line, so the free 40-minute facial held at the Nordstrom Spa in the San Francisco Centre was a great (and relaxing) way to learn about their products.

Yes, girl, the San Francisco Nordstrom has a spa with the usual spa treatment menu of facials, massages and body treatments costing upwards of $80, depending on the service.

But because Clarins’ complimentary facials are held in their spa rooms, they’re kinda like experiencing the spa without having to pay the big bucks. Here’s where my facial took place:

nordstorm-spa-clarins-facial.jpg

Um, the treatment bed wasn’t messy when I walked in. I actually laid down on it for a short nap before taking this picture (hey, I exercised early and was tired!). The room was a little noisy due to store traffic outside the door, which was only partially drowned out by tunes from the Top 40 radio station piped through overhead speakers. If you’re used to going to spas where they play soft, soothing sounds of chirping crickets or, God forbid, Enya, then you may not like this. But let me remind you again — this facial is gratis.

Despite the background noise, the facial and overall experience was great. Sharon Trajico, a specially trained Clarins facialist, first asked me a ton of questions about my skin and my skin care routine. Based on my answers, she selected a few choice Clarins products to cleanse, treat and protect my skin. I liked that the products weren’t heavily scented; most smelled very light, clean and plant-esque.

Over the course of the treatment Sharon carefully described the products she was using along with each product’s intended use. Clarins facialists apply product with their hands, warming each between their palms first before application, and then lightly massaging and pressing the product into the face and neck. It’s a combo massage-beauty treatment — incredibly relaxing.

Like specialists at European-style day spas, Shannon cleansed and toned my skin, applied a face mask, then finished with a series of anti-aging and skin protection serums and lotions. They skipped the facial steaming (which typically happens before or after the mask) and black head extraction (hate those, ouch!), which was fine with me.

At the end of the facial my skin felt smooth, looked brighter and the red splotches I’d had at the start of the treatment were gone. I loved the scents and textures of Clarins’ face products and can’t wait to try more of the line, which includes body care and makeup.

Clarins complimentary Nordstrom facials are offered once a month. Call your nearby Nordstrom and ask to speak with someone at the Clarins counter. They’ll provide you with dates and schedule a time for you to come in!

San Francisco readers can call…

Nordstrom at San Francisco Centre (near Union Square): (415) 243-8500
Nordstrom at Stonestown Galleria: (415) 753-1344

And if you’re in Marin…

Nordstrom at The Village at Corte Madera: (415) 927-1690

For numbers to other Bay Area Nordstrom stores, perform a search here.

Take note — not all Nordstrom stores have spa rooms like the ones in S.F. do At some of store counters, your facials will be done on the sales floor, but they’ll shield you behind a screen to grant you some privacy.

By the way, in the beauty world, “free” and “complimentary” services are often code for “you should purchase at least one product before you head out,” but I’m sure you won’t be disappointed by the Clarins line. Later today I plan to swing by my local Nordstrom to grab a few of the goodies Sharon introduced me to!

clarins-products-final.jpg

I hope your day has been going well so far! Whatcha up to on this lovely Tuesday?

Your friendly neighborhood beauty addict,

Karen

There are 13 comments on this post. Leave yours.

Categories: Beauty Tips, News, Skin Care, Spas

You Must Choose: The Mini Monday Edition

February 4th, 2008 by Karen 27 Comments

Hallelujah, it’s a makeup miracle! For the next three years you are given every limited edition color collection from (insert your favorite makeup line here) for FREE. MAC Fafi? Free. Heatherette? Gratis. Every single dreamy piece of limited edition goodness for the next three years, free!

However… you can’t get your hot little hands on any of it unless you commit to EITHER

1. Forgoing all forms of hair removal for the next three years. No plucking, shaving, waxing, tweezing, threading, nada. You might as well legally change your name to Yeti, already, because you’re gonna be one hairy mo’ fo’.

hairy-yeti.jpg

OR

2. Wearing Renaissance fair gear ALL THE TIME for the next three years. Say goodbye to your Seven Jeans and hello to stylin’ Elizabethan costumes. Going to the gym? Gotta rock the corset. Headed out to the club with your girls? Don’t forget your snood.
ren-fair.jpg

What say ye, fair maiden? Will you rock the Ren fair look or go all jungle-style like Chewbaca? YOU MUST CHOOSE! (Please leave your answers in les comments.)

Your friendly neighborhood beauty addict,

Karen

There are 27 comments on this post. Leave yours.

Categories: Just For Fun

Shu Uemura Makeup Tutorial: Go Pastel for a Fresh Spring Eye

February 4th, 2008 by Karen 65 Comments

Last week I posted swatches of the eyeshadows from Shu Uemura’s new Spring Rebirth collection. There were five Easter egg-esque pastel colors in the group, each with an oh-so-purty white floral pattern, that promptly disappeared after I swatched ’em!

shu-uemura-rebirth-shadows-after-swatching.jpg

  • Pristine Green – light green (iridescent)
  • Sun Stream – light pastel orange (iridescent)
  • Earth Brown – warm brown (iridescent)
  • Spring Breeze – light pastel purple (pearl)
  • Yellow Elation – light yellow (pearl)

I’m not normally terribly attracted to pastel shades, but these colors are fun, easy to use, and have great color payoff. I combined them with Shu’s Tri-Color Eye Pencils (also from the Rebirth collection) and got in touch with my blossoming inner color diva.

The limited edition Tri-Color pencils, creme shadow pencils that can be used both as liner and eyeshadow base, come in two versions — cool-toned Aqua Flow and warm-toned Energy Flow ($25 each). Each “Flow” has three different colored pencil tips.

shu-tri-color-final-1.jpg

I really like these as a shadow base because they glide so easily onto lids and give the accompanying shadows a nice punch of color. The texture is thick without feeling heavy, and, remarkably, the formula lasts all day on my semi-oily eyelids. If you’ve got super oily lids, though, these might crease on ya after a few hours, so you might want to use a neutral colored lid primer beforehand! Utlimately, if you’re a fan of MAC Shadesticks, then you’ll dig these, fo’ sho.

To be honest, I rarely wear pastel colors on my eyes and didn’t really know what the heck to do with these colors! To get inspired I studied the Rebirth beauty shot…

rebirthmain_new_447×452.jpg

And here’s what I came up with!
shu-uemura-cosmetics-rebirth-collection-fotd-0

This was so much easier than I thought it would be!

First, grab the Energy Flow Tri-Color pencil and apply the yellow color directly beneath your brow bone, about 2/3 in from your outer brow. To the remaining 1/3, apply the orange color.

shu-uemura-cosmetics-rebirth-collection-fotd-1

Now, smooth out any edges with a firm, flat brush like the MAC 239.

shu-uemura-cosmetics-rebirth-collection-fotd-3

Next, apply the green shade from the Aqua Tri-Color pencil into your crease, going barely into the lid.

shu-uemura-cosmetics-rebirth-collection-fotd-4

Directly beneath the green shade you just applied, add a thin layer of the yellow color from the Energy Flow pencil, and then an even thinner line of white right next to the lash line. Use the same 239 brush to smooth away any hard edges. The end result should look like a little something like this:

shu-uemura-cosmetics-rebirth-collection-fotd-5

Use a crease brush to apply Pristine Green eyeshadow into your crease with a sweeping motion. For this I used a MAC 275 angled fluff brush with the pointy side facing my lash line.

shu-uemura-cosmetics-rebirth-collection-fotd-6

Next, grab a thin pencil brush like the MAC 219 and apply a thin line of Yellow Elation eyeshadow onto the lid.[Continue reading…]

There are 65 comments on this post. Leave yours.

Categories: Face of the Day (FOTD), Makeup, Makeup Tips/How To, Product Reviews

Fashion Week Runway Tips: Smokey Eyes 101

February 3rd, 2008 by Karen 42 Comments

Smokey eyes are all over the frickin’ place at NY Fashion Week. Check it: warm brown smokey eyes and neutral lips at the Boy By Band of Outsiders show.

boy-by-band-of-outsiders-final.jpg

Le sigh… I both love and hate this at the same time. Love it because it’s really pretty and sexy (and dare I say, smoldering); hate it because for the life of me I can’t get it right. I’ve got two left feet (hands?) when it comes to doing smokey eye looks. I aim for “stylish rave vampire” but end up more “barefoot Britney walking into a gas station restroom.”

There are times when I feel like your friendly neighborhood beauty addict won’t ever prevail over the elusive smokey eye. She’ll be forced to hang up her brushes to live a life of smokey eye-free debauchery.

Despite my proclamations of klutziness, Gordon Epsinet, Vice President of Makeup Artistry for MAC Cosmetics, insists that just about anyone (even me) can do a hot smokey eye.

How to get the look

“To do a beautiful smokey eye you must start with a fabulous dark pencil,” says Gordon. “You have to have MAC Smolder [eyeliner]. “It blends beautifully together with shadows and cream colors and MAC paints as well.”

“Start with lots of black pencil on the eye,” says Gordon. “Apply the pencil around the rim of the eye first, then blend it with the #219 brush, which looks like a fat little pencil.”

smokey-eye-tut-2.jpg

“You’re going to blend that, smudge it in a bit, so it looks like a smokey stain.”

smokey-eye-tut-3.jpg

Next, blend a dark brown eyeshadow into the black liner to create a mix of brown and black colors. Blend the brown shadow over the black pencil stain you just created. Gordon suggests using…

    MAC Espresso – muted golden brown (matte)
    MAC Brun – muted blackish brown (satin)
    MAC Mystery – muted plumish brown (satin)

For this I chose MAC Brun, and here’s what it looks like after I blended it on top of Smolder.

smokey-eye-tut-4.jpg

Gordon then suggests using a MAC #224 brush (a soft, fluffy, tapered brush), to blend a lighter eyeshadow into and above the dark brown layer you just created. His favorite colors are…

    MAC Kid – beige cashmere (veluxe)
    MAC Soba – golden brown flecked with golden shimmer (satin)

I have a MAC #224 but find it gets shadow all over the place, so I ended up using a Billy B Paint Brush #6 to apply Soba over the Brun/Smolder mix.

smokey-eye-tut-5.jpg

Ultimately, says Gordon, the final look should have the darkest colors at the lash line, and the colors should transition into lighter colors the farther you get away from the lashline.

smokey-eye-tut-6.jpg

And here I am in the final look. The only thing missing from this picture is a black beret and a copy of On the Road.

smokey-eye-look-final-karen-1-13.jpg

Okay, okay, this wasn’t as hard as I thought it was going to be. With a lil’ bit of practice, I think I’ll be able to get the color transitions to look more subtle and smoother. Come fall I’ll be ready to rock it with the other trendsetters.

smokey-eyes.jpg

Speaking of smokin’, the other night I watched Donnie Darko for the umpteenth time and was reminded of how totally unfair it is for Jake Gyllenhaal to be so hot. Why doesn’t he call and ask me to make out with him?

jake-g.jpg

Of course I’d say no (married, hi), but it would still be nice to be asked.

Anyway, if you’re hunkered down in front of a TV watching the Superbowl, I’ll be with you in spirit. Besides the tight pants and the prospect of eating profound amounts of junk food, I don’t care much for the big game, so I’ll be out and about running errands today. Eat a hot dog for me!

Your friendly neighborhood beauty addict,

Karen

P.S. Your weekend ain’t over yet! Here are the best posts o’ the week from the Beauty Blog Network…[Continue reading…]

There are 42 comments on this post. Leave yours.

Categories: MAC Makeup, Makeup Tips/How To

  • « Go to Previous Page
  • Go to page 1
  • Interim pages omitted …
  • Go to page 1875
  • Go to page 1876
  • Go to page 1877
  • Go to page 1878
  • Go to page 1879
  • Interim pages omitted …
  • Go to page 1912
  • Go to Next Page »

Primary Sidebar

Welcome to Makeup and Beauty Blog

Welcome to Makeup and Beauty Blog! My name is Karen, and I’m a freelance writer obsessed with makeup.

Makeup and Beauty Blog features daily product reviews, makeup tips and beauty news — like an interactive version of a monthly print magazine, except with occasional pictures of my cat.

Recent Posts

Sundays With Tabs the Cat, Makeup and Beauty Blog Mascot, Vol. 878

Makeup and Beauty Blog Monday Poll, Vol. 894

Makeup and Beauty Blog Monday Poll, Vol. 893

Makeup and Beauty Blog Monday Poll, Vol. 892

Makeup and Beauty Blog Monday Poll, Vol. 891

/* real people should not fill this in and expect good things – do not remove this or risk form bot signups */

Social

  • Facebook
  • Instagram
  • Pinterest
  • Twitter
  • YouTube

Featured Posts

Sundays With Tabs the Cat, Makeup and Beauty Blog Mascot, Vol. 771

Lady Unicorn

Weird Things I Like to Do

brows fill out beforehand

Before You Pluck or Wax Your Brows, You Must Do This

current bare skin status

What’s One Thing That Drastically Changed Your Skin for the Better?

Copyright © 2025 Makeup and Beauty Blog. Get in touch.