• Skip to main content
  • Skip to primary sidebar

Makeup and Beauty Blog | Makeup Reviews, Swatches and How-To MakeupMakeup and Beauty Blog | Makeup Reviews, Swatches and How-To Makeup

A beauty blog blooming with fresh makeup reviews, swatches and beauty tips from your friendly neighborhood beauty addict

  • Home
  • About
    • About
    • Contact
    • FAQ (Frequently Asked Questions)
    • Advertising & Media
  • Categories
    • Product Reviews
    • Makeup
    • Skincare & Fragrance
    • Style & Fashion
    • Hair
    • Nails
    • Tips & Tutorials
    • Just for Fun
  • Brands
  • Store

Food

Checking In: TGIF | Leche Flan Adventures | A Most Excellent Foundation by Chanel

January 27th, 2023 by Karen 16 Comments

Connor made this note, which is supposed to say, “When you’re feeling sad and blue, find a friend to help you through.”

Hi, friend! Thank goodness it’s Friday. No seriously. TGIF! Been a long week.

I just finished a video interview with a beauty brand which I use and love… I think it went OK! I should be finding out more next Monday, so until then, please keep your fingers and toes crossed for me.

Anywho, all this preparation for video calls lately has reminded me of just how stellar Chanel Vitalumiere Aqua foundation truly is.

Most days I typically wear a sheer tinted moisturizer (Urban Decay Hydromaniac), but if I’m going to be on camera, then Chanel Vitalumiere Aqua is it!

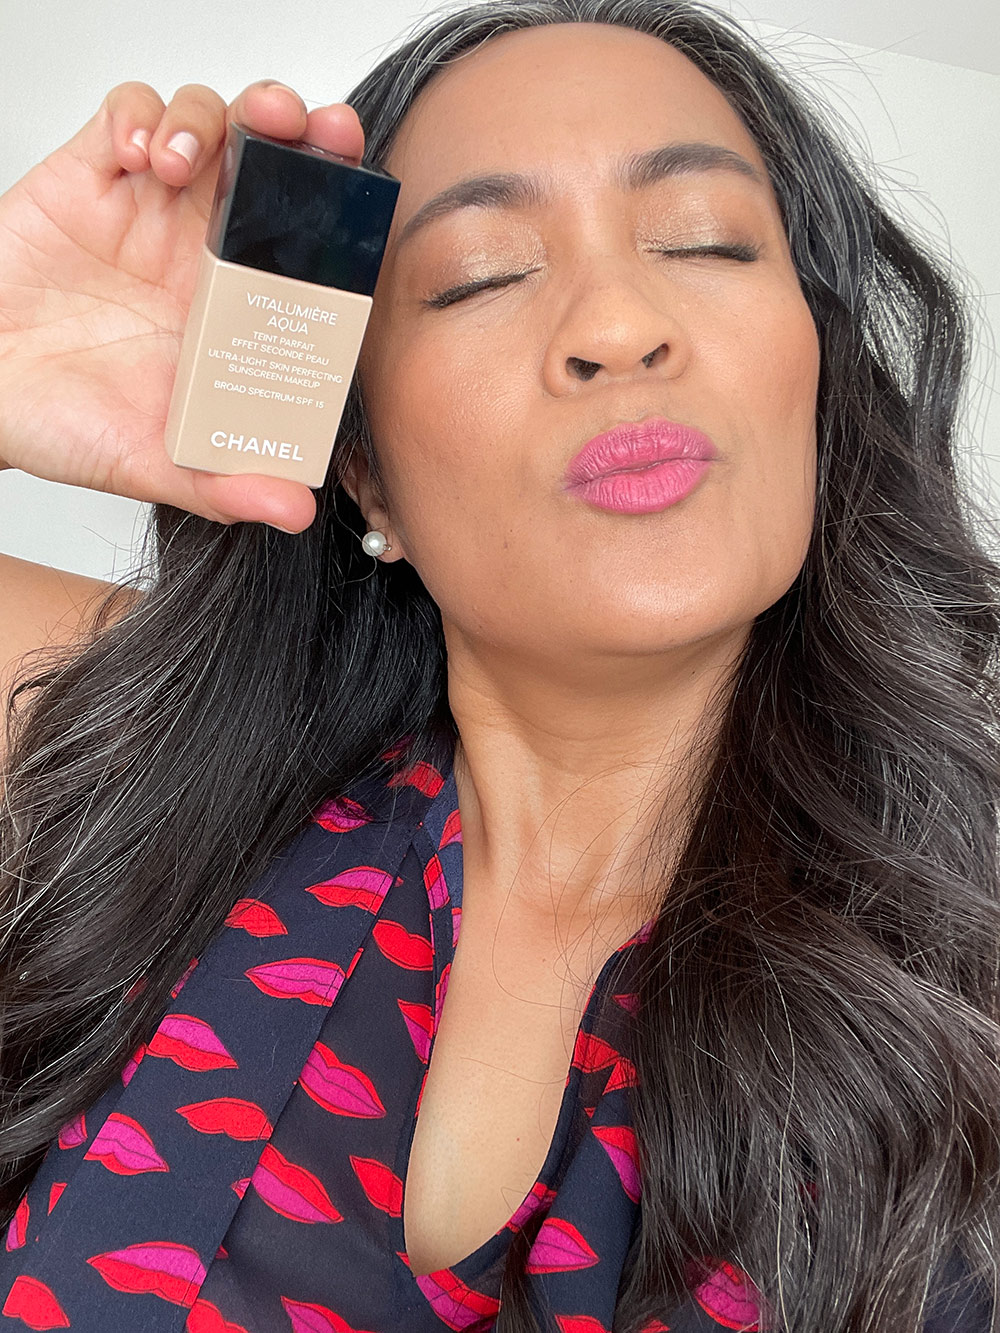
Not only can I barely feel it on, ’cause lightweight is totally key, but it smoothes out my pores and evens out patchy-looking parts without appearing obvious. I’m wearing 50 Beige in this pic, which I set with a light dusting of MAC Mineralize Skinfinish Natural in Medium Golden. A *chef’s kiss* worthy combo!

I think I mentioned earlier in the week that I’m learning how to make a Filipino dessert called leche flan. It’s like a creme brulee, but without the crunchy top, and it’s typically served at Filipino parties and celebrations.

Leche flan has two parts. First, you make a caramel on the stovetop.

Don’t ask me why, but for some reason, this part is completely terrifying to me! I think it’s the fact that you don’t have a lot of wiggle room with making caramel, so you have to heavily rely on your instincts to know when it’s time to take it off the heat. Otherwise it’ll burn, baby, burn.

Plus, that ish gets hella hot! I can see myself burning a hand or a wrist quite easily in a caramel-related incident.

OK, so the caramel goes into the bottom of your ramekin. Ideally neater than I did here.

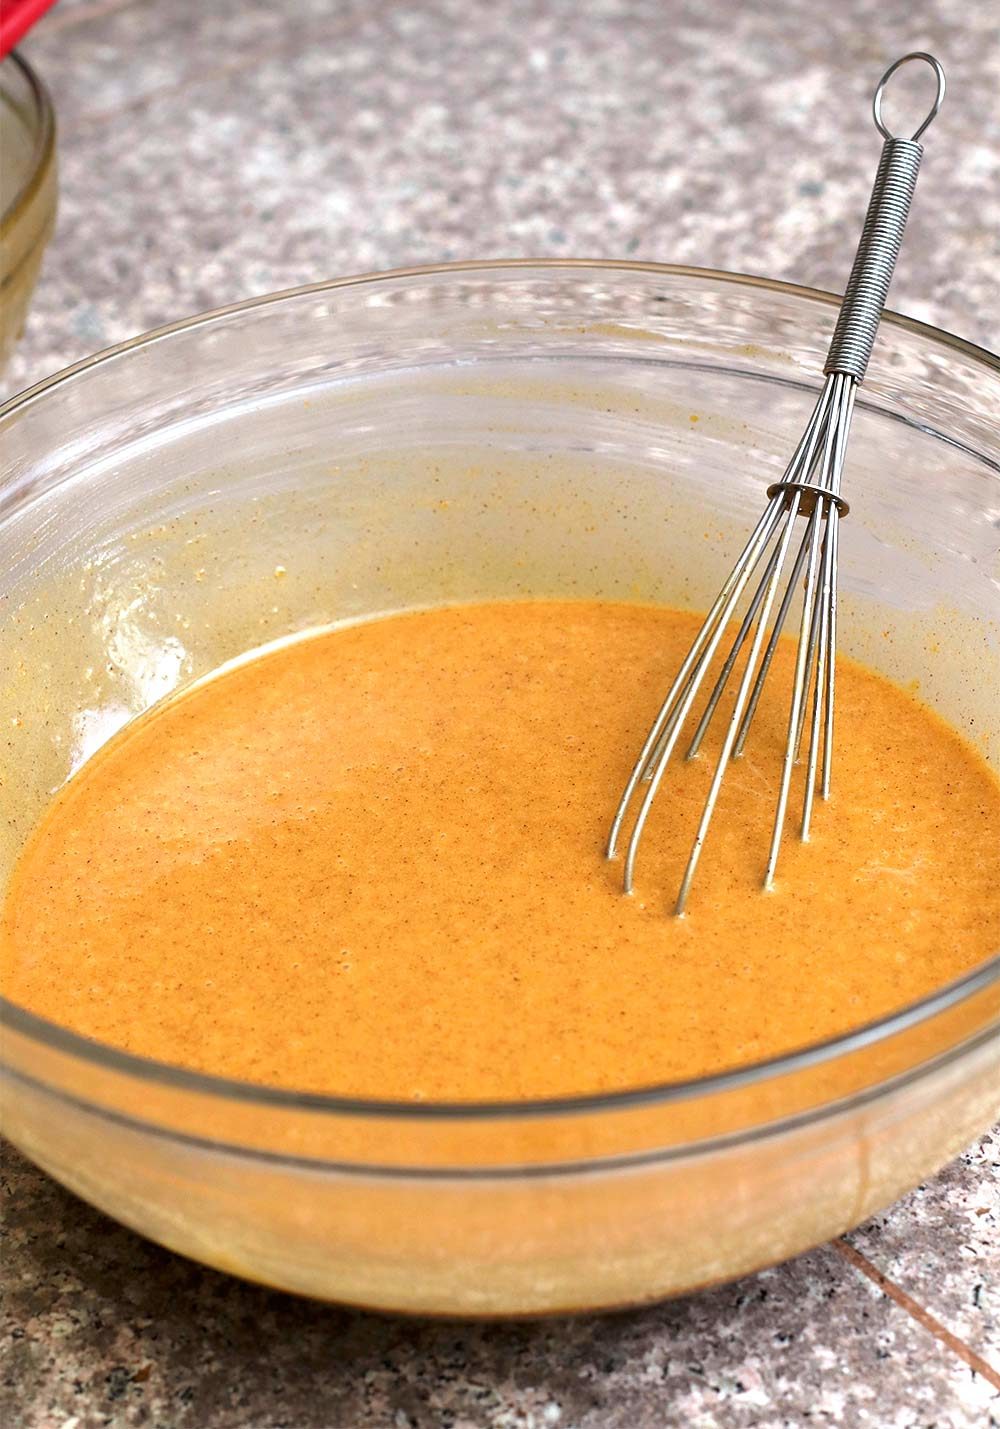
The second part involves making custard out of egg yolks, evaporated milk, condensed milk and a little vanilla. Then you strain it at least two times…

The custard goes into the ramekins, and then you steam them on the stove or in an oven. When a knife goes into the middle and comes out clean, they’re done.

After cooling down, you loosen the edges and then flip the ramekin onto a plate. You’ve gotta get all the juicy bits, too!

The result is a creamy, silky caramel custard. YUM.

Let’s see, what else has been going on? One of my New Year’s resolutions was to learn how to cook a few vegan dishes, and this was one I made for lunch early on in the week.

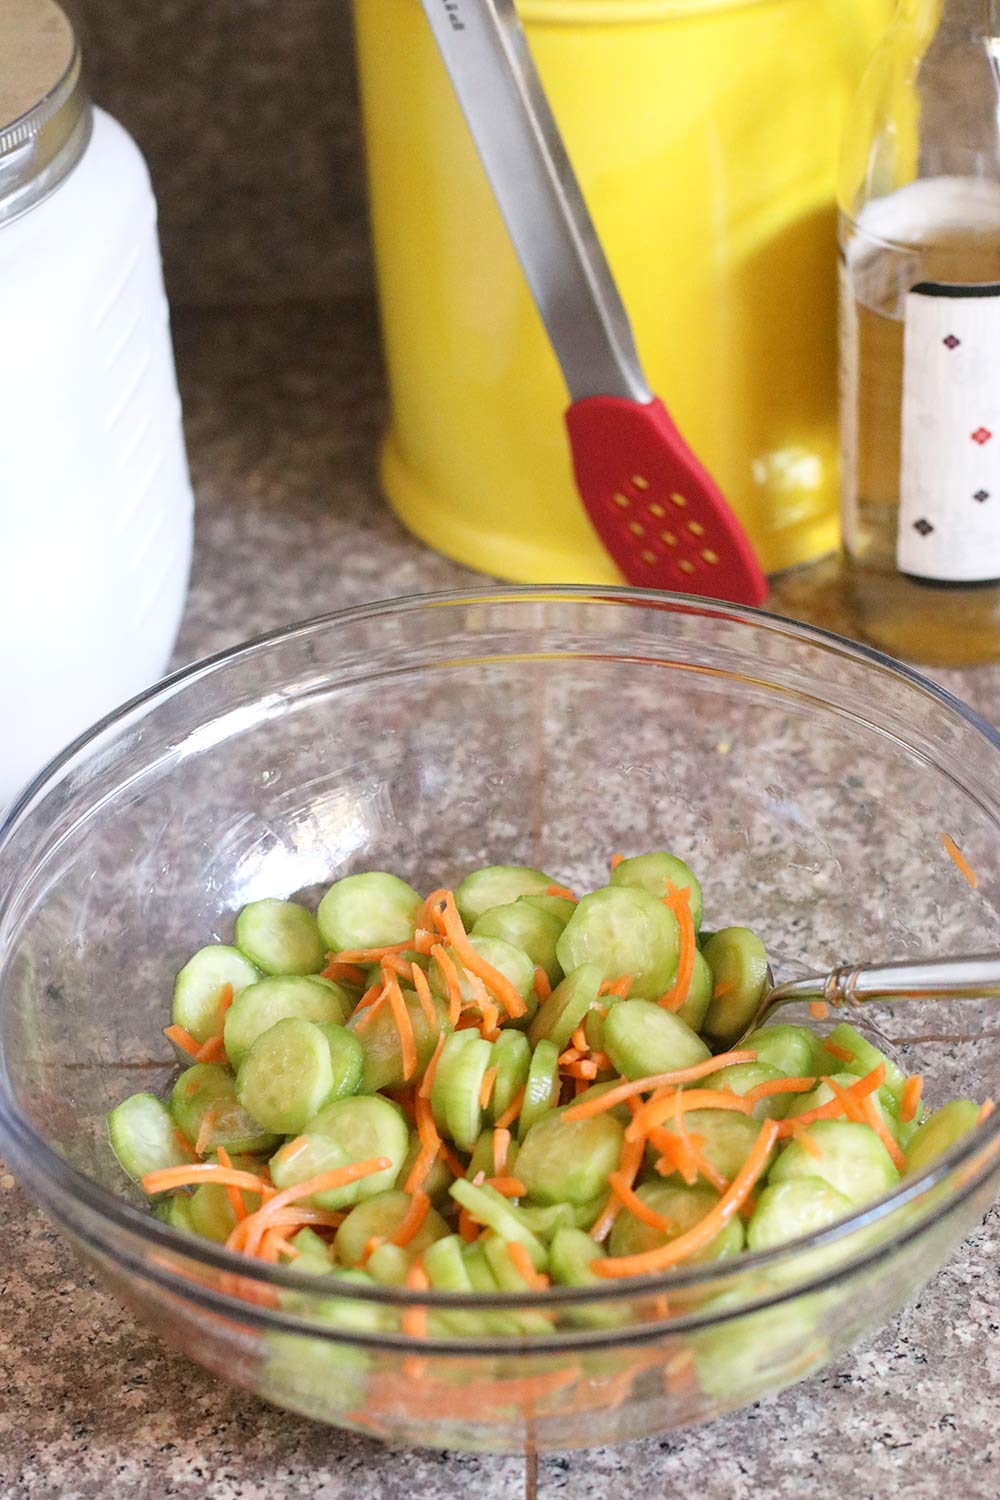
It’s garlic fried rice with stir fried potatoes, zucchini and edamame in a homemade teriyaki sauce — which is just equal parts sugar, soy sauce and water, sprinkled with ground ginger powder. It was pretty good, but next time I make it, I’m going to add cashews to bump up the protein.

I’m finally calming down from the excitement of my earlier interview and now ready to get the weekend started, like, right meow. LOL!

What are your plans? Doing anything fun?

Your friendly neighborhood beauty addict,

Karen

There are 16 comments on this post. Leave yours.

Categories: Chanel, Food, Makeup

Pumpkin Spice Cupcakes With Brown Sugar Pecans and Cream Cheese Frosting 🧁

November 16th, 2021 by Karen 6 Comments

This recipe is one of my favorite things to make and eat during the holidays. I hope you give it a try!

🧁🧁🧁🧁🧁

Let’s discuss the struggle.

The eternal Thanksgiving struggle.

You see, it’s real, it’s totally legit, and it’s deadly serious.

It typically manifests toward the end of the meal (when your shirt is covering the top of your jeans because you’ve just unbuttoned them), and you’re sitting there wondering, “Hmm…do I conclude this carbfest with a slice of pumpkin pie, or do I go with the pecan?”

Truly, it is one of life’s most difficult decisions…

If you, too, have faced this challenging predicament, then this cupcake recipe is for you. It’s a Frankenstein of fall flavors that combines the beautifully balanced spiciness of a perfect pumpkin pie, with the glorious greatness of brown sugar pecans — toasted first, then incorporated into the batter.

And as if that weren’t tantalizing enough, a cream cheese frosting tops it all off!

Also, as a full-time employee in the Crazy Cat Lady Department, I decorated mine with sprinkles and cute kitty fondant cutouts, but you could sub the cats for leaves or turkey shapes (that should also work).

In the cupcake world, there are two major categories of cupcake batter — oil-based and butter-based. Butter-based batters tend to be a little more complicated and finicky (mainly with regard to how far you’ve melted your butter) than oil-based batters. Basically, with oil-based batters, you just dump and mix! Also, oil makes it easy to end up with a melt-in-your mouth texture. No dry cake here! So, this recipe uses an oil-based batter.

You don’t need any special equipment either. Just a couple of mixing bowls and a whisk, and heck, if you don’t have a whisk, you can use a fork.

If you want to bake Thanksgiving cupcakes but don’t want something too complicated, this is the recipe for you.

Pumpkin Spice Cupcakes With Brown Sugar Pecans

DESCRIPTION
This melt-in-your mouth pumpkin cupcake has a subtle kick of spice for a festive addition to your Thanksgiving table! Studded with brown sugared pecans and finished with a cream cheese frosting.

  • Prep Time: 20 minutes
  • Cook Time: 30 minutes
  • Total Time: 3 hours
  • Yield: 12 cupcakes

INGREDIENTS

For the brown sugar pecans:

  • 1 cup finely chopped pecans
  • 2 tablespoons salted butter, melted
  • 3 tablespoons light brown sugar

Dry ingredients for the batter:

  • 1 cup (125g) cake flour (spoon & leveled)
  • 1 teaspoon baking powder
  • 1/2 teaspoon baking soda
  • 1/2 teaspoon salt
  • 1 teaspoon ground cinnamon

Wet ingredients for the batter:

  • 1 and 1/2 teaspoons pumpkin pie spice
  • 1/2 cup (120ml) grapeseed oil (any neutral tasting oil, like canola or vegetable oil, works too)
  • 2 large eggs
  • 3/4 cup (150g) packed light brown sugar
  • 1 cup (225g) canned pumpkin puree
  • 1 teaspoon pure vanilla extract

For the frosting:

  • 8 ounces (224g) full-fat block cream cheese, softened to room temperature
  • 1/2 cup (115g) unsalted butter, softened to room temperature
  • 3 cups (360g) confectioners’ sugar (you may need to add a 1/4 cup if you prefer a stiffer frosting)
  • 1 teaspoon pure vanilla extract
  • 1/8 teaspoon salt

For the decorations:

  • Fall-colored sprinkles (I got mine at Micahels)
  • Orange or other fall-colored fondant (I bought premade fondant at Michaels)
  • Cat shaped cookie cutter

INSTRUCTIONS:

1. Steps to prep
Preheat your oven to 350°F (176°C). Line 12-cup muffin pan with cupcake liners, and set aside. Roll out your orange fondant, and then cut out 12 cat shapes with your cookie cutter. Allow to air dry for at least 30 minutes, or take a blow dryer and dry them using the cool setting until they harden; set aside for later.

2. Toast the pecans
Line a cookie sheet with parchment paper. Chop pecans into small pieces. In a medium-sized bowl, combine the melted butter, brown sugar and chopped pecans. Toss to coat. Spread the pecans evenly on the cookie sheet, and bake for about 7 minutes, or until they’re toasted. Set aside to cool.
[Continue reading…]

There are 6 comments on this post. Leave yours.

Categories: Food, Just For Fun

Latest Trader Joe’s Finds: Grapefruit Body Butter, Croissant Bread, Gluten-Free Treats and More

March 30th, 2021 by Karen 6 Comments

trader joes grapefruit body butter
YES

Girlfriend, I had to do it. Grapefruit. Body butter. FOUR NINETY-NINE! I no longer even pretend to have any self-restraint when it comes to a new Trader Joe’s body butter. Sampling their myriad of “flavors” over the past few years has taught me that TJ’s Body Butters generally do me right, and this new Grapefruit one is one of my favorites to date.

Coincidentally, I’ve been having grapefruit with my breakfast every morning lately, and this cream smells legit. It’s light and fresh and lingers for a few hours before fading away, so it’s not all up in my nostrils into the evening.

Like the other TJ’s Body Butters I’ve tried, this one’s thick and creamy, like an actual stick of room-temperature Salted Kerrygold (THE BEST); you can cut it with a butter knife, so it’s more balm-y and less fluffy whipped cream, and it’s moisturizing enough to get crusty heels to bow down.

FYI, it contains coconut oil and shea butter, so if your skin likes both or either of those, you have that to look forward to!

Also, I really like that the lid flips up because the jar is easy to open and close with slippery fingers.

I’m currently wearing Grapefruit underneath Chanel Paris-Riviera (otherwise known as “orange explosion!”), and I smell pretty darned good, if I do say so myself.

Warning: the following Trader Joe’s photos should’ve been taken, ya know…before I went to town on all the food, but hey, this is real life, and apparently we’re REALLY HUNGRY at my house.

Part of me really wants to not tell you about the following bread because I want more for me, because my addiction to it is that serious, but we’re friends, and friends don’t let friends sleep on hella good baked delights!

Grab thee a Joe’s Cinnamon Croissant Loaf ASAP. This hybrid of sliced cinnamon bread and flaky croissant is heavenly. I eat it every morning with the big ol’ grapefruit.

trader joes cinnamon croissant loaf

Here’s the deal: you need to toast it first in order for it to be all it can be. Warming it up seems to make the layers of croissant even more delicate and melty, and enhances the cinnamon flavor.

You could put some butter on it, I suppose, but I just keep it plain so I can shove it into my mouth with coffee that much faster.

Also, in gluten-free news, El Hub has celiac, and he LOVES the Trader Joe’s Gluten-Free Coffee Cake Muffins. He usually thinks that most store-bought gluten-free baked goods are either too grainy or crumbly or oily, but he says these are fan-friggin-tastic.

This is El Hub’s jam.

They’re made with sour cream, which I suspect is the magic ingredient responsible for their tender crumb. He says they taste exactly like a regular coffee cake. Highly recommended from the resident GF person in our house!

Connor and I have been snacking on the Mini Orange Cranberry Tea Scones. These are lovely when you need a little something to tide you over with your afternoon beverage…

Apparently, the theme for today day is CARBS. Ha!

Your friendly neighborhood beauty addict,

Karen

There are 6 comments on this post. Leave yours.

Categories: Food, Just For Fun, Trader Joe's

Easy Cheesy Cheddar Garlic Biscuits (GLUTEN-FREE!)

December 11th, 2020 by Karen 19 Comments

gluten free cheddar garlic biscuit recipe
You’ll love these tender gluten-free cheddar garlic biscuits!

To ensure that this post is kindasorta makeup related…here I am wearing the new Urban Decay Boogie palette and eating a gluten-free cheddar garlic biscuit! ?

I made these biscuits for Thanksgiving, and they were the best — THE BEST — thing on the menu. Sliced ’em open and served them with maple glazed ham slices (BOOM!), but they’re just as delicious with a salad, soup, chili, clam chowder, etc.

In other words, all the things. ?

gluten free cheddar garlic biscuit recipe 1
YUM!

First off, they’re easy to make, and there isn’t any complicated rolling out or chilling of dough. Even though this particular batch is gluten-free, you could just as easily make them with gluten-full all-purpose flour.

The full recipe is below, but here’s a quick rundown…

Before we start, you gotta gather the ingredients. The list is short and sweet, just like my Coycoy!

gluten free cheddar garlic biscuit recipe ingredients
Start your prep!

First, measure out your dry ingredients, and whisk them in a bowl.

gluten free cheddar garlic biscuit recipe dry ingredients
Whisk away…

Next, shred the cheddar cheese. THIS IS KEY! The pre-shredded stuff in a bag won’t melt as well.

gluten free cheddar garlic biscuit recipe shredded cheese dry ingredients
Aw, you’re so cheesy!

While you’re at it, prep the wet ingredients.

gluten free cheddar garlic biscuit recipe cheese and wet ingredients
The start of something good!

Now, it’s time to make the dough! Begin by adding the cheese to the dry ingredient bowl; toss the shreds in the flour to coat them thoroughly.

gluten free cheddar garlic biscuit recipe coated cheese
All up in the mix

Then, add the wet ingredients.

gluten free cheddar garlic biscuit recipe add wet
Like I said, it ain’t diet food…

Mix the dough until it barely comes together, and try your best to avoid over-mixing; otherwise, you’ll end up with a tough biscuit. It’ll look and feel a little dry, which is totally OK.

gluten free cheddar garlic biscuit recipe dough
Don’t stress if your dough looks a little crumbly!

Form the dough into 12 biscuits, and place them on a baking sheet lined with parchment paper into an oven that’s been preheated to 425F. Bake for 12-14 minutes, or until the tops of the biscuits look golden.

gluten free cheddar garlic biscuit recipe biscuits on baking sheet
About to do the damn thing…

While the biscuits are baking, make your butter topping.

gluten free cheddar garlic biscuit recipe melted butter topping
TOPPING!

When the biscuits are done, right after you take them out of the oven, immediately spoon the melted butter on the tops of the biscuits.

Devour heartily! ?

gluten free cheddar garlic biscuit recipe final biscuit
And you’re done! Let’s eat!

Easy Cheesy Cheddar Garlic Biscuits (GLUTEN-FREE!)

DESCRIPTION
These cheesy garlic biscuits melt in your mouth, and, full disclosure, you’ll have a hard time eating just one! The dough quickly comes together and doesn’t require any complicated kneading, so you can easily mix a batch to serve for lunch, dinner or even breakfast. They’re delicious as is, or served with sliced ham (YUM), chili or clam chowder.

  • Prep time: 25 minutes
  • Bake time: 12 minutes
  • Total time: 37
  • Yield: 12 biscuits

BISCUIT DRY INGREDIENTS:

  • 10 ounces (2 cups) gluten-free 1-to-1 flour (I like Cup4Cup Multipurpose Flour)
  • 2 teaspoons baking powder
  • ½ teaspoon baking soda
  • ½ teaspoon garlic powder
  • 1 teaspoon sugar
  • ¾ teaspoon salt
  • 6 ounces (1 ½ cups) freshly shredded sharp cheddar cheese (don’t use bagged and pre-shredded cheese; it doesn’t melt as well)

BISCUIT WET INGREDIENTS:

  • ½ cup full-fat sour cream
  • ½ cup whole milk
  • 6 tablespoons unsalted melted butter

TOPPING:

  • 3 tablespoons unsalted melted butter
  • ¼ teaspoon crushed, dried parsley
  • ½ teaspoon garlic powder

[Continue reading…]

There are 19 comments on this post. Leave yours.

Categories: Food, Just For Fun

Latest Trader Joe’s Finds

November 5th, 2020 by Karen 15 Comments

trader joes bag front steps
There’s no place like home.

I do most of our grocery shopping at Trader Joe’s, so every week, in addition to picking up the usual staples (milk, eggs, nacho cheese tortilla chips, FROZEN WAFFLES!), I try to get at least one or two things I haven’t gotten before at Trader Joe’s…to try something new. I’m a pretty adventurous eater, and I’m trying to pass that on to Connor Claire.

Anywho, here are a few new finds I’ve been eating and loving lately…

Harvest Apple Salad Kit

This is a complete salad kit! You get a spring mix, unexpected cheddar cheese, apple cinnamon chips, pecans and an apple vinaigrette spring mix, and there’s enough for small side salads for four people, although, truth be told, I ate an entire bag all by myself in one day (half for lunch and half for dinner).

Apparently, I’m not the only person who does this because the cashier who helped me earlier this week said she’ll finish one in a single sitting. It’s THAT good!

trader joes harvest apple salad kit

Turkey Meatballs

You can find this bag of Italian flavored pre-made turkey meatballs in the frozen section. I snack on these throughout the day. I’ll microwave a meatball or two and dip them into TJ’s Marinara Sauce.

trader joes turkey meatballs

Cauliflower Crisp Snack Thins

These thin crackers have a delightful crunch! Great to nibble on with a slice of TJ’s pre-sliced Swiss cheese.

trader joes cauliflower crisps

Les Petite Carrots of Many Colors

The fam-bam LOVES these tiny carrots. They come prepared in a bag, already peeled and washed and ready for cooking or snacking. I like to toss them with a little bit of avocado oil and salt, then roast them in the oven. I served them as a side with roasted shrimp scampi last Friday and they were a hit!

trader joes petite carrots

trader joes petite carrots shrimp scampi

Colorful Carrot Coins

Sliced, seasoned and pre-cooked frozen carrot coins, yum! I use these as a quick-and-easy side to have with my lunch salad. I warm them up in a pan, which takes about 5 minutes.

trader joes carrot coins

Bite Size Sharp Cheddar Cheesy Crackers

I love these crunchy, crispy crackers because they have a strong sharp cheddar flavor. (Connor isn’t a fan, though).

trader joes bite size cheesy crackers

Pepita Salsa

This salsa is made with pumpkin seeds and tastes delish with eggs. I’m a wimp when it comes to heat, and if I eat too much my tongue feels like it’s on fire, LOL!

trader joes pepitas salsa

Cinnamon Croissant Loaf

Like a cross between a croissant and a cinnamon bun, and extra delicious when lightly toasted and buttered. If you see this loaf, DO NOT PASS IT UP!

trader joes cinnamon croissant loaf

Bamba Peanut Snacks

WARNING: These peanut snacks are melt-in-your-mouth lighter than air and highly addictive. Connor also loves ’em!

trader joes bambas

What yummy finds have you uncovered at Trader Joe’s lately?

Your friendly neighborhood beauty addict,

Karen

There are 15 comments on this post. Leave yours.

Categories: Food, Just For Fun

Recipes for a Tropical-Inspired Plate Lunch: Hawaiian Chicken, Hawaiian Mac Salad, Coconut Rice, and Cucumber and Carrot Salad

October 22nd, 2020 by Karen 12 Comments

hawaiian chicken plate top

Hi, friend! If you’ve been hanging with me here at MBB for a while, you might already know that my husband (the infamous El Hub!) is from Oahu in Hawaii, and we try to visit when we can to see our family.

We had trips planned for this year to celebrate some big birthdays for the grandparents, but, as you know, “The ‘Rona” was like “HAHAHAAAAAA,” so we haven’t been able to make it back in a while. Hopefully, sooner than later though (fingers and toes crossed).

We’ve been missing Hawaii a great deal lately, so I’ve been making this Hawaiian lunch plate-inspired meal to help us feel a little more connected to the islands.

hawaiian chicken plate side

A Hawaiian lunch plate typically has a scoop of rice, a scoop of sweet and tangy macaroni salad, a protein of some kind (like spam or teriyaki chicken) and a side of veggies. El Hub grew up eating them, and I’m all about ’em now too.

Granted, the plate lunches that I, an SF Bay Area girl, make here probably won’t be considered “authentic” (air quotes) by Hawaiian lunch plate culinary die-hard standards, my family really likes them. Babygirl says this one has “the yummiest chicken ever,” and El Hub has put in more than a few requests for this dish over the last month.

hawaiian chicken with sauce
A little sweet, a little salty, and all kinds of yum!

The protein in this meal is a pineapple and soy sauce marinated Hawaiian chicken, which I cooked in my Instant Pot!

I like using the Instant Pot because I can set it and forget it, and the results are consistently fan-frickin’-tastic. The chicken is always tender and bursting with flavor.

If you are culinarily-inclined, you could probably adapt it to a stovetop or a grill, but I haven’t tried either of those yet. But seriously, the Instant Pot is a foolproof tool for me, so that’s what I use for this meal.

instant pot hawaiian chicken
My much-loved Instant Pot!

I serve the chicken with coconut rice, a creamy Hawaiian mac salad (usually with whatever pasta shape I can find!) and a Thai-inspired cucumber and carrot salad, and when I posted a pic of it a while back here, there were quite a few requests for the recipes…

So, here they are below! Enjoy.

INSTANT POT HAWAIIAN CHICKEN

DESCRIPTION
Tender, juicy chicken cooked in an Instant Pot! Sweet pineapple perfectly balances with the soy sauce sauce, ginger and garlic in this easy, kid-friendly dish.

  • Prep time: 15 minutes
  • Cook time: 45 minutes
  • Total-ish time: 4-8 hours, depending on how long you marinade the chicken
  • Yield: 6 servings

INGREDIENTS

  • 2-3 pounds boneless, skinless chicken thighs or tenders (I use a mix of 1 pound thighs and 1 pound tenders)
  • 1 cup pineapple juice
  • 1 cup low-sodium soy sauce (I used gluten-free Tarmari)
  • 2/3 cup brown sugar
  • 1 tablespoon freshly grated ginger
  • 6 cloves finely minced garlic (or 1 teaspoon garlic powder)
  • 1/2 cup of low-sodium chicken broth or water

DIRECTIONS

Marinate the chicken:

  1. Place the chicken thighs and/or tenders in a shallow dish or in a gallon-size plastic bag.
  2. Whisk together the pineapple juice, soy sauce, brown sugar, ginger and garlic until the brown sugar is dissolved (or mostly dissolved); then divide it in half.
  3. Pour half the marinade over the chicken in the bag so the chicken is evenly coated. Seal the bag and refrigerate for at least 4 hours, or up to 24 hours.
  4. Refrigerate the remaining marinade until the chicken is ready to be cooked.

Cook the chicken in the Instant Pot:

  1. When you’re ready to cook the chicken, place the trivet into the bottom of the Instant Pot, and layer the chicken on top evenly. Pour in one cup of the marinade from the bag, and then a 1/2 cup of broth or water. Cook on Manual at high pressure for 12-14 minutes, do a 10-minute natural steam release, and then a quick release.
  2. You can remove the trivet and shred the chicken directly in the pot to mix into the juices if you want. Or, you can take them out and shred them outside of the pot and the juice. I usually take the chicken out, shred it, then top it with the sauce, but really it’s up to you!

Make the sauce:

  1. Bring the refrigerated reserved marinade to a simmer in a small saucepan on the stove. Simmer for 5-10 minutes (the longer it simmers, the more reduced and slightly thickened it will be). Spoon it on top of the chicken and/or rice when serving.

hawaiian chicken marinade ingredients

hawaiian chicken marinade
You can also use ground garlic and ginger if you’re in a hurry

CUCUMBER AND CARROT SALAD

DESCRIPTION
Crunchy, tangy and just a touch sweet! This easy cucumber salad tastes just like something you’d find at your favorite Thai restaurant. I customize ours to suit my four-year-old daughter’s palate, but I’ve added options below if you’d like to dial up the stronger flavors.

  • Prep time: 15 minutes
  • Cook time: 5 minutes
  • Total time: 20 minutes
  • Yield: 4 servings

INGREDIENTS

  • 1 pound persian cucumbers, peeled and thinly sliced
  • 1 teaspoon salt
  • 1/4 cup shredded carrots
  • 1/2 cup rice vinegar
  • 1/4 cup sugar
  • Optional: 1/4 cup fresh cilantro, 1/4 cup red thinly sliced red onion, and 1/3 cup chopped peanuts

DIRECTIONS

  1. Place peeled and sliced cucumbers in a colander, and sprinkle salt over them.
  2. Toss the cucumbers to coat them with the salt, and let sit for 10 minutes.
  3. Gently blot the cucumber slices dry with a paper towels.
  4. In a small bowl, mix the rice vinegar and sugar. Microwave for about 30 seconds until sugar is dissolved.
  5. In a large bowl, place the cucumbers and carrots, pour the rice vinegar and sugar mixture over the top, and stir to combine.
  6. Optional: at this point, feel free to mix in the cilantro and sliced red onion as well.
  7. Cover and refrigerate for 20 minutes, or up to 24 hours.
  8. If you’re using peanuts, sprinkle them on just before serving.
cucumber carrot salad
This cucumber carrot salad adds crunch and texture to the meal.

cucumber carrot salad ingredients

HAWAIIAN MAC SALAD

DESCRIPTION
A creamy, sweet and tangy salad with some crunch. This is a staple on a typical Hawaiian lunch plate. You can easily customize this salad to make it your own by adding onions, your favorite proteins (eggs or chicken would be good!), or maybe even some diced, cooked potato. Totally up to you. When I make it for our family, I leave out the raw onions because otherwise my kid won’t touch the stuff, but I’ve added options below if you prefer punchier flavors.

  • Prep time: 30 minutes
  • Cook time: 10 minutes
  • Total time: 40 minutes
  • Yield: 4 servings

INGREDIENTS

  • 1 8-oz box of pasta (macaroni is great, but spirals work too! Because El Hub has Celiac and is gluten-free, I use Banza Pasta)
  • 1/4 cup apple cider vinegar
  • 1 cup mayonnaise, divided (I used light mayo)
  • 1 cup whole milk, divided
  • 1/2 tablespoon brown sugar
  • 1 teaspoon salt, plus additional for cooking the pasta
  • 1/2 teaspoon black pepper
  • 1 cup shredded carrot
  • 1 cup minced celery
  • Optional: 5-7 green onions, sliced thin

DIRECTIONS

  1. Generously salt a large pot of water, bring to a boil, and cook your past according to the instructions on the box. Drain, return to the pot and toss with the vinegar. Let cool for 10 minutes.
  2. In a large bowl, whisk together 1/2 cup of the mayonnaise and 3/4 cup of the milk until fully incorporated. Then, mix in the brown sugar, salt and pepper.
  3. Toss the cooled pasta into the mayo/milk mixture, and let come to room temperature (I usually wait about 15-20 minutes).
  4. Once cool, fold in the carrot and celery. If you’re using the green onions, you can add them at this point. Whisk the remaining mayonnaise and milk, pour over the salad, and toss well to coat. Add additional salt and pepper to taste.
  5. Chill in the refrigerator until the pasta is cold.
hawaiian mac salad
Creamy, tangy and delicious

COCONUT RICE

DESCRIPTION
Lightly sweet and fluffy, this coconut rice is the perfect addition to your Asian-inspired dishes. Long grain rice like Basmati and Jasmine work best; however, I have used short grain rice in a pinch, and although it’s “technically” edible, it’s very gluey and gummy, so I wouldn’t recommend it. Also, I prefer to use the full-fat version of the coconut milk because the fam-bam likes the richer flavor, but you can substitute it with light if you’d like.

  • Prep time: 5 minutes
  • Cook time: 25
  • Total time: 30
  • Yield: 6 servings

INGREDIENTS

  • 1 1/2 cups jasmine or basmati rice
  • 1 can coconut milk, regular or light
  • 1 1/4 cup chicken broth
  • 1/4 teaspoon coarse, kosher salt

DIRECTIONS

  1. Combine the rice, coconut milk, broth and salt in a large pan.
  2. Bring to a gentle boil over medium heat, stirring on occasion to prevent the rice from sticking to the bottom of the pan.
  3. Reduce the heat to low, then place a cover on the pot, and cook for 16 minutes.
  4. Turn off the heat, leave the pot covered (don’t lift up the lid!), and let it sit on the stove for 10 minutes.
  5. Fluff with a fork if you’d like, then serve.
coconut rice ingredients
The start of something yummy!

coconut rice overview

Aloha and enjoy! ??

Your friendly neighborhood beauty addict,

Karen

There are 12 comments on this post. Leave yours.

Categories: Food, Just For Fun

Checking In: The Hask Mask in a Tub, New (Old) MAC Eyeliners, and Baking a Sprinkle Cake

September 22nd, 2020 by Karen 25 Comments

baked sprinkle cake final
I baked a cake!

Hey, guys. Happy Tuesday! Has the universe ever sent you a gentle reminder that perhaps you should probably get back to doing what you love? I got one of those nudges to start baking again (it’s been months) because I made this kick-butt cake a few days ago… Granted it was from a mix, but still!

Of course I had to share it with you… ?

It’s the Sprinkle Party Snack Cake Mix With Frosting by a brand called Baked. I picked it up randomly at Cost Plus World Market a few weeks ago because it was on sale and…I liked how the box looked!

baked sprinkle cake
The box comes with the frosting and the dry ingredients for the cake.
baked sprinkle cake
Notice the beautiful sprinkles…
connor stirring the batter
My sous chef

baked sprinkle cake

baked sprinkle cake
Love the colors

baked sprinkle cake

I could whip up a cake from scratch, but eh, baking requires attention, precision and, well…heart. I haven’t had much leftover soul to invest in baking sweets lately, but then I found this cake mix. Not only did it make things easy, but the cake actually tastes homemade. Highly recommended!

The mix includes a packet of dry ingredients for a butter-based vanilla cake with rainbow sprinkles, and another packet for plain with vanilla frosting. The instructions are pretty detailed, too, which makes it easy to not mess up.

baked sprinkle cake
Here’s the batter…

THIS CAKE IS SO GOOD. It’s light-as-air and melts in your mouth, and it doesn’t have that obvious taste of your typical boxed cake. Hard to explain, but to me boxed cakes all taste the same — kinda oily and heavy, without much flavor. Anyway, this one’s really, really good, and so is the frosting.

If you happen to live near a World Market, I suggest grabbing a box!

Anywho, that lovely cake opened up a metaphorical baking door, so I’ve made even more goodies since then, including brownies, chocolate chip cookies, and marbled cookies, which are half chocolate chip and half dark chocolate.

cookies and brownies
Chocolate chip cookies and brownies, YUM!
chocolate chip cookies september 2020
The most beautiful thing I ever did see…
marbeled cookies
Marbled cookies

I’m thinking of making a pie next, because rumor has it that Trader Joe’s has a pre-made gluten-free pie crust. Or, maybe I’ll make some savory scones, or perhaps I’ll finally try my hand at croissants?!

Sorry, I’m getting distracted. Before I lose my train of thought, I have one more World Market thing to show you — this box of dark chocolate sprinkles!

It’s from Holland and from a brand called DeRuijter (“masters of bread toppings”), and the picture on the front looks like a loaf of French bread cut in half with the dark chocolate sprinkles on top.

chocolate bread sprinkles
OK, so how does this work, exactly?

Can somebody please explain what’s going on here? Do you eat the bread with just the sprinkles on top, or do you toast the bread in an oven to melt the sprinkles? Or, are the sprinkles attached to the bread with Nutella or peanut butter or something? Or, do you just eat it plain like a dark chocolate sprinkle sandwich?

If someone from Holland could please explain just exactly how this works, please fill me in, because I don’t know what’s going on here, and I would love to, LOL!

Now, to ensure that this post is marginally related to beauty, I finished the packets of Hask Hair Masks I got a while back, so I popped into Ulta to grab some more and found out that they sell the Argan Oil version in a jar for six bucks!
[Continue reading…]

There are 25 comments on this post. Leave yours.

Categories: Food, Hair, Hask, Just For Fun, MAC Makeup, Makeup

5 Things I’ve Been Loving Lately

June 10th, 2020 by Karen 5 Comments

5 things loving lately

1. Creamy pastel pink manis

I’ve been into opaque pastel bridal-style manis lately, specifically pale, creamy pinks. There’s something so refreshing about them… Maybe it’s because they remind me of ice cream? An added bonus is when the edges chip — which is inevitable these days, since I wash my hands about 6,924 times a day — because you can’t really see the nicks unless you look really closely.

duri forever beautiful
I’m wearing Duri Forever Beautiful, and Connor’s wearing shades from the Sally Hansen Jelly Belly collection.

This particular shade is by Duri, and it’s called Forever Beautiful. I’m wearing two coats along with my go-to Essie Gel Couture topcoat.

2. Archer Farms Vanilla Bean Crème Brulee Light Roast Ground Coffee

I don’t like it when coffee is bitter and tastes like punishment. Blech! Gimme a smooth and easy to drink cup of coffee any day of the week. I guess I’m a wimp like that.

archer farms vanilla bean creme brulee
I’m drinking a cup right now, as a matter of fact!

Anyway, this vanilla flavored coffee from Target has very little bite, and the vanilla bean and crème brulee flavors are present but not overpowering.

I love when I can find it… Seems like it’s always out of stock these days, but I’ve also seen it available online.

3. Ooly Pastel Liners

These rainbow pastel markers are double ended. They have an angled tip on one side and a fine tip on the other, and ooh! — the surge of satisfaction I feel when I cross items off my to-do list with these markers. It’s off the charts!

Multi-colored rainbow lists are the best.

4. Deep belly breathing

A few weeks ago I set a reminder on my phone to chime every few hours to remind me take some deep belly breaths throughout the day, and those breath breaks make a HUGE difference in my overall mental health.

Yes, having to remind myself to breathe felt silly at first, but with current events as they are…I don’t care anymore! 🙂 When you reach the point where your shoulders scrunch up to your ears and stay there all day long, you’ll try anything.

Five or six deep breaths take all but a minute or two, and I do it every few hours to help my nerves.

5. Free People Movement Om Crew Neck Tank Tops

I bought a few of these $15 tanks on a whim a few weeks ago to wear with my stretchy workout pants, and I like ’em. A lot. They’re lightweight, and the fabric is pretty thin, which I like, because we’ve already started with the 90-degree days here, and it’s been a struggle to, ya know, actually wear real clothes.

These tanks feel light as air, and they’re a bit “see through” depending on the color, so wear a cute sports bra underneath and call it a day.

Your friendly neighborhood beauty addict,

Karen

There are 5 comments on this post. Leave yours.

Categories: Fashion, Food, Just For Fun, Nails

  • Go to page 1
  • Go to page 2
  • Go to Next Page »

Primary Sidebar

Welcome to Makeup and Beauty Blog

Welcome to Makeup and Beauty Blog! My name is Karen, and I’m a freelance writer obsessed with makeup.

Makeup and Beauty Blog features daily product reviews, makeup tips and beauty news — like an interactive version of a monthly print magazine, except with occasional pictures of my cat.

Recent Posts

Sundays With Tabs the Cat, Makeup and Beauty Blog Mascot, Vol. 878

Makeup and Beauty Blog Monday Poll, Vol. 894

Makeup and Beauty Blog Monday Poll, Vol. 893

Makeup and Beauty Blog Monday Poll, Vol. 892

Makeup and Beauty Blog Monday Poll, Vol. 891

/* real people should not fill this in and expect good things – do not remove this or risk form bot signups */

Social

  • Facebook
  • Instagram
  • Pinterest
  • Twitter
  • YouTube

Featured Posts

Sundays With Tabs the Cat, Makeup and Beauty Blog Mascot, Vol. 771

Lady Unicorn

Weird Things I Like to Do

brows fill out beforehand

Before You Pluck or Wax Your Brows, You Must Do This

current bare skin status

What’s One Thing That Drastically Changed Your Skin for the Better?

Copyright © 2025 Makeup and Beauty Blog. Get in touch.