• Skip to main content
  • Skip to primary sidebar

Makeup and Beauty Blog | Makeup Reviews, Swatches and How-To MakeupMakeup and Beauty Blog | Makeup Reviews, Swatches and How-To Makeup

A beauty blog blooming with fresh makeup reviews, swatches and beauty tips from your friendly neighborhood beauty addict

  • Home
  • About
    • About
    • Contact
    • FAQ (Frequently Asked Questions)
    • Advertising & Media
  • Categories
    • Product Reviews
    • Makeup
    • Skincare & Fragrance
    • Style & Fashion
    • Hair
    • Nails
    • Tips & Tutorials
    • Just for Fun
  • Brands
  • Store

Guest Post

Unsung Makeup Heroes: Chanel Black Satin Nail Polish

July 24th, 2013 by Karen 22 Comments

Chanel Black Satin Nail Polish
Chanel Black Satin Nail Polish ($27), available now at Chanel counters and online
Kelly Keeton of Vampy VarnishAbout the Author
The following guest post was written by Kelly Keeton of Vampy Varnish. You can also find Kelly on Twitter, Facebook, Instagram, Pinterest and Google+.

Do you own a shade of eyeshadow, lipstick or nail polish that started you down a long and perhaps expensive makeup collecting path? I sure do, and her name is Chanel Black Satin (available now in the Chanel permanent collection).

I’ve been into nail polish for as long as I can remember, but there have been phases where I didn’t really think about it much for months at a time. I was in one of those slumbering “dry spells” when Chanel Black Satin came out.

Chanel Black Satin Nail Polish

When I first saw it in fashion magazines, I liked it, but I wasn’t completely smitten . I was, however, very interested in any black nail polish that had fashion editors and people in general going gaga.

The long-running Unsung Heroes series features much-loved permanent collection products from a variety of bodacious beauty brands.

Previous to Chanel Black Satin, black nail polishes weren’t really ever seen on anyone other than musicians, artsy types and those into various genres of music, like punk rock, heavy metal and goth. Now, all the sudden it was going mainstream. After seeing it over and over, it started this spark within me that grew and grew, and I knew I HAD TO HAVE IT.

I searched high and low but couldn’t find it anywhere in stores. Finally, I resorted to eBay and spent more on it than I had ever spent on any nail polish before. A whopping $35! At the time, that seemed completely outrageous, but now, after many years of collecting, I can say that it’s not the most I’ve ever spent on a nail polish (yikes!).

Chanel Black Satin Nail Polish

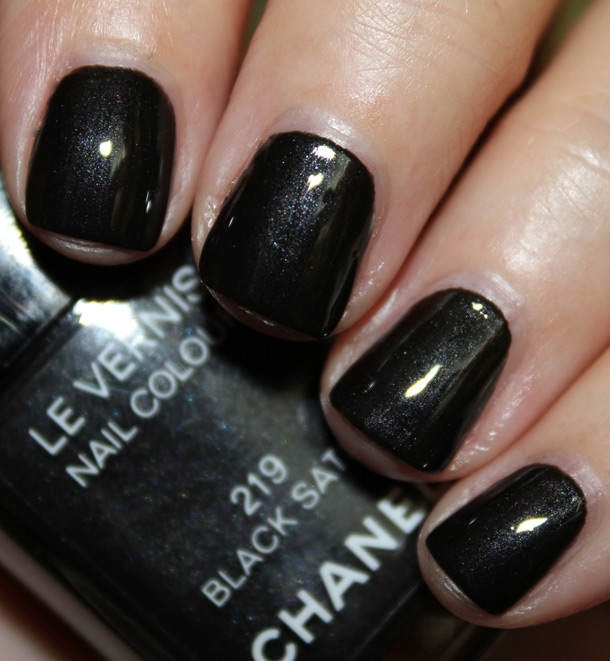
Black Satin, as the name implies, has a black base with a silver satiny shimmer running throughout. It has a great smooth and creamy formula, and covers perfectly in two coats.

It might not be the most unique black polish out there anymore, but this beauty definitely started bringing dark nail shades back into the spotlight, and for that, I am grateful!

What item in your makeup collection do you have a great fondness for?

– Kelly

Kelly Keeton of Vampy VarnishAbout the Author
This guest post was written by Kelly Keeton of Vampy Varnish. You can also find Kelly on Twitter, Facebook, Instagram, Pinterest and Google+.
There are 22 comments on this post. Leave yours.

Categories: Chanel, Guest Post, Nails, Unsung Heroes

I’m Kelly Keeton of Vampy Varnish, and This Is My Makeup Life

July 24th, 2013 by Karen 34 Comments

The fabulous Kelly of Vampy Varnish
The fabulous Kelly Keeton of Vampy Varnish!
The My Makeup Life series asks beauty biz insiders, bloggers, makeup mavens and artists to share their holy grail products, tricks, tips and favorite beauty tools. Is there anyone you would like to see featured in My Makeup Life or questions you think I should ask? Let me know here.

Name: Kelly Keeton
Location: The East Bay Area near San Francisco, California, U.S.
Hangouts online: Vampy Varnish, Twitter, Facebook, Instagram, Pinterest, Google+
Current favorite product: Too Faced Tinted BB Cream in Vanilla Glow
Beauty inspirations: Music, books, England, the SF Bay Area, tropical islands, flowers
One word that best describes your outlook on beauty: Artistic


What makeup/beauty products can’t you live without?

The number one thing I can’t live without is an excellent eyeshadow primer, like Too Faced Shadow Insurance or Milani Eyeshadow Primer. I also must have MAC Fast Response Eye Cream (thanks to your rec, Karen!), Simple Light Moisturizer with SPF 15, Nubar Diamont Seal & Shine Topcoat, MAC Russian Red Lipstick and Jack Black Lip Balm, especially in Shea Butter.

When did you start getting into makeup?

I played around with nail polish and lip gloss around 11 or 12 but really started wearing it consistently when I was 13.

What’s your best beauty time-saving trick?

A quick-dry topcoat like Nubar Diamont is a must-have item for anyone who loves nail polish. It dries so quickly and shiny, it’s perfect.

Also, if you want to do a mani but are super short on time, try a textured polish or metallic. They usually dry much quicker than other formulas, and with a texture, you don’t need a base or topcoat!

What’s your favorite beauty tool?

I love the Benefit synthetic angled brush for brows. It’s the perfect size and width for my brows.

What’s the best beauty advice you ever received?

Wear SPF on your face every day! I started in my early 20s, and I really think it’s helped me look younger.

What’s your skincare routine?

In the a.m. I wash my face with a gentle cleanser like Cetaphil in the shower, and twice a week or so I’ll also use a gentle scrub like MAC Volcanic Ash or TheBalm Almond Microdermabrasion Face Scrub.

Then I apply my moisturizer with SPF and usually MAC Fast Response Eye Cream. At night, I usually wash with a Clinique or Soap & Glory cleanser and apply some retinol products on my eye area and face. Then a moisturizer on top. About once every week or two, I’ll do some kind of face mask, like TheBalm Blueberry Face Mask, Origins Charcoal Mask or c.Booth Volcanic Mud Mask.

What’s the weirdest thing you’ve tried in the name of beauty?

For some insane reason when I was in my early 20s I dip-dyed the ends of my bleached blond hair black.

So about 4 inches of the bottom were black.

It looked much better on singer Berlin! So, to get rid of it, I dipped the ends in pure bleach for a long time, which only turned it a horrible faded brown.

Then I had to cut all of that off.

Do you have a trademark look?

I’ve tried many hair colors and styles, but I always wind up going back to an edgy short pixie or bob and platinum blond. It just works the best for me, and it’s the perfect blank palette for any makeup colors!

Are there any beauty decisions you’ve made that you look back on and ask yourself, “why?!”

Oh, yes! I wore acrylic nails (shudder) for many years in the ’90s, and it makes me nauseous to think about now!

Where are your favorite places to shop?

I do a lot of shopping online, and some of my favorite places are ModCloth, Sephora, Amazon, Etsy and Zappos. For in-store I like Target, Nordstrom, Sephora and Ulta.

There are 34 comments on this post. Leave yours.

Categories: Guest Post, Just For Fun, My Makeup Life

No Crease? No Problem. In-Crease Your Eye Makeup Skills With These 5 Monolid Makeup Tips

May 12th, 2012 by Karen 70 Comments

SunnyAbout the Author
The following guest post was written by Sunny of Mostly Sunny blog. You can also find Sunny on Twitter and Facebook.

Despite the fact that it’s impossible to generalize “Asian eyes” in a single word, monolids seem to be one of the traits most commonly associated with them. Monolids are characterized by the lack of a prominent crease, and monolidded eyes are usually more almond shaped than round.

I remember thinking how unfair it was as a child that I ended up with my father’s monolidded eyes, while my mother and one of my brothers have a prominent crease. It took me years to see how both were beautiful in their own way, and now my monolids aren’t something I try to work around, but something I enjoy working with!

Sure, round eyes with pronounced creases are beautiful, but so are almond-shaped eyes without a crease. 🙂


My naked eye

Now, I know that it’s also impossible to generalize even among people with monolids, as there are different shapes and techniques, and people will sometimes prefer one method over another. Ultimately, it all comes down to what you like and feel comfortable with.

Nowadays, there are even eyelid tapes and glues available to create a crease, if you think it helps you apply makeup, and some even find that applying false lashes gives their eyelids a fold.

In general, I don’t believe in hard and fast rules when it comes to makeup, and I think you should do whatever you’re most comfortable with. The following tips are just some things that have worked well for me.

I know that many readers who come across this post might not have monolids themselves, but why not keep these tips in mind for a friend who does?


The MAC 217 Blending Brush

Tip 1: Blend, blend, blend!

As important as blending is when it comes to eyeshadow application, I think it’s even more important for those of us with monolids, because we lack a natural demarcation between our eyes and brow bones, so if we apply a patch of color right on top of our eyes without blending, it can look a bit unnatural.


Unblended eyeshadow

In the picture below, I’m wearing Urban Decay Verve on the inner half of my eye and Busted on the outer. Personally, I think that once the eyeshadows have been blended, they appear more natural, and add more dimension to the look than a simple patch of color.


Blended eyeshadow

Tip 2: (Don’t) work it into your crease

If you don’t have one, why fight it? I know that dramatic cut-crease looks are gorgeous on our double-lidded counterparts, but if we’re not careful, they can easily look overdone, and dare I say it, a little fake.

While it’s not impossible to emphasize the outer v and bring a bit of the color into our (imaginary) crease, I try to do it with an easily blendable color using a blending brush instead of a pencil brush; otherwise, it can take a looong time to blend the harsh line out afterwards!


Defined outer v
[Continue reading…]

There are 70 comments on this post. Leave yours.

Categories: Guest Post, Makeup Tips/How To Keywords: guest post

10 Skincare Luxuries for $10 or Less

May 5th, 2012 by Karen 38 Comments

RadhikaAbout the Author
The following guest post was written by Radhika of Weekend Ramblings. You can also find Radhika on Twitter and Facebook.

10 of my favorite drugstore skincare treats

Shortly after finishing college, I started working a regular job — not an amazing job, but it was enough to allow my beauty habit to go somewhat unchecked for a while. Then, everything changed when life happened, and I quit my job and moved to the U.S.

It took me a while to find another job; my days of carefree shopping sprees were over, and to be honest, I didn’t take to beauty budgeting all that well. If you had called me a pampered brat, I would have had to agree. 😛

But something very good came out of that time. I discovered some excellent wallet-friendly beauty and skincare products, and not just those tempting cute packages strategically placed beside the checkout counter, or the last-minute dollar deals I add to my cart to reach the free shipping threshold (don’t tell me I’m the only one who does that!), but products I’ve consistently purchased over and over, just because I love them.

Here are 10 of my favorite skincare treats, each of them $10 or less, to leave your skin healthy, glowing and fresh, without making your wallet unhappy.

1. Shiseido Facial Cotton ($9.50)

shiseido-facial-cotton

I know, fancy facial cottons might be the last thing on your mind when you’re on a budget, but hear me out. Shiseido’s version is thicker and softer than the average drugstore cotton, and it doesn’t leave behind any stray fibers on my face.

But those aren’t even the reasons it’s on my must-have list. What I recommend using this for is something called “the lotion mask.”

It’s an idea I picked up from a book called the Japanese Skincare Revolution, by Chizu Saeki, and it’s a fabulously simple way to healthier skin. Here’s a video from the author, but to break it down…

shiseido-facial-cotton2
Shiseido’s cotton is much thicker than regular drugstore cottons and withstands a little stretching. It also separates easily into thinner layers.

Start by taking one of the cotton pads, soak it in water, and squeeze out most of the water by pressing it between your palms.

Then, pour a few drops of any alcohol-free toner on it (I think rose water works great), stretch the cotton a bit, and separate it into three thinner layers.

Next, place them over your face, and relax for about 10 minutes. When you’re done, even after just one use, your face will feel hydrated, smooth, and have a noticeable glow.

Try it! It could be the best $10 I’ve ever spent, and if you have a Japanese store nearby, you might be able to find an even less expensive version of a similar idea.

2. Olay Daily Facials Cleansing Cloths ($7)

olay-daily-facials-cleansing-cloths

These are carried in most drugstores, and having tried many different cleansing cloths and washes — including some crazy expensive ones — I have yet to find one that leaves my skin in a condition as good as these.

If you’re new to them, here’s how they work: They’re small square towelettes that you wet, and when you rub them against your skin, they work up a lather. Just gently scrub with them to cleanse.

I use them like a washcloth, and then use lukewarm water to rinse off most of the lather from my face, before rinsing any residual cleanser with cooler water.

There’s not a lot to them, but I think these cloths really work only up to their potential if you follow the directions.

Thrifty tip: Half a towelette should be sufficient in most cases (unless your normal day involves mud-wrestling alligators). Just snip them in half and store. The smaller size makes them easier to use, and this way they last longer. Store in any air-tight container, so they stay moisture-free.

3. Lush Toner Tabs ($2)

lush-toner-tabs

I’ve tried just about every Lush product out there and have loved most of them. I’m a Lushie. My favorites, though, are their fresh face masks, which are made with natural ingredients. Pair them with one of Lush’s Toner Tabs, and you’ve got yourself a nice relaxing at-home facial, all for less than $10.

First the toner tabs, which look and feel like macro-versions of regular tablets (some have petal bits in them).
[Continue reading…]

There are 38 comments on this post. Leave yours.

Categories: Drugstore Beauty Finds, Guest Post, Skin Care Keywords: guest post

7 Steps to a Perfect DIY Manicure

May 1st, 2012 by Karen 53 Comments

SammyAbout the Author
This guest post was written by Sammy of The Naulasaurus. You can also find Sammy on Twitter, Facebook and Etsy.

How to do a salon perfect manicure

I’ve been blogging about all things nail-related for more than two years now, and most of the questions I get from readers go back to basics. How do you get the polish so smooth? How do you get it so neat around your cuticles? What’s the secret?

I must’ve painted my nails more than a thousand times in my life, so I suppose if there is a secret, it’s just practice, practice, practice!

To get you started on the practicing, here are the seven steps I take to get a perfect DIY manicure!

Step 1:

Start by washing your hands and giving your nails a good scrubbing with a nail brush. Make sure you completely remove the remnants of your previous manicure.

One trick I use to remove stubborn old polish stuck around my cuticles is to use an old toothbrush dipped in polish remover to scrub it away.

Pushing back your cuticles with a cuticle pusher makes it easier to smoothly paint on your polish without making a mess, and here’s a good bargain on a set from E.L.F.

Salon perfect manicure: step 1

Step 2:

With a glass nail file, smooth away any snags around your nails, and sculpt them to your favourite shape. Glass nail files are my favourite kind. They work mush faster than other files, and they’re better for your nails.

Salon perfect manicure: step 2

Step 3:

Apply a base coat to protect your nails, keep them strong, and make your mani last longer.

Salon perfect manicure: step 3

My all-time favourite base coat is OPI Nail Envy, and before I discovered it, my nails were weak!

I couldn’t grow them out at all because they’d snap and peel all the time, but I’ve been using Nail Envy under every manicure for years now, and my nails are practically diamond hard! It’s a must for anyone whose nails peel or break easily.
[Continue reading…]

There are 53 comments on this post. Leave yours.

Categories: Guest Post, Makeup Tips/How To, Nails Keywords: guest post

Detoxify Your Skin the Bentonite Way With a DIY Bentonite Clay Mask

April 30th, 2012 by Karen 20 Comments

NadegeAbout the Author
This guest post was written by Nadege of Atomic Beaute. You can also find Nadege on Twitter and Facebook.

Bentonite clay face mask

With what our faces face on a daily basis — sun exposure being the big one — clay masks are a great way to treat common skin challenges. I like to give my face a good detoxing once a week to make up for not taking good care of my skin during the week (I’m definitely guilty of this!).

Take a night, and treat yourself to a nice, calming bentonite clay mask.

Bentonite clay is here to save the day! — scratch that. The week! This soft volcanic clay is suitable for all skin types. It absorbs toxins, draws out blackheads, kills acne-causing bacteria, and it’s great for spot treatments, too (just mix it with a little bit of water). It also has anti-aging benefits, because as it exfoliates the skin, it helps with cell turnover.

So, are you ready to detoxify the bentonite way? 🙂 If you are, here’s…

What you’ll need

  • A few small stalks of sage
  • 2 tbsp of bentonite clay powder
    (carried at most health food stores)
  • 1 tbsp of honey
  • 1 tbsp of coconut oil
  • Half a lemon

Sage (enough to fit in a small bowl)

Bentonite clay face mask

2 tbsp of bentonite clay (available here and here)

Bentonite clay face mask

1 tbsp of honey

Bentonite clay face mask
[Continue reading…]

There are 20 comments on this post. Leave yours.

Categories: Beauty Tips, Guest Post, Skin Care Keywords: guest post

Tango With Tangerine: Simple Ways to Wear Pantone’s Color of the Year

April 30th, 2012 by Karen 26 Comments

RadhikaAbout the Author
This guest post was written by Radhika of Weekend Ramblings. You can also find Radhika on Twitter and Facebook.

The Sephora Pantone Tangerine Tango Collection

Back when we were kids, my cousins and I spent a good deal of each summer vacationing at our grandma’s place. I don’t really remember how we spent our time (stealing mangoes, yes), but one thing I do remember clearly is the ice cream man.

Well, it wasn’t actually ice cream… More like frozen sticks of bright orange juice that prompted animated discussions about whose tongue was the most stained.

Sigh… Good times. 😀

Anyhow, that’s what I thought of when I saw Pantone’s Color of the Year, a bright reddish orange quite aptly named Tangerine Tango.

While I can see a bright tangerine pump making all the difference between drab and chic, I’ve always found it difficult to embrace bright orange makeup. Then, this year, it starts up popping up everywhere! — most notably perhaps in the much hyped Sephora + Pantone Tangerine Tango Collection.

Truth be told, I’m a little shy about venturing beyond beiges and browns, and it took me a while to build up the courage to try the colour. When I did, though, I caved and bought the set.

If you’re wondering how you can add a splash of tangerine to your look while staying firmly on the safer side of the colour spectrum, here are some options:

Tangerine eyes

Sephora Pantone Tangerine Tango on the eyes
Sephora + Pantone eyeshadow quad and Tangerine Tango Twist eyeliner

The easiest way I’ve found to add the colour to my eyes is by using a tangerine eyeliner close to my lash line, which I usually smudge with some brown eyeshadow.

Sephora Pantone Tangerine Tango on the eyes

MAC CopperingThe Sephora palette comes with a tangerine eyeliner and an eye shadow quad, which is probably enough tangerine to last someone a lifetime!

If you’re looking for a drugstore option instead, try Maybelline Colour Tattoo eye shadow in Fierce & Tangy, or for a colour bound to outlast the current tangerine trend, try orangey copper MAC Coppering.


MAC Coppering and Maybelline Colour Tattoo Eyeshadow Fierce and Tangy
[Continue reading…]

There are 26 comments on this post. Leave yours.

Categories: Guest Post, Makeup Keywords: guest post

4 Easy DIY Skincare Recipes With Lemon

April 28th, 2012 by Karen 12 Comments

JennAbout the Author
This guest post was written by Jenn of Hello Brio. You can also find Jenn on Twitter, Facebook, Pinterest and Google+.

DIY Lemon-based skincare

I’ve been working on switching over to all natural beauty and makeup products for several months now. It’s not an easy transition, and it can be quite expensive.

Growing up, my mom created beauty and health concoctions with plants from her herb garden combined with common pantry items like olive oil, and I thought it was a bit odd. But as a lot of mother-daughter things go, I’ve learned that her practices aren’t so strange: her natural beauty routine is quite admirable – and now I’m following suit! After all, she is in her 60’s and still has fantastic, clear, glowing skin.

So, when life gives you lemons, make all-natural at-home beauty treatments!

Lemons are fruit; they’re natural. They’re inexpensive. Lemon juice has antiseptic, healing and lightening properties, and can also help with acne.

See where I’m going here?

Combined with the right ingredients, lemons can be a staple in many natural DIY skincare treatments. Here are four easy lemon-based beauty recipes: two for face, and two for feet.

And if you’re like me and don’t cook fancy things very often, I picked recipes that call for a small number of common ingredients. I hope you’ll love these inexpensive, surprisingly luxurious beauty treatments as much as I do!

Lemon yogurt peel

For this super-gentle exfoliating mask, you’ll need 1 tablespoon of lemon juice (fresh squeezed is best), 1/4 cup of plain yogurt (I use Greek yogurt), and about 1 tablespoon of honey. Yogurt combined with honey makes a great gentle antibacterial cleanser.

Lemon yogurt peel

Mix the ingredients together until the mixture is uniform, and apply to clean skin. Leave it on for 10 minutes, and rinse with warm water.

Oh, yeah. And feel free to eat some yogurt and honey if you’re so inclined (it’s one of my favorite treats!).

Sweet honey lemon face scrub

Combine 2 tablespoons of honey, 1 tablespoon of brown sugar, and the fresh squeezed juice from a quarter of a lemon. Honey’s natural antibacterial quality gives this nourishing and moisturizing scrub acne fighting properties, and my skin glows after doing this treatment.

Sweet honey lemon face scrub

This recipe yields about four uses for me. Apply about one quarter of the mixture by gently rubbing it on clean skin, and then leaving it in place for about 5 minutes before rinsing.

You can store the rest of the mixture for later use — just not more often than once every 3 or 4 days.

Oh, and if you happen to accidentally taste the mix, I won’t tell. 🙂
[Continue reading…]

There are 12 comments on this post. Leave yours.

Categories: Beauty Tips, Guest Post, Skin Care Keywords: guest post

  • « Go to Previous Page
  • Go to page 1
  • Interim pages omitted …
  • Go to page 35
  • Go to page 36
  • Go to page 37
  • Go to page 38
  • Go to page 39
  • Interim pages omitted …
  • Go to page 42
  • Go to Next Page »

Primary Sidebar

Welcome to Makeup and Beauty Blog

Welcome to Makeup and Beauty Blog! My name is Karen, and I’m a freelance writer obsessed with makeup.

Makeup and Beauty Blog features daily product reviews, makeup tips and beauty news — like an interactive version of a monthly print magazine, except with occasional pictures of my cat.

Recent Posts

Sundays With Tabs the Cat, Makeup and Beauty Blog Mascot, Vol. 878

Makeup and Beauty Blog Monday Poll, Vol. 894

Makeup and Beauty Blog Monday Poll, Vol. 893

Makeup and Beauty Blog Monday Poll, Vol. 892

Makeup and Beauty Blog Monday Poll, Vol. 891

/* real people should not fill this in and expect good things – do not remove this or risk form bot signups */

Social

  • Facebook
  • Instagram
  • Pinterest
  • Twitter
  • YouTube

Featured Posts

Sundays With Tabs the Cat, Makeup and Beauty Blog Mascot, Vol. 771

Lady Unicorn

Weird Things I Like to Do

brows fill out beforehand

Before You Pluck or Wax Your Brows, You Must Do This

current bare skin status

What’s One Thing That Drastically Changed Your Skin for the Better?

Copyright © 2025 Makeup and Beauty Blog. Get in touch.