• Skip to main content
  • Skip to primary sidebar

Makeup and Beauty Blog | Makeup Reviews, Swatches and How-To MakeupMakeup and Beauty Blog | Makeup Reviews, Swatches and How-To Makeup

A beauty blog blooming with fresh makeup reviews, swatches and beauty tips from your friendly neighborhood beauty addict

  • Home
  • About
    • About
    • Contact
    • FAQ (Frequently Asked Questions)
    • Advertising & Media
  • Categories
    • Product Reviews
    • Makeup
    • Skincare & Fragrance
    • Style & Fashion
    • Hair
    • Nails
    • Tips & Tutorials
    • Just for Fun
  • Brands
  • Store

Makeup Tips/How To

A Small But Life-Changing Makeup Tip (Hint: It Has to Do With Your Sharpener)

August 14th, 2019 by Karen 12 Comments

makeup pencil sharpener

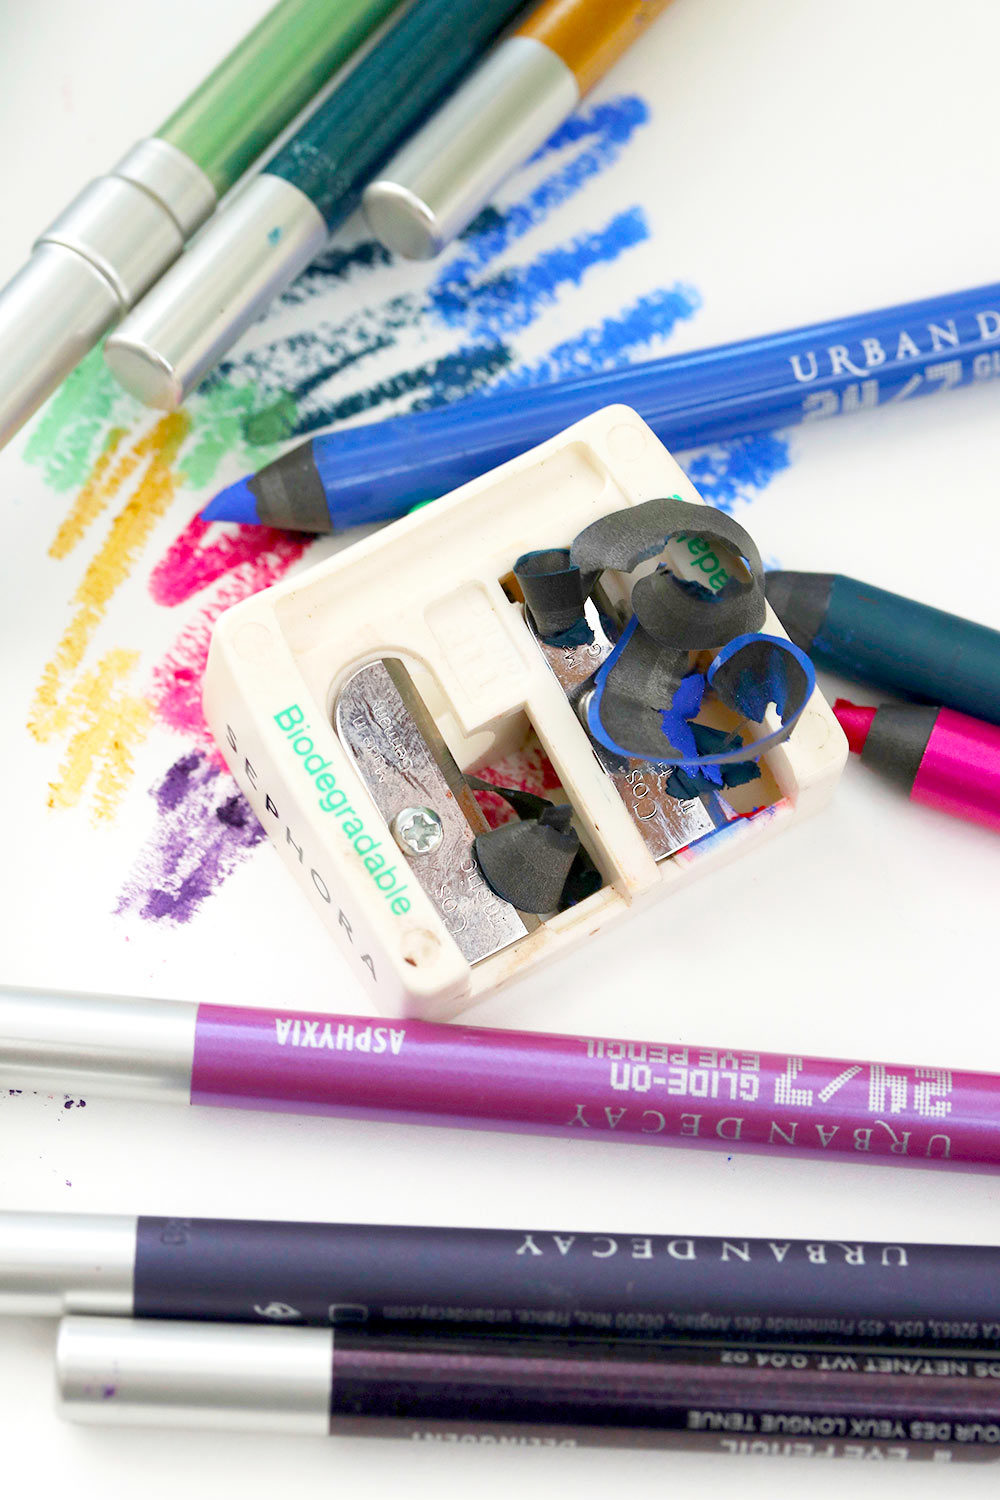
I’ve talked about the misery inflicted by my makeup pencil sharpener before, but I’m no longer livin’ that messy life, because I recently figured out how to make it perform better by — novel idea here — cleaning it!

The solution I stumbled on has two parts. First, I ditched my Make Up For Ever, and UD Grindhouse, sharpeners for the no-frills Sephora sharpener shown at the top. It doesn’t have a built-in enclosure to catch the shavings, but that actually forces me to toss the shavings in the trash after every use.

Those enclosures never seem to stay affixed very well anyway, and they burst open no matter how many rubber bands I wrap around them.

Second, and this part is key, I swipe the blades clean after every use. To facilitate this, I keep baby wipes from Costco around and usually end up using one of those, but makeup wipes, a clean Q-Tip, tissue or a cotton pad (either soaked with a little makeup remover, or just dry on its own) work too.

Doing this ensures that there aren’t any errant makeup particles floating around, and consequently no transfer of color between eyeliners and lip pencils.

Seriously, why did this never occur to me before?! Oh, my gosh…

Your friendly neighborhood beauty addict,

Karen

There are 12 comments on this post. Leave yours.

Categories: Just For Fun, Makeup, Makeup Tips/How To, Makeup Tools

7 Makeup Tips and Techniques I Learned From Nerding Out to This ’90s Makeup Tutorial By Sam of Pixiwoo

June 28th, 2019 by Karen 8 Comments

Nerd alert!

(Of course I mean that in the best possible way because makeup nerds ROCK.)

I nerded out big time to this ’90s makeup how-to video by Sam of Pixiwoo, and after watching it, all I wanted to do was grab my brushes (they’re clean, hallelujah!), sit down with a pile o’ makeup and a mirror, blast some Prince, and just play for hours.

Sam shows step-by-step how to do a classic, full-on ’90s matte eye similar to what Janet Jackson and Whitney Houston (two of my favorite ’90s divas) wore back in the day. Then she pairs it with a ’90s-style Pamela Anderson lip (complete with the overdrawn, un-blended lip liner…BUT DAMN IT LOOKS HELLA GOOD!).

Sam updates the look though, so it’s not straight outta the ’90s, and she does this by pairing the dramatic eyes and lips with a sheer, barely-there base. I think the final result is totally wearable but not boring, not too difficult to do, and modern looking. I would totally do this look for a dinner, or drinks with the girls, or to Trader Joe’s to buy some whole wheat bread… HA HA HA!

The tips are moderate-advanced, which I appreciate — because how many times do we have to hear the phrase “move in a windshield wiper motion” on YouTube? — and almost all of them are techniques I’ve never heard before.

1. Use a domed blending brush and a thin tapered brush to precisely apply crease color.

For detailed crease work, Sam recommends keeping these two brushes on hand so you can place your darkest crease color exactly where you want it. She starts with a domed brush to place the darkest brown shade on the outer corner, then swaps it for for a thin, tapered brush.

She loads eyeshadow only on the very tip of the brush, then removes most of it before carefully sketching a thin line in her inner crease. This allows her to place the color exactly where she wants with maximum control. GENIUS!

2. Pay close attention to where you put your fingers on your brush relative to the ferrule.

Where you wrap your fingers around the brush determines how much control you’ll have over it. If you want more control, like when you’re drawing a pinpoint thin line in your inner crease, then hold closer to the ferrule, but if you’re going for a more blended, diffused look, hold your fingers father away from the ferrule.

3. Brace your hand against your cheek so you can steady your body before drawing fine lines.

To draw fine, perfect lines, Sam likes to steady her hand by anchoring it against her cheek; then, when it’s time to sketch out the line, she uses her fingers to move the brush. Moving just your fingers minimize any jerky movements.

She does this whenever she uses liquid liner or lip liner or anything that requires precision.
[Continue reading…]

There are 8 comments on this post. Leave yours.

Categories: Makeup, Makeup Tips/How To

Skinny Mini

May 23rd, 2019 by Karen 31 Comments

yellow flowers bouquet
For you, my dear.

A bouquet of fresh picked wildflowers for you, my friend, courtesy of the “floral artisans” at the local playground.

Translation: Connor and the other little girl she was playing with ran up and down every hill plucking every yellow flower in sight when we were at the playground the other day, and when I was handed the final bouquet, my first thought was, “Oh, this is so pretty. I wonder how many dogs have pee’d on these flowers.” ?

Got a few things on my mind today that I wanted to chat with you about, including expanding my makeup knowledge with a couple of new books, and a snazzy styling tool that will forever change the way you see flat irons.

Also, there’s a healthy, yummy, easy chicken recipe at the end that I think everyone — even the pickiest eaters — will love. It’s so good that if Tabs were around, I’m sure he’d try to steal the food off my plate.

Y.U.M.

As I know you know, this last month I was reminded that life is blisteringly (and unfairly) short. To put it mildly, this has lit a fire ? under my @ss, and now I want to learn as much as I can about anything and everything — all of my interests. One of those interests, of course, is makeup.

I mean, I do know a thing or two about it already, but there’s a whole wide world of techniques and history and beauty vocabulary that I’ve yet to discover.

Kevin James Bennett, MUA and outspoken dude

This month I’ve been reading a couple of books that were recommend by makeup artist Kevin James Bennett. He’s an Emmy award-winning MUA and a somewhat controversial presence on social media because he goes for the jugular when it comes to calling out what he sees is wrong about current beauty influencer culture.

makeup artist handbook
Reading is fundamental.

While I don’t have the mental bandwidth to deal with that aspect of his content (again, life is short), I love the technical information he provides on his Instagram and his blog.

He wrote a list of his most-used makeup reference books, and I picked up two of them from Amazon: Color: A Course in Mastering the Art of Mixing Color by Betty Edwards, and The Makeup Artist Handbook by Gretchen Davis and Mindy Hall.

I’ve only been able to skim a few chapters in Color so far, but they were fascinating! The book dives deeply into the art and science of color mixing and explores the vocabulary and theory behind it.

I want to be able to understand the “why” behind which colors “go” best with which colors in makeup, photography and life in general.

color betty edwards
A little obsessed with this cover
color betty edwards
Hue and value!

The other book, The Makeup Artist Handbook, is like a succinct manual on everything you’d ever need to know and own to do makeup on a production set. It’s written for professionals and working artists in the industry and covers a wide array of things I’ll probably never need to do (like creating a beard! FROM SCRATCH!), but they’re still fun to know.

makeup artist handbook
Does that eye in the middle freak you out?
makeup artist handbook
Lots of detail
makeup artist handbook
You learn something new every day.
makeup artist handbook
Stuff I can use in everyday life
makeup artist handbook
And just in case you need to make a beard!

I think from a casual makeup lover’s standpoint, the chapters on beauty makeup and natural makeup for photography and film are the most useful and helpful, so I can’t wait to dive into that.

Mini flat irons are a thing

Check out this funky little piece of equipment I picked up recently at Ulta. It’s a mini flat iron!

LOOK HOW THIN THE PLATES ARE! They’re so skinny.

beadhead pixie on point
Skinnier than your skinniest pair of skinny jeans (ya know, the ones that make you feel like a sausage in a casing)

I had no idea that mini flat irons were even a thing until I recently looked for different ways to smooth the crazy rogue baby hairs around my hairline (because I know that plucking them isn’t a long-term solution).

beadhead pixie on point
“Cuz I know you like it hot.” LOL!

They’re typically used to tame very short hairstyles like pixie cuts because the ultra-thinness of the plates lets you get closer to the scalp than a traditional flat iron.

I used it for the first time yesterday, and yeah — you can indeed get close to your roots.

Like, uncomfortably close.

On the one hand, awesome. On the other, I’m deathly afraid I’m going to accidentally burn myself.

beadhead pixie on point
The half-inch plate, with the ghd 1-inch plate for size

It helped to smooth down my baby hairs, though, so that’s a plus. I’ll have to do it a few more times to get into a flow… (If you see me rocking a Disney Princess Band-Aid across my forehead in the next few days, you’ll know what happened.)
[Continue reading…]

There are 31 comments on this post. Leave yours.

Categories: Hair, Just For Fun, Makeup, Makeup Tips/How To

Current Foundation Routine —> All About That Base

January 15th, 2019 by Karen 30 Comments

OK, it’s true, I seemingly have a new foundation routine every two seconds because I like to switch things up all the time. Lately I’ve been using a slightly different combo of some old faves, and I’ve been getting a lot of questions about what I’ve been doing with my skin. So I guess it’s working for me! Here’s the product lineup in order from start to finish…

  1. MAC Fix+: A few spritzes on bare skin
  2. MAC Prep+ Prime Natural Radiance: One pump applied all over face
  3. MAC Mineralize Timecheck Lotion: One pump on oily spots (forehead, nose, chin)
  4. MAC Studio Fix Fluid Foundation in NC42 mixed with a few drops of Pinklite Strobe Cream (1-3 very thin layers)
  5. Charlotte Tilbury Magic Away Liquid Concealer in shade 7 (under the eyes) and shade 8 (on cheeks and around nose)
  6. MAC Mineralize Skinfinish Natural Powder in Golden Tan
  7. MAC Fix+: A few more sprays after all of the powder products have been applied (powder, blush, bronzer, highlighter, etc.)

I’d call this a medium-coverage base. The coverage is just shy of full, and I like that this combo doesn’t feel heavy, but there’s still enough coverage to even out the skin.

It does take time, though. Definitely more than a one-minute job with tinted moisturizer and concealer applied with my fingers and buffed out with a brush or sponge (which is also a totally legit process, but also a totally different look).

If you’re gonna go this route, I recommend doing a couple things…

1. Wait for your face primer to dry

I usually apply my face primer at the start of my makeup, then do my brows and eyes to give the primer time to absorb. If I’m in a hurry, I’ll wait a minute or two, and then blot down as much as I can with a tissue or paper towel, but you basically want the primer to have fully absorbed so it can do its thing. You don’t want to jump to the next steps while it’s sitting on top of your skin.

2. Thin layers are key!

OH, THE MAGIC OF THIN BASE LAYERS. I could talk about this for ages, but here’s the gist of it: If you’re going for a good amount of coverage but don’t want your base makeup to look like cake frosting, use multiple thin layers of foundation and/or concealer, as opposed to just piling a ton of product on bare skin.

The thin layers will give you the coverage you want without looking like batter.

It does takes time and effort, though…

Apply each thin layer with your fingers or a sponge or brush, and blend it in with a buffing brush (you want to get the layers as close to your skin as possible). Also, wait for the previous layer to dry (at least a minute or two) before applying the next one, and repeat until you reach the coverage you want.

It’s like walking around with a goat in your arms…

[Continue reading…]

There are 30 comments on this post. Leave yours.

Categories: Face, MAC Makeup, Makeup, Makeup Tips/How To

The Easiest Way to Wear Red Lipstick

December 12th, 2018 by Karen 17 Comments

urban decay tryst lipstick
—-> I’ve found your new favorite way to wear red lipstick. ?

Nine times out of 10, I’d rather wear a nude lip than a red, because I just don’t like having to deal with the precision, man. I don’t want to spend the time loading a lip brush or dealing with red lip liner, or correcting any wonkiness with concealer. I just wanna put on some lipstick, quickly, and get on to living my cat’s best life, ha ha ha!

Be that as it may, this doesn’t mean I don’t ❤️ wearing red lips because I totally do! — especially during the holidays. ‘Tis the season for red, after all, so I have a workaround way to wear red that I’ve been loving lately, and I think you will too.

Note: It’s SUPER easy.

I’ve been doing it a lot lately with Urban Decay Vice Lipstick in Tryst ($18), a charming creamy reddish fuchsia.

Here it is straight from the tube. No liner, no lip brush.

urban decay tryst lip swatch
Crazy for crimson (but not the time it takes to apply it)

I like this red full-on by itself, but it does take some elbow grease to get everything all even, and to do it semi-decently in a moving car, which is where I usually put on my lip color these days, because I’m always cutting it this close to getting somewhere on time.

So lately I’ll start with a layer of nude lipstick (Honest Beauty Blossom is my current fave, but any nude should work) instead. Then, after I get a layer down, I apply a thin layer of red lipstick on top, directly from the tube. Then I rub my lips together to mix everything, and feather the edges with a finger.

urban decay tryst on top of honest beauty blossom
You can totally do this in a moving vehicle, I swear.

[Continue reading…]

There are 17 comments on this post. Leave yours.

Categories: Makeup, Makeup Tips/How To, Urban Decay

Going for the Glitter? Get Thee a Fluffy Brush, ASAP!

December 12th, 2018 by Karen 17 Comments

nars ignited palette k
Glitter during the daytime hours? WHY NOT!

Friends, please raise your coffee mugs and join me in congratulating my dayum self!

Now, you might be asking, “Um…Karen, what the heck are we toasting to?” And if so, fair enough. ? See, I’ve come to the life-changing conclusion that using a fluffy brush to apply glitter changes lives.

Why a fluffy brush?

Correction: It has to be a specific type of fluffy brush. What you want is a fluffy flat or angled eyeshadow brush — something like the MAC 275S or my fave, the Sephora Pro Angled Shadow Brush #13, which, sadly, is discontinued.

Basically, though, a fluffy flat (or angled) brush deposits the perfect amount of glitter onto lids while simultaneously minimizing fallout.

I’ve only just started doing this because I normally just use a finger to press the glitter on my lids to pack that ish in place, but the thing is, when I wanna wear glitter during the daytime, BECAUSE WHY NOT, this approach can be a little too disco.

nars ignited palette k2
Pretty subtle as far as glitter goes. I’m wearing the NARS Ignited Palette, by the way. It has lots of pink and purple and warm reddish browns, and methinks it looks *good* with rose-colored tops and dresses.

Sheer, but precise

Fluffy brush, though? Yes, life-changing! The key is the low density of the brush head. The fluffiness sheers out the glitter just enough to leave you with a dusting of elegant sparkle on your eyes, as opposed to full-on rave glitter (err, do people still call those parties raves? #datingmyself). The shape of the brush head is also a may-jah player. Since flat or angled eye brushes are precise, and much more precise than, say, domed or tapered eye blending brushes like the MAC 217 or 224, so you can put your glitter exactly where you want it.

I mean, of course you’ll have to tap off your brush first, and then pat, rather than sweep, the glitter on your lids to reduce as much fallout as you can (obvi), but using a fluffy brush results in a sheerer, more elegant and subtle application that *totally* works for daytime makeup.

Fix that fallout

And if you do end up with fallout, no worries. Just use a little Scotch tape or the sticky part on the back of a Post-it, and gently press it onto any wayward glitter flecks to lift them away!

What I’m wearing in these pics

I used the Sephora #13 brush to apply some glitter from the new NARS Ignited palette ($59, limited edition, available at Sephora) that I wore last week, and it was a look I also happened to be wearing when I picked up Connor Claire at preschool.

nars ignited palette
The NARS Ignited Palette
nars ignited palette packaging
I like the packaging, too.

[Continue reading…]

There are 17 comments on this post. Leave yours.

Categories: Eyes, Makeup, Makeup Tips/How To, NARS, Palettes

Hanging With “Makeup People,” and Thoughts on Looking Like You’re Trying With Your Makeup Even Though You Really Haven’t Tried at All

November 9th, 2018 by Karen 15 Comments

Last weekend at a children’s birthday party, which was held inside an art studio, I got to make pinch bowls with ceramic clay (I asked El Hub if he wanted to recreate that scene with Patrick Swayze and Demi Moore from Ghost but he said no). At the party, I bumped into a fellow makeup person (hey, Shakun!), and as our kids devoured birthday cake and buzzed around the room, naturally, the conversation drifted to the makeup we were wearing, because that’s what you do when you are a “makeup person,” as opposed to a standard “makeup civilian” (yes, I’m officially coining that term right now).

Big surprise! — I was wearing neutrals on my lids and lips, but because it was a party and I felt like I needed to try a little bit, I also drew some shimmery blue winged liner at the last minute using two colors for an ombre effect. I used a light teal in the inner part of the lash line (Urban Decay Deep End) and a darker sapphire for the outer third and wing (LSD, also by UD).

Not one at that party — not even El Hub, who was the person who probably spent the most time looking directly at my eyes that afternoon — noticed that I was wearing two shades of blue liner, except for Shakun.

BAM! Right off the bat, she pointed out the ombre effect and asked what I used. Funny how it’s like that when you’re hanging with a makeup person, right?! They notice the details right away.

I complimented Shakun on her bright red matte lipstick, and she said that she was wearing red lips because she didn’t have a lot of time to get ready, but she still wanted to look like she tried because it was a party. LOL!

That got me thinking bout the things we do as “makeup people” when we want to look like we tried, but we’re still pressed for time.

I definitely have a go-to bag of tricks for these occasions, like colorful liner, of course, which is so easy, and it’s even easier if you leave out the winged part of it. Anything jewel-toned and shimmery, I like, but purples are what I reach for the most. And GLITTER! A glittery liquid liner, or a glittery eyeshadow top coat (Urban Decay Diamond Dog!), always works wonders and doesn’t take a lot of effort. And, of course, a bright hot pink or red lip. All of these things pop with hardly any effort.

False lashes also up the ante, but at this point in my life I reserve them for special events and holidays like Halloween.

Thanks for being a fellow makeup person. 🙂 Because sometimes I really need someone more interactive to talk to about these things than Tabs…

Your friendly neighborhood beauty addict,

Karen

P.S. TGIF!

There are 15 comments on this post. Leave yours.

Categories: Eyes, Lips, MAC Makeup, Makeup, Makeup Tips/How To, Urban Decay

The Best Glue for False Lashes

November 6th, 2018 by Karen 12 Comments

urban decay lash glue the best
The best!

It had been a minute since the last time I wore false lashes, but I went there on Halloween. Thankfully, I remembered an absolutely game-changing tip when it comes to falsies. If you’ve every had trouble applying them (and who hasn’t?), what you need to do is hunt down a set of UD Urban Lash False Eyelashes.

They’ll make your life easier.

Doesn’t really matter which style… Seriously, it’s not about the lashes themselves, although they’re pretty good too.

But I’m all about that lash glue. I think it’s the best out there. I stockpile Urban Decay falsies just to get more of the glue!

I think it’s even better than Duo lash glue, which you can find everywhere and almost everyone (except me) seems to like… I think it’s 1) stinky and 2) almost too sticky, and unless I place it perfectly that first time, it’s darned near impossible to lift the lashes off to re-position them.

Urban Decay’s glue, on the other paw, doesn’t stink (YAY!), and it has some “leeway” to it, meaning that I can lift off the lashes and put them back on a few times (which always happens because I never get it perfect on the first try) before committing to the final positioning.

It’s just so easy! Plus, once it’s dry, it doesn’t move at all.

The viscosity of the UD glue is perfect, too. It isn’t too runny or too thick, which are other issues I have with Duo. The consistency of the formula varies wildly, whereas I’m consistently able to apply the exact amount of UD’s glue I need on the lash band.

Oh, and when you open the tube, there’s also the teeny, very skinny applicator, and it’s easy to get just the littlest amount of glue on your false lashes with it, which is crucial because you want to use the least amount of glue you can get away with (bonus: one tube will last a while).

halloween 50s girl
Is it weird that I have a favorite lash glue?

Did I mention the style I’m wearing in this pic? It’s called HBIC.

I mean…by no means is it a natural lash look, but it’s great for ? parties and cutting-loose days.

Your friendly neighborhood beauty addict,

Karen

There are 12 comments on this post. Leave yours.

Categories: Eyes, Makeup, Makeup Tips/How To

  • « Go to Previous Page
  • Go to page 1
  • Interim pages omitted …
  • Go to page 11
  • Go to page 12
  • Go to page 13
  • Go to page 14
  • Go to page 15
  • Interim pages omitted …
  • Go to page 93
  • Go to Next Page »

Primary Sidebar

Welcome to Makeup and Beauty Blog

Welcome to Makeup and Beauty Blog! My name is Karen, and I’m a freelance writer obsessed with makeup.

Makeup and Beauty Blog features daily product reviews, makeup tips and beauty news — like an interactive version of a monthly print magazine, except with occasional pictures of my cat.

Recent Posts

Sundays With Tabs the Cat, Makeup and Beauty Blog Mascot, Vol. 878

Makeup and Beauty Blog Monday Poll, Vol. 894

Makeup and Beauty Blog Monday Poll, Vol. 893

Makeup and Beauty Blog Monday Poll, Vol. 892

Makeup and Beauty Blog Monday Poll, Vol. 891

/* real people should not fill this in and expect good things – do not remove this or risk form bot signups */

Social

  • Facebook
  • Instagram
  • Pinterest
  • Twitter
  • YouTube

Featured Posts

Sundays With Tabs the Cat, Makeup and Beauty Blog Mascot, Vol. 771

Lady Unicorn

Weird Things I Like to Do

brows fill out beforehand

Before You Pluck or Wax Your Brows, You Must Do This

current bare skin status

What’s One Thing That Drastically Changed Your Skin for the Better?

Copyright © 2025 Makeup and Beauty Blog. Get in touch.