• Skip to main content
  • Skip to primary sidebar

Makeup and Beauty Blog | Makeup Reviews, Swatches and How-To MakeupMakeup and Beauty Blog | Makeup Reviews, Swatches and How-To Makeup

A beauty blog blooming with fresh makeup reviews, swatches and beauty tips from your friendly neighborhood beauty addict

  • Home
  • About
    • About
    • Contact
    • FAQ (Frequently Asked Questions)
    • Advertising & Media
  • Categories
    • Product Reviews
    • Makeup
    • Skincare & Fragrance
    • Style & Fashion
    • Hair
    • Nails
    • Tips & Tutorials
    • Just for Fun
  • Brands
  • Store

Makeup Tips/How To

Products I Have Completely Used Up! Will I Repurchase Them?

June 9th, 2016 by Jen Clark 12 Comments

IMG_9331

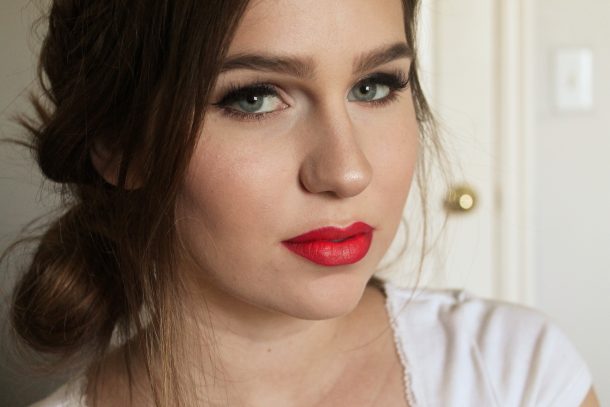
Do you get that intense feeling of satisfaction when you use the last drop of something you’ve been working on for months? It makes me feel like an actual responsible adult who got her money’s worth! If I completely use up a product, it’s usually a testament to how much I love using it…usually.

Rather than chucking my empties into the garbage, I channeled my inner hoarder and kept my trash in a box to take pictures of and show you all. Totally normal!

1. Simple Cleansing Facial Wipes ($5.99 at Ulta)

Simple Cleansing Towlettes
Simple Cleansing Facial Wipes ($5.99 for 25 wipes, available at Ulta)

I’ve gone through an absurd number of these wipes — like, literally more than 20 packs of 25 wipes! I really should collect the empty wrappers to see how many I actually use…

These are my all-time favorite go-to makeup removers. I’ve tried countless different wipes and even micellar water on cotton pads. Some of them are nice, but I always, always, always come back to these.

The actual cloth wipes are so nice and soft and don’t irritate my skin, and the cleanser they’re soaked in is super gentle and doesn’t burn my eyes, but it still does the job and gets off all of my makeup.

Will I repurchase them? Yes, I already have, and I’m quickly burning through my last pack!

2. Pixi Glow Tonic Exfoliating Toner ($15 for 3.4 oz.)

Pixi Glow Tonic
Pixi Glow Tonic ($15 for 3.4 oz.)

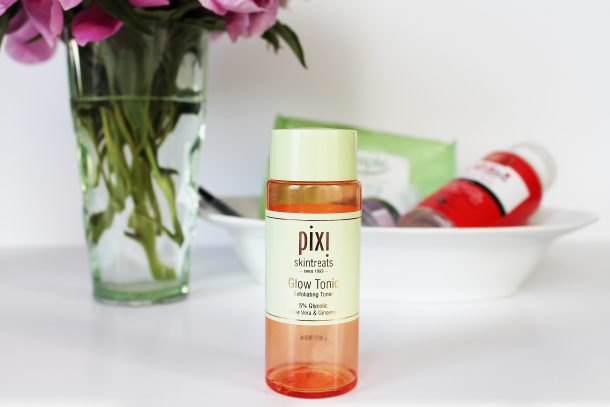
Ugh, I hate how fast I go through these toners! I get the smaller, cheaper 3.4-oz. bottle because I feel like I’m being oh, so thrifty, but I fly through them in about three weeks (I use it twice a day).

I really should get the bigger bottle, huh.

I fell in love with this toner a few months ago and have been religiously using it ever since. I like that it’s exfoliating and helps get rid of some of the bumpy, uneven texture I tend to get on my skin. It really does leave my skin super soft and glowing.

I’ve talked about why I think toners are so important in my Pixi Skincare Routine post, but you really should use one. Really.

Will I repurchase? Yes! As soon as I make it back to Target, which is about an hour away from where I live!

I know. Feel sorry for me. 🙁

3. Yes To Tomatoes Acne Clearing Facial Toner ($9.99 for 8.5 oz.)

Yes To Tomatoes Toner
Yes To Tomatoes Acne Clearing Facial Toner ($9.99 for 8.5 oz.)

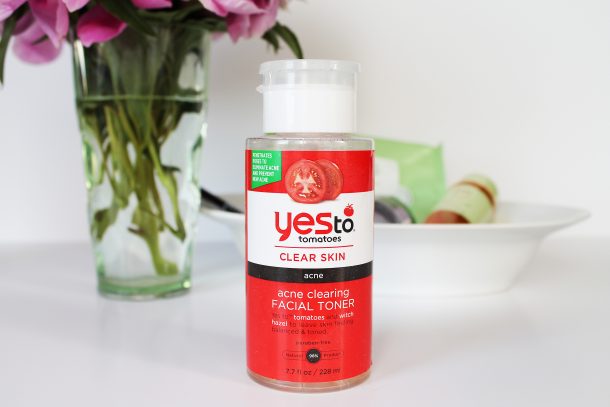
You know how when you use something and you’re trying to decide what you think about it, but you really don’t know? That’s how I feel about Yes To Tomatoes Acne Clearing Facial Toner…

I picked it up when my skin was acting up and used it off and on for about six months until I finished it.

I really don’t know what to say about this one!

Obviously, it didn’t “wow!” me, but I didn’t hate it either. It did the job and got my skin super clean, but I can’t really remember if it helped me with breakouts or not. My guess is that if I don’t remember, it probably didn’t.

I wouldn’t completely write this one off, though, if you’re looking for something with salicylic acid and witch hazel to keep your pores nice and tight. I do really like the ingredients in this.

Will I repurchase it? Probably not…mostly because I wasn’t wow’d by it.

4. Ole Henrikson Nurture Me Moisturizer ($40)

Ole Henrickson Nurture Me
Ole Henrikson Nurture Me ($40)

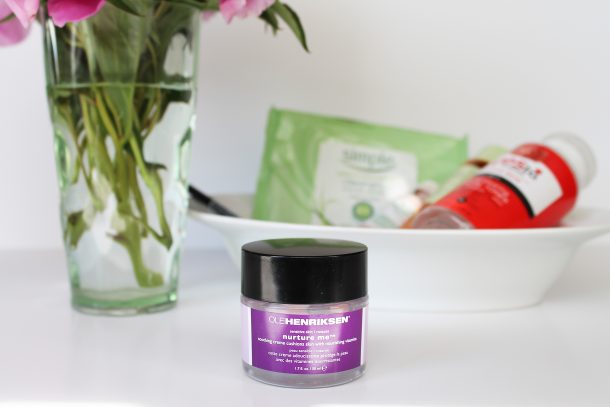
I wish I remember the name of the guy who helped me that fateful day in Sephora when I was encouraged to give this moisturizer a try because he changed my life!

OK, that’s a little much, but I love this moisturizer so much. I went in looking for something, anything, to help calm the redness that I was experiencing on my skin and came out with this.

First off, I have to tell you how good it smells, because if something smells amazing, that makes me love it 100 times more. It legit smells like the most delicious orange Creamcicles… My mouth waters every time I use it.

Of course, the smell isn’t why I use it, though. Not only does it soothe my skin and relieve the redness, but it makes my skin feel so smooth and comfortable. There are no massive, angry breakouts, no redness, no rough texture. My skin is happy!

Will I repurchase? Absolutely! As soon as all the bills are paid and everyone has what they need, I WILL buy my magic orange Creamsicle again.

[Continue reading…]

There are 12 comments on this post. Leave yours.

Categories: Beauty Tips, Guest Post, Makeup Tips/How To, Skin Care

The Perfectly Imperfect Smudged Liner, AKA the Ultimate Bada$$ Look

June 8th, 2016 by Carolina Braina 27 Comments

Smudged Liner Look How To
Messy hair and smudged black liner is what I like to call “The Ultimate Bada$$ Look”, LOL!

If you knew me in real life, you’d know that I smile a lot and, most of the time, have a pretty friendly face.

Like, for instance, I’m one of those people who always get asked for directions in the street. I even got asked for directions in Copenhagen, even though I don’t exactly look like your typical Danish girl, right?

But if you knew me really well, then you’d also know that I’m not always that easy to approach… I mean, if I don’t want to be approached, I know how to make sure no one does it.

Like, at my old job, I was friends (or at least friendly) with most of my colleagues, but there were a couple of fake, toxic people I really couldn’t stand.

Whenever I wanted to be 100% sure they wouldn’t bother me, I’d make my “I’ll-take-no-sh*t” face, and they wouldn’t even dare come near me.

Basically, I’d never take my eyes off the computer screen, and just look like I was very, VERY pissed off. I swear it always worked.

A L W A Y S.

In case the “I’ll-take-no-sh*t” face sounds like something you may want to try, let me suggest the perfect makeup to go with it…

Smudged Liner Look How To

Well, it’s the smudged liner look! Strictly in black.

Listen to me — if you ever need a little help with your “don’t-you-dare-come-near-me” face, put your black kohl to good use, and you’ll instantly feel more bada$$, I promise! 😉

Smudged Liner Look How To
You don’t wanna mess with me! 😉

[Continue reading…]

There are 27 comments on this post. Leave yours.

Categories: Guest Post, Makeup Tips/How To

A Subtle, Less Scary Way to Wear the Ombre Lip Trend

June 2nd, 2016 by Jen Clark 16 Comments

Loving the red ombre lip!

I can’t even tell you how often I’ll be scrolling through Pinterest or Instagram and see all these really cool chicks wearing the coolest makeup trends, then get super bummed because I don’t think I can actually pull them off! But even for makeup trends that are super scary, there’s usually a more wearable way to wear them, although we should all just be brave enough to wear whatever we want, whenevever we want. Of course, that’s easier said than done.

One of those trends I always “pin” but never wear is an ombre lip. I decided to grow a pair and just try it, and it turns out, I love it! And it turned out to be pretty wearable too! I could walk around wearing this and not feel like a crazy person, even though that’s sometimes a liberating feeling. 😉

I love how customizable ombre lips are; you can literally do whatever colors you want, and make them as dramatic as you want. For my lips here I decided to go with red and coral and fairly subtle.

1. Blank out the color of your lips

The first step is to use the leftover product of whatever you used for your foundation to blank out the color of your lips. This will make the lip colors you use more vibrant and longer lasting.

ombre lip tutorial
Using my leftover foundation on my beautyblender to pat over my lips

2. Line your lips, and bring in the color slightly at the inner corners

Next, use a lip liner in the darkest shade that you want to use for your ombre (gradient) effect. I used an ancient Sephora Collection Lip Liner in a deepish raspberry that I didn’t realize wasn’t available anymore (sorry about that!). Line your lips, and bring in the color slightly at the inner corners.

ombre lip tutorial
Line your lips using the darkest shade

[Continue reading…]

There are 16 comments on this post. Leave yours.

Categories: Guest Post, Makeup Tips/How To

A Pink Eyeshadow Makeup Tutorial

May 24th, 2016 by Jen Clark 10 Comments

How I rock pink eyeshadow
Loving the pink eye shadow look!

Not long ago, Anna, Adia and I collaborated on how we rock pink eyeshadow, and many of you wanted to know how I got my look! I loved it too, so I thought I would do a quick tutorial. It’s actually super easy.

If you saw the other post, you’ll know that I mostly used the e.l.f Blush Palette in Light.

Are you ready? Here we go!

To start, blend the lightest pink blush in the palette into and slightly above your crease using a fluffy blending brush.

Bright pink eyeshadow tutorial
Top left shade in the e.l.f Blush Palette
Top left shade in the crease

Next, once you have that blended out really well, using a blending brush that’s a little more dense, place the bottom left shade from the palette all over your lid, and blend it into the crease.

[Continue reading…]

There are 10 comments on this post. Leave yours.

Categories: elf, Eyes, Guest Post, Makeup Tips/How To Keywords: wear pink eyeshadow

A Rockabilly Winged Liner Look: This Eye Look’s Mine, So I Walk the Line

May 6th, 2016 by Jessica Revitte 18 Comments

Rockabilly Winged Liner
I “walk the line” with my go-to Rockabilly Wing!

You know I love makeup (duh), but what you may not know about me is that I’ve always been into the rockabilly/psychobilly music scene.

Everybody luuurves Johnny Cash, but I also adore Empress of Fur, the Nekromantix and Tiger Army. Sadly, 1950s-inspired hairstyles and outfits are challenging to keep up with on the day-to-day, especially as a professional and a mom, so I most often indulge my affinity for this “look” by applying a nice big winged cat eye.

When Nicole and I talked about teaming up to show you our tips, tricks and techniques for all things “cat eye,” I immediately knew what I wanted to feature: my go-to Rockabilly Wing! Long before I started my own blog or possessed more makeup than I could choose from on a daily basis, I always had a good black liner in my collection to rock this look quite literally every day.

My arsenal of “tools” has grown exponentially, but somehow I can’t quit this classic.

Grab your favorite liners, put on your favorite vinyl and get ready! 🙂 I’m going to show you how to Walk the Line.

I keep a close watch on this wing of mine,

I keep my cat eye flicked out all the time, 

I pick a long lasting liner formula to bind,

This eye look’s mine…so I walk the line.

Rockabilly Winged Liner
Tools of the trade: (L-R): Scotch Tape, Clio Waterproof Pen Liner in Kill Black, Kat Von D Tattoo Liner in Trooper, Tarte So Fine Microliner, Too Faced Perfect Eyes Waterproof Liner in Black, Cynthia Rowley Liner in Black an Laura Mercier Black Karat Baked Eyeshadow

[Continue reading…]

There are 18 comments on this post. Leave yours.

Categories: Eyes, Face of the Day (FOTD), Guest Post, Makeup Tips/How To

How I Rock Pink Eyeshadow (A Collaboration With Jen and Adia)

May 6th, 2016 by Anna Oh 17 Comments

fotd-pink-photoshoot

fotd-pink-makeup2
Wearing Ardency Inn Rose Gold Eyeshadow, Becca Rose Gold Pressed Eyeshadow, and MAC Finally Free Lipstick

A friend and I recently had a photography date in a charming neighborhood, snacking on amazing salted caramel “cake” donuts (they are as good as they sound). It was a picture perfect weekend, so I decided to take advantage of the amazing weather to wear pink.

This week Jen, Adia and I are showcasing our favorite way to rock pink eyeshadow, and I call this look “Rose Gold Eyeshadow for a Day of Donuts and Photoshoots.”

Here are a few of my favorite pink-toned pieces…

fotd
FOTD Makeup Menu: Nars Concealer, MAC Mascara, Kat Von D Tattoo Liner, MAC Finally Free Lipstick, and Becca Rose Gold
ardency inn rose gold
Ardency Inn “Rose Gold” — the singles pop out from the magnet!

naked 3 palette
Urban Decay Naked 3. I used this palette to blend

What I used:

  • Nars Radiant Creamy Concealer ($29): I have the shade called Honey, and I’m joining the bandwagon… It’s an awesome concealer. I use it to target my problem areas, and I can skip the foundation step on good days.
  • MAC Charged Black Mineralize Multi-Effect Lash ($22): From the MAC Future Collection, this mascara is lightweight and lengthening. No crazy volume here. but I have been using this for weeks.
  • Kat Von D Tattoo Liner ($19): There are 2 types of people in this world — those who love the Tattoo Liner, and those who prefer the Ink Liner. I always come back to the Tattoo because I love the flexible soft brush pen.
  • MAC x Caitlyn Jenner Finally Free Lipstick ($17): This is with me in my minimal makeup bag, and I can’t recommend this color enough. SO pretty and perfect. I didn’t re-apply after the donuts, though, so it’s not present in the outdoor images.
  • Becca Shimmering Skin Perfector Pressed ($38): As the only Shimmering Skin Perfector I own, this deserves a special place on my vanity. Rose Gold is a highlighting blush or a blush-topper for the lighter skinned girls.
  • Ardency Inn Modster Manuka Honey Enriched Pigments ($21): The star of my look, Rose Gold is the creamiest, most nuanced rose-taupe eyeshadow I’ve seen. A perfect pick for anyone interested in getting into pinks.
  • Urban Decay Naked 3 Palette ($54): I use the darker shades in this palette constantly for many of my looks. They blend perfectly, and I love the matte colors in particular. I used some of the darker shades to quickly shade in my eyebrows too.

[Continue reading…]

There are 17 comments on this post. Leave yours.

Categories: Ardency Inn, Becca, Guest Post, Kat Von D, MAC Makeup, Makeup, Makeup Tips/How To, NARS Keywords: wear pink eyeshadow

How I Rock Pink Eyeshadow (A Collaboration With Adia and Anna)

May 5th, 2016 by Jen Clark 34 Comments

How I rock pink eyeshadow
Loving the pink eye shadow look!

Pink eyeshadow?! This was a first for me, and I have to say, I. AM. OBSESSED! I’ve used lots of rose tones on my eyes before, but never anything bright pink. I decided I was going to use a bright pink just as a transition shade, but then I got carried away experimenting, as I always do. Sometimes it’s so fun to just take your time, and do something fun with your makeup that you wouldn’t normally do, and I’m so happy with how it came out.

I got together with Anna and Adia for this look and we decided on pink. I was like, “Wait…I don’t own a pink eye shadow…but I own lots of blushes!” I use bronzer as eye shadow all the time, so why wouldn’t blush work the same way?

I grabbed my favorite, the Elf Blush Palette in Light and used it for the majority of this look, and I’ve gotta tell you, if you don’t have this palette already, get your booty to Target and buy it. It’s only $6 and has 4 incredibly soft, pigmented, blend-able blushes. The colors are just perfect as blushes, and now, as eye shadows too! It even made a special appearance in my Top 10 Under $10 post over on Jen Leigh Beauty!

How I rock pink eyeshadow
I used the two shades on the left for this look!
Pink eye shadow look
A pink eye shadow look using the e.l.f Blush Palette in Light

I do have one important tip when using bright pink eye shadow that might help before you give it a try, because with pink shadow, if it’s used incorrectly, you can end up looking a little diseased and zombie-like.

When the pink is right up next to the whites of your eyes, your eyes will look sore, so the solution to this is to put something between your eyeballs and the pink. In this case, I put a brown eyeliner on my water line and plenty of mascara. Problem solved!

See how the brown on the water line breaks up the pink?

Here’s what’s on the rest of my face!

[Continue reading…]

There are 34 comments on this post. Leave yours.

Categories: elf, Eyes, Guest Post, Makeup, Makeup Tips/How To Keywords: wear pink eyeshadow

Graduation Day Done Right: Hair, Makeup and Nail Tips for a Long-Lasting, Camera Ready Look to Take You From the Ceremony, to Your Post-Grad Family Fetes, to the Big Festivities at Night #sponsored

May 4th, 2016 by Karen 22 Comments

graduation-day-done-right-1

This post was sponsored by imPRESS Gel Manicures. Designed for every mood, every moment. Check out imPRESSmanicure.com for more colors and designs!

Aren’t graduations the best? They’re one of my favorite milestone events, because not only do they commemorate a major life success, but they also herald the start of a new adventure.

I dunno… I just love that feeling of endless possibilities. It’s like, “the future’s so bright, you gotta wear shades.” (Extra big ups if you actually get that reference.)

If you’re graduating this year, first, congrats, babe! Second, when you get to the end of the ceremony and everybody is throwing their caps up into the air, please throw yours as high as you can! — because I never got to do it at my graduation ceremonies (don’t know why, but it wasn’t allowed). And this way I can live vicariously through you.

Third, we gotta talk pre-grad hair, makeup and nails (of course), because graduation days, in my experience, tend to be looong.

There are the pre-parties (more on these in a sec), then the actual ceremony, then the post-ceremony celebrations, and then, if you’re a champ, the post-post-celebration parties at night.

That all adds up to a long day and a long night, and seeing as how everyone’s a photographer these days (hello, camera phones!), it doesn’t hurt to be camera ready for all of it.

First, let’s start with your makeup. 🙂

Makeup

One word: primer. Before you paint that face, prime that skin.

Two of my go-to primers by Make Up For Ever and NARS

Makeup primers work a little like paint primer…except they’re for your skin and not the walls. They fill in uneven areas so that any products you apply on top of them — like your concealer, your foundation, etc. — look smoother and last longer.

I’ve taken roughly 10 gajillion pictures for le blog (give or take), and I think primer makes a HUGE difference, especially when it comes to face products like foundation and concealer.

Primers also help your makeup apply more evenly, so you don’t get any of those funky patches where your blush or your eyeshadow look darker in some spots than others.

But the main reason I suggest wearing primer on graduation day is longevity. That’s primer’s superhero power — the ability to grab makeup and not let go — so if you’re having a long day, which then goes into a long night, your makeup stays intact longer and doesn’t fade as quickly.

I’d do a face primer, and then also an additional eye primer for your lids. For face primers, I love the Make Up For Ever Step 1 Primers ($37), because a little goes a long way, so I don’t have to use very much (which means that it doesn’t feel like you’re wearing an extra layer of spackle), and they help my makeup last a good 12-14 hours.

I use the Smoothing Primer For Large Pores & Fine Lines on my combination skin, but if you have oily skin, try their Mattifying Primer.

For eye primer, NARS Pro-Prime Smudge-Proof ($26) is the best one out there in my opinion. It will hold onto your eye makeup like Tabs clutches his Chanel purse filled with cat treats! — and it won’t let go until you wash it off.

Here are a few more grad day makeup tips…

[Continue reading…]

There are 22 comments on this post. Leave yours.

Categories: Makeup, Makeup Tips/How To, Nails, Sponsored Post Keywords: imPRESS

  • « Go to Previous Page
  • Go to page 1
  • Interim pages omitted …
  • Go to page 22
  • Go to page 23
  • Go to page 24
  • Go to page 25
  • Go to page 26
  • Interim pages omitted …
  • Go to page 93
  • Go to Next Page »

Primary Sidebar

Welcome to Makeup and Beauty Blog

Welcome to Makeup and Beauty Blog! My name is Karen, and I’m a freelance writer obsessed with makeup.

Makeup and Beauty Blog features daily product reviews, makeup tips and beauty news — like an interactive version of a monthly print magazine, except with occasional pictures of my cat.

Recent Posts

Sundays With Tabs the Cat, Makeup and Beauty Blog Mascot, Vol. 878

Makeup and Beauty Blog Monday Poll, Vol. 894

Makeup and Beauty Blog Monday Poll, Vol. 893

Makeup and Beauty Blog Monday Poll, Vol. 892

Makeup and Beauty Blog Monday Poll, Vol. 891

/* real people should not fill this in and expect good things – do not remove this or risk form bot signups */

Social

  • Facebook
  • Instagram
  • Pinterest
  • Twitter
  • YouTube

Featured Posts

Sundays With Tabs the Cat, Makeup and Beauty Blog Mascot, Vol. 771

Lady Unicorn

Weird Things I Like to Do

brows fill out beforehand

Before You Pluck or Wax Your Brows, You Must Do This

current bare skin status

What’s One Thing That Drastically Changed Your Skin for the Better?

Copyright © 2025 Makeup and Beauty Blog. Get in touch.