• Skip to main content
  • Skip to primary sidebar

Makeup and Beauty Blog | Makeup Reviews, Swatches and How-To MakeupMakeup and Beauty Blog | Makeup Reviews, Swatches and How-To Makeup

A beauty blog blooming with fresh makeup reviews, swatches and beauty tips from your friendly neighborhood beauty addict

  • Home
  • About
    • About
    • Contact
    • FAQ (Frequently Asked Questions)
    • Advertising & Media
  • Categories
    • Product Reviews
    • Makeup
    • Skincare & Fragrance
    • Style & Fashion
    • Hair
    • Nails
    • Tips & Tutorials
    • Just for Fun
  • Brands
  • Store

Makeup Tips/How To

My Manicure Essentials

March 9th, 2016 by Adia Goss 28 Comments

manicure essentials

I love doing my nails. It’s relaxing, and I always feel proud of myself afterward for saving a few dollars (so I can spend it on more makeup, obvs).  

That being said, I usually don’t have a ton of time, so here are my essentials to get the job done as quickly and easily as possible.

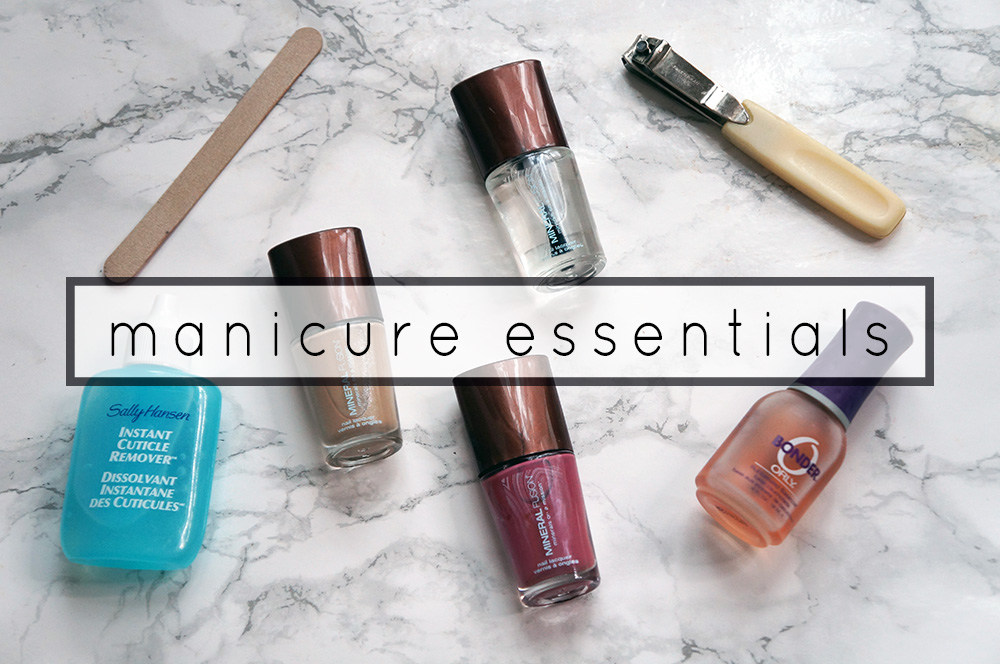
Nail Clippers and File

Pretty obvious choice, but nothing ruins cute polish like ragged nails.  I’ve bought more expensive nail files, but I always go back to these cheap ones that come like a dozen to a box.  I like being able to stash these at work, in my purse and in my gym bag.  I also use the nail file to clean up the polish around the edges of my nails.

Cuticle Remover

I felt like such a pro the day I incorporated Sally Hansen Instant Cuticle Remover into my manicure routine!  I never had the patience to soak my nails in water before pushing back my cuticles, so this product is perfect.  I squeeze it around my cuticles, lightly, push them back with my fingers, and then rinse it off.  It’s easy and really effective.  Sally Hansen Instant Cuticle Remover is available at Target for $5.

Base Coat

I’m always looking for the best base coat, and lately I’ve been reaching for Orly Bonder.  I think it works well with different polishes, and I love that it dries quickly.  

It’s an extra step, but my nails won’t last more than a day without base coat.  Orly Bonder is available at Ulta for $10.

Nail Polish

I’m usually choosing between a neutral and a bold color, but I almost always end up going for the neutral.  I’m really hard on my nails, so I like to pick something that won’t show the chips.  When I sat down to do my nails the other day, I debated between Golden Sand and Cashmere, both by Mineral Fusion.  

I ended up choosing the nude, of course!  Golden Sand is a neutral tan with subtle silver shimmer.  It’s a unique and really pretty shade.  I like how it’s close enough to my skin tone to be subtle but doesn’t look muddy or boring.

mineral fusion polishes
[Continue reading…]

There are 28 comments on this post. Leave yours.

Categories: Beauty Tips, Guest Post, Makeup Tips/How To, Nails

Crazy Colors Made Wearable: A Question of Balance

March 4th, 2016 by Carolina Braina 41 Comments

Wearable Bright Makeup
MAC Lipstick in Heroine ($17) on my lips

If you know me (and chances are you don’t yet, but I do hope we get there!), then you’ll know that I love color, especially when it comes in the form of a TF-engraved bullet — but I’m not one to underestimate the power of purple eyeshadow or teal liner either.

Yet the comments I get the most on my blog are when I wear natural, classic looks. Which got me wondering… How’s that even possible? Can you wear colorful makeup and still look natural?

Well, as a matter of fact, YES, I think you totally can! As with everything in life, it’s a question of balance.

Which simply means that if you play something up, you should play something else down. So, if you’re using bright shades on your eyes or lips, in order to get well-balanced, natural-looking makeup, my main suggestion is to go very minimal with your base and brows. Let me explain this in more detail…

Wearable Bright Makeup
Maybelline Master Drama Chromatics in Magic Magenta (LE) on my eyes

Start with a light base

Even though I often have quite a few blemishes to conceal, I usually like to apply a lightweight foundation (my oily skin loves Chanel Perfection Lumière Velvet, because it’s matte, yet luminous), and then use a full-coverage concealer only on my problem areas, so that the end result is very natural and not mask-like at all.

Contour subtly with powder products

Since cream contour can often look too heavy and harsh, I recommend opting for sculpting powders, which are not as easy to overdo.

Wearable Bright Makeup
Laura Mercier Crème Eye Liner in Canard ($25) on my eyes and BITE Beauty Luminous Crème Lipstick in Palomino (discontinued) on my lips

Skip the highlight

I know highlighters are all the rage these days, but in my opinion the very shimmery/metallic ones can look pretty artificial. If you feel like your complexion looks too dull and flat, try using something more understated like the Hourglass Ambient Lighting Powders or a highlighting blush.

Keep your brows as natural possible

I think this is really crucial to balance out those crazy hues. Very strong, sculpted brows can easily make you look overdone, so my suggestion is to either use a tinted gel to define and set in one single step, or a pencil to very lightly fill them in (for a softer look, try using the side of the tip rather than the point).

Wearable Bright Makeup
Thrash and Urban from the Urban Decay Electric Pressed Pigment Palette ($49) on my eyes and Anastasia Beverly Hills Perfect Brow Pencil in Dark Brown ($23) on my brows

Ditch those falsies and black liner

Although your Instagram or Pinterest feeds are probably suggesting that makeup isn’t complete without falsies and thick black liner, I personally disagree. In my opinion, if you’re going for a colorful, yet fresh-faced look, you can just skip them altogether. OR, if you find that lashings of mascara aren’t enough to define your eyes, I suggest adding a very thin line with a little flick and/or individual lashes.
[Continue reading…]

There are 41 comments on this post. Leave yours.

Categories: Guest Post, Makeup Tips/How To

A Shimmery Green Chanel Spring 2016 Makeup Tutorial

February 19th, 2016 by Karen 16 Comments

There should be a video right up here in this post, but if it isn’t appearing for any reason, you can click here to watch it on YouTube.

Green.

Like the coat of moss the oak tree outside my window is wearing, and the color of the tiny buds springing to life on the tips of its beautiful branches.

Green means spring is coming! 🙂

Aaand green also happens to be the color of baby poo…which is neither here nor there, but you can’t really blame me for mentioning it because, SERIOUSLY, I am so ready for this baby to check out of Hotel Karen already.

Ugh. Still. So. Pregnant.

Yup, greens: they aren’t just for smoothies anymore. Green is good, and I thoroughly support wearing green eyeshadow, especially in the spring.

Green gets top billing in this shimmery, springy makeup look I’m wearing with a bunch of products from the Chanel spring 2016 collection, which is brimming with bright shades of green, teal, purple and pink, but they’re handled in that elegant Chanel way.

I think that if my granny saw me wearing this look, she’d still recognize me, ya know what I mean? I feel like I still look like me, because sometimes, when I’m experimenting with colorful makeup, I look into the mirror and think, “WHOA! Who is that girl?”

To subdue some of the bright green intensity on my eyes, I incorporated a satiny pink, and then also a black liner on my lower water lines to sort of neutralize some of the intensity of the purple and bright blue. Then, to balance, instead of compete, with my eyes, I’m wearing soft peach, pink and tan on my cheeks, and pink lips.

chanel spring 2016 makeup look

chanel griffith green
Chanel Illusion D’Ombre in Griffith Green
chanel might moonlight pink
Chanel Rouge Coco Shine in Mighty (left) and Illusion D’Ombre in Moonlight Pink (right)

chanel sunkiss ribbon blush
Chanel Sunkiss Ribbon Blush

[Continue reading…]

There are 16 comments on this post. Leave yours.

Categories: Chanel, Collections, Makeup, Makeup Tips/How To, Video

For Sensationally Soft, Squeaky Clean Skin, Scrub-a-Dub-Dub and Exfoliate Before You Turn on the Shower

February 17th, 2016 by Karen 22 Comments

exfoliators

Next time you exfoliate your bod in the shower, instead of wetting your skin first before you get down to it, try applying your scrub to your skin while it’s still dry, with the shower turned off. Then, after rubbing your little heart out, turn on the water and rinse.

Sooo, why would anyone do it this way?

LOL! Good question… No, but seriously, I think I get a better, more intense scrub when I scrub while my skin is dry. My skin feels softer and squeakier clean than when I scrub while it’s wet.

The first time I heard about doing it this way was at a spa years ago, but, wouldn’t you know it? After getting home, I promptly forgot.

But I remembered after seeing it mentioned recently in a magazine. I think it was this month’s Allure… There’s an article in there about multitasking and getting the most out of your shower time.

Anywho, I did it last night with three different exfoliating scrubs. I hopped in the shower (with the water off) and used one of the scrubs on my arms, one on my torso and the other one on my legs. Then I stood there for few minutes scrubbing everything south of my neck.

Doop-da-doo…

After I turned on the water and rinsed, my skin felt smooth as a baby’s bottom — smoother, I feel, than it would have had I used the scrubs on wet skin.

And I’m sure I also ended up using less product.

By the way, the three scrubs I tried last night were…

  • Tree Hut Vanilla & Honey Gentle Oatmeal Scrub ($7.99) — This gentle, non-abrasive creamy scrub smells faintly of yummy oatmeal cookies. Mmm… Oatmeal cookies…
  • Soap & Glory Flake Away ($15) — This highly moisturizing, fragrant scrub (the strong scent reminds me of the old Dior Miss Cherie, which I loved) contains shea butter, sugar and pretty big scrubby bits, so it’s a little more intense than the Tree Hut Gentle Oatmeal Scrub. It also leaves behind a slightly oily residue.

    I really like this one. It did the business, and my skin felt soft and great.

  • Clarins Exfoliating Body Scrub for Smooth Skin ($38) — This creamy concoction has medium-sized scrubby bits made from natural bamboo fibers and a very faint, almost imperceptible peach scent.

    It also did a great job. Plus, I didn’t have to use much, and it didn’t leave behind an oily residue.

Have you been using any good scrubs lately? And do you usually use them on wet skin or dry? Inquiring minds want to know…

Your friendly neighborhood beauty addict,

Karen

There are 22 comments on this post. Leave yours.

Categories: Clarins, Makeup Tips/How To, Skin Care, Soap & Glory

For Plumper Brows, Apply a Bit of Foundation and Setting Powder to Them First

February 5th, 2016 by Karen 16 Comments

hello-brows

If you aren’t #blessed with naturally big, bushy brows, first, I feel ya. Second, you need to know about this secret squirrel way to thicken and volumize (is that even a real word??) your eyebrows.

Apply a bit of foundation and setting powder to your brows first, while they’re still bare (just let it run over your brows), before you go in with your brow pencils and brow gels, brow powders, etc.

So I stumbled on this trick by accident. It was one of those “Once upon a time…” things. One day, while I was doing my makeup, I was applying my foundation and setting powder and accidentally got quite a bit up in my brows, but instead of removing it by brushing through my brows with a brow comb or using a Q-tip soaked in makeup remover, I left it be. (I think I was just feeling lazy.)

After that, I went about my normal brow routine but noticed that my brows looked particularly thick, plump and bangin’ later that day.

So, next time you’re going about your merry makeup way, try plopping a little bit of your foundation and setting powder on your brows (just the smallest, almost accidental amount), and then do your brows like you normally would afterward.

I think you’ll notice a difference. 🙂

Your friendly neighborhood (naturally brow-less) beauty addict,

Karen

P.S. TGIF!

There are 16 comments on this post. Leave yours.

Categories: Makeup Tips/How To

Tuesday Quick Tip: For Easier Eyeliner Application, Warm Up Your Liner on the Back of Your Hand

February 2nd, 2016 by Karen 20 Comments

Improv leopard spots or liner trick?
Improv leopard spots or liner trick? You be the judge…

This one’s just a super quick makeup tip, but I wanted to mention it before I forgot.

To make lining your water and lash lines a little easier, and your application smoother, try warming up your liner first on the back of your hand. Just run the tip of the pencil back and forth a few times to get that warm friction going, which slightly softens the product.

I always do this before I apply liner. It’s just a simple thing, but it makes a noticeable difference.

Your friendly neighborhood beauty addict,

Karen

P.S. Aaand since we’re on the subject of liner, do you have any good liner tips? Inquiring minds want to know. 🙂

There are 20 comments on this post. Leave yours.

Categories: Makeup, Makeup Tips/How To

Hold That Curl! Start With a Layer of Waterproof Mascara to Lock In Your Lash Curl

January 27th, 2016 by Karen 19 Comments

k-lashes

If your unruly lashes refuse to hold a curl after you apply mascara, try coaxing them into being more cooperative by starting with a thin layer of waterproof mascara first. Then, follow it up with your regular go-to mascara.

Starting with the waterproof formula should help your lashes hold their curl longer and discourage them from quickly falling out of attention.

This was a recent discovery for me, because something strange happened to my lashes when I got pregnant…

All of a sudden (seriously, it was like it happened overnight), mascara stopped working, and by “stopped working,” I mean none of them — absolutely NONE — would hold a curl. They lost all respect for my lashes and my Shu Uemura lash curler.

I’d curl my lashes and apply a layer of mascara, but less than a minute later, every little lash would be straight as a board again.

Bluh.

So I asked on Facebook for tips, and a wonderful mascara angel suggested this one, LOL! It’s really helped with the curling situation, and it doesn’t seem to matter which waterproof mascara I use, whether high end or drugstore. It just works.

Give it a go sometime if you ever find yourself “lash curl challenged.” 🙂

Your friendly neighborhood beauty addict,

Karen

There are 19 comments on this post. Leave yours.

Categories: Eyes, Makeup Tips/How To

Make Up For Ever Ultra HD Invisible Cover Concealer Demo and Application

January 14th, 2016 by Karen 9 Comments

There should be a video right up here in this post, but if it isn’t appearing for any reason, you can click here to watch it on YouTube.

How good is new Make Up For Ever Ultra HD Invisible Cover Concealer?

To put it in heavily hyphenated terms, it’s get-out-of-your-pajamas,-put-on-your bra-again-(right-after-you’ve-taken-it-off-for-the-evening),-and-drive-straight-to-Sephora-immediately good.

Yup, that good!

If you haven’t seen the swatches yet or read the review, here you go.

And here it is in all its magical action (in the video), along with a few more observations and a mini-review. 🙂

Make Up For Ever Ultra HD Invisible Cover Concealer: the basic scoop

  • Available now online and at Make Up For Ever counters, stores and Sephora in 10 shades; $27 for a 0.23-oz. tube.
  • The 10 shades are divided into two complementary groups — the color-correcting shades, which include R20 Porcelain, R22 Pink Beige, R30 Beige, R32 Peach Beige and R40 Apricot Beige; and the concealing shades, which include Y21 Pearl, Y23 Ivory, Y31 Sand, Y33 Vanilla and Y41 Honey.
  • The setting powder I mention in the video is MAC Mineralize Natural in Medium ($32)

As always, thank you for watching!

Your friendly neighborhood beauty addict,

Karen

There are 9 comments on this post. Leave yours.

Categories: Eyes, Make Up For Ever, Makeup, Makeup Tips/How To, Video

  • « Go to Previous Page
  • Go to page 1
  • Interim pages omitted …
  • Go to page 25
  • Go to page 26
  • Go to page 27
  • Go to page 28
  • Go to page 29
  • Interim pages omitted …
  • Go to page 93
  • Go to Next Page »

Primary Sidebar

Welcome to Makeup and Beauty Blog

Welcome to Makeup and Beauty Blog! My name is Karen, and I’m a freelance writer obsessed with makeup.

Makeup and Beauty Blog features daily product reviews, makeup tips and beauty news — like an interactive version of a monthly print magazine, except with occasional pictures of my cat.

Recent Posts

Sundays With Tabs the Cat, Makeup and Beauty Blog Mascot, Vol. 878

Makeup and Beauty Blog Monday Poll, Vol. 894

Makeup and Beauty Blog Monday Poll, Vol. 893

Makeup and Beauty Blog Monday Poll, Vol. 892

Makeup and Beauty Blog Monday Poll, Vol. 891

/* real people should not fill this in and expect good things – do not remove this or risk form bot signups */

Social

  • Facebook
  • Instagram
  • Pinterest
  • Twitter
  • YouTube

Featured Posts

Sundays With Tabs the Cat, Makeup and Beauty Blog Mascot, Vol. 771

Lady Unicorn

Weird Things I Like to Do

brows fill out beforehand

Before You Pluck or Wax Your Brows, You Must Do This

current bare skin status

What’s One Thing That Drastically Changed Your Skin for the Better?

Copyright © 2025 Makeup and Beauty Blog. Get in touch.