• Skip to main content
  • Skip to primary sidebar

Makeup and Beauty Blog | Makeup Reviews, Swatches and How-To MakeupMakeup and Beauty Blog | Makeup Reviews, Swatches and How-To Makeup

A beauty blog blooming with fresh makeup reviews, swatches and beauty tips from your friendly neighborhood beauty addict

  • Home
  • About
    • About
    • Contact
    • FAQ (Frequently Asked Questions)
    • Advertising & Media
  • Categories
    • Product Reviews
    • Makeup
    • Skincare & Fragrance
    • Style & Fashion
    • Hair
    • Nails
    • Tips & Tutorials
    • Just for Fun
  • Brands
  • Store

Makeup Tips/How To

How to Take a Good Selfie

July 16th, 2013 by Karen 29 Comments

How to Take a Good Selfie: Tips and Tricks!
How to Take a Good Selfie

Maybe I’m an everyday voyeur, because I sure do enjoy seeing pics of people go about their business on Instagram (here’s me).

It’s interesting! Even the boring stuff, because it’s happening all over the world. Breakfast in Hong Kong, lunch in Toronto, drinks in New York. Every day I get to visit with people’s pets, accompany them on vacation, and indulge in cheat meals (without the calories, whee!). 🙂

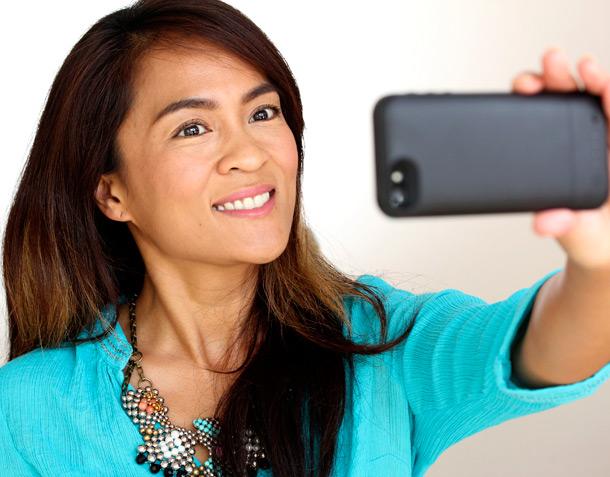
I also get a kick out of seeing so many self-portraits, or selfies. Makes me feel like I’m right then and there.

As someone who’s taken her share of blurry selfies, I can tell you that a sharp, cool self-portrait isn’t always as easy as point and click, especially in bad lighting. You’d think it would be pretty simple, right? Just smile, point and click.

In a moving car with a camera phone? Uh, not exactly.

But we have tips! Here are some things you can do to take a fantastic selfie.

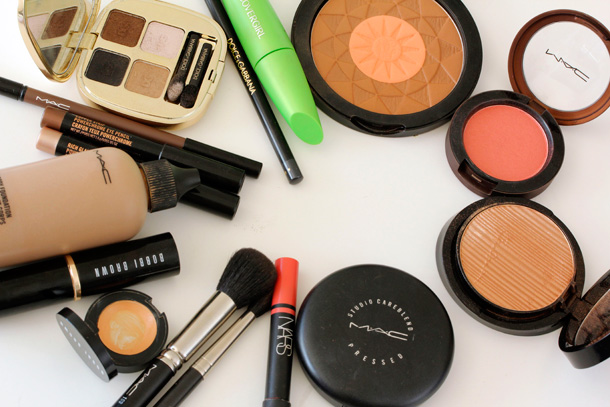
Double-check your hair and makeup

How to take a good selfie

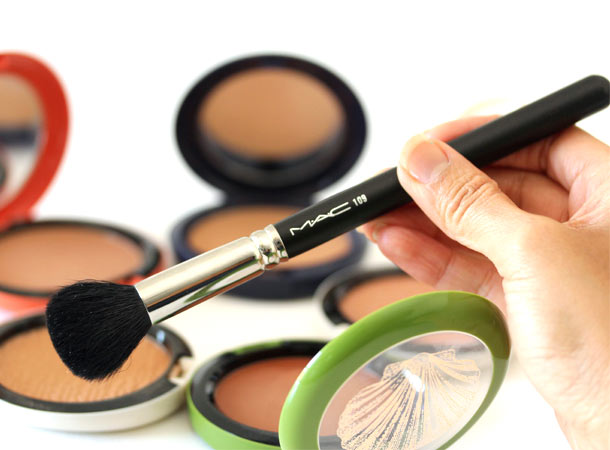
Before you actually take your selfie, hold your camera right out in front of your face, straight on, and snap a quick test shot of your hair and makeup.

I do this all the time, not just for selfies, but whenever I finish my makeup. Even better than a mirror, seeing a picture helps me tell if my brows, liner, blush and eyeshadow are even. A test shot can help you target areas that need fixing.

While you’re at it, glance at your clothes to make sure your bra straps aren’t peeking out or your collar’s wonky.

Choose a clear background

How to take a good selfie

I remember reading an Us Weekly article at the salon a while back (my guilty pleasure!) about Tori Spelling’s husband posting a pic on Twitter with Tori’s naked breast in the background.

Not that you’re going to have boobs hanging out behind you in your selfie, but there’s a lesson here. Always check your background before you post pics.

Look for solid colors, like walls, to stand in front of, and de-clutter. Move laundry baskets and messy piles of books — anything you don’t want the world to see. For serious! I can’t tell you how many cute selfies I’ve seen with bras hanging in the background.

I try to find a nearby wall or textured curtains. Generally, the less cluttered your background, the better.
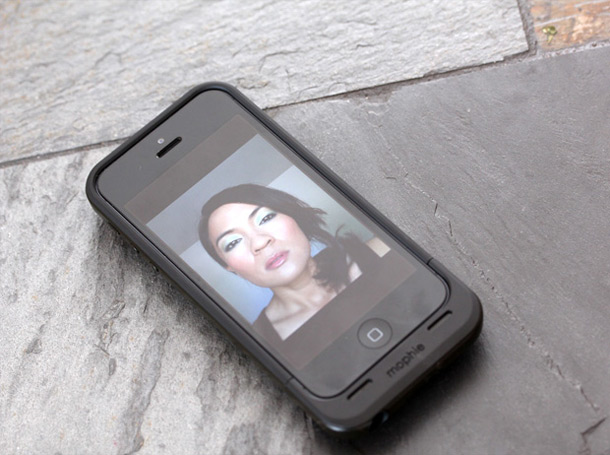
Don’t move a muscle

How to take a good selfie

Do your iPhone pics always look blurry? It’s usually caused by camera shake, which happens when you tap the shutter button while the phone is moving. Even the slightest shake or wiggle can produce a blurry pic, especially in dim light.

Hold your phone as steady as possible. Here’s a trick I borrowed from sharp shooters…

Right before I press the shutter, I take a breathe, exhale and hold for a couple seconds. Very still. Then I tap the button.

Find your light

How to take a good selfie
[Continue reading…]

There are 29 comments on this post. Leave yours.

Categories: Beauty Tips, Makeup Tips/How To

Crank Up Colors Along Your Lash Lines With This Easy Eye Makeup Trick

May 24th, 2013 by Karen 7 Comments

How to get super bright lash lines
Super bright lash lines are just a swipe away

Something about a super bright swoosh of color along my lower lash lines just says “summer” to me.

Have you ever lined your lower (or upper, for that matter) lash lines with a bright eyeliner or shadow and have it not turn out as bright or eye-catching as you expected it to be?

Um…me too.

One trick I use to wind up the wattage along my lash lines is to line them with a creamy white eye shadow stick first.

It intensifies colors and brings out more of the brightness of whatever you layer on top, making greens look greener, blues look bluer and teals…well, more teal. And it does the same thing for other colors.

Rimmel’s Whitness White Scandal Eyes Eyeshadow Stick kicks arse with this trick, and it costs less than $5! It’s so pigmented that it’s almost opaque, and once it sets, it’s not going anywhere (has a waterproof and smudge-proof formula).

Plus, it doesn’t tug at my skin. It glides… (And have I mentioned that it’s less than $5?) 🙂

Your friendly neighborhood beauty addict,

Karen

There are 7 comments on this post. Leave yours.

Categories: Drugstore Beauty Finds, Eyes, Makeup Tips/How To, Rimmel

Brighten Up: 3 Bold Summer Makeup Looks, Step-By-Step

May 24th, 2013 by Karen 63 Comments

Brighten your lids, your look and your summer days with these three bold summer makeup looks


This summer inspiration is brought to you by Target. Find more fun and surprises all season long on Target’s #SummerUp Pinterest board.

“No fear!”

I think we should make that our summer makeup motto… After all, it’s only makeup, right? Nothing to be afraid of (we can always wash it off).

And summer is a perfect time to shine. The longer days, the warmer nights, flip-flops and loose-fitting clothing.

Why be daunted by daring, dynamic duos and multidimensional eye looks? In the spirit of adventure! — let’s kick off the season and face our fears right now. 🙂

Flashes of teal, shimmery oceans of blues, gleaming golds and juicy pinks and corals crank up the heat and fun-factor in these three bright, bold makeup looks.

Everything I’m wearing on my eyes, cheeks and lips in these looks comes from Target, so it didn’t cost an arm and a leg.

Your beauty assignment today: nothing! And you will not be graded.

We only have one goal here: no fear! Just have fun.

Purple, Teal and Fuchsia

A look featuring purple lids, with shimmering teal on your lower lash lines, bronze cheeks and hot pink lips. This one’s for fearless felines unafraid of color. In other words, you.

  1. Begin by applying a shimmery beige cream shadow, like Maybelline Color Tattoo 24HR Metal in Barely Branded ($6), all over your lids and along your lower lash lines.
  2. Next, sweep a matte brown eye shadow in a shade close to your natural skin tone into your crease. I ended up mixing two shades from the Sonia Kashuk Eye on Neutral Palette ($20) to create a custom color (just for the heck of it).
  3. Then, sweep a shimmery coral shadow just above your matte brown. If you’re stuck for ideas, try Pacifica’s Coral Sand from the company’s new Enlighten Eye Brightening Shadow Palette ($12). I’m lovin’ it so far.
  4. Pat a dark black matte shadow, like the black matte from Sonia Kashuk’s Eye on Neutral Palette, into the outer corners of your eyes, and then blend away any harsh lines you see.
  5. Blend a gray matte shadow directly on top of that to create a soft gradient of color by dragging the gray into the middle of your lids. I used Sonia Kashuk’s Eye on Neutral Palette again here. 🙂
  6. Now, wet a flat eye shadow brush with water or a makeup setting spray, and use it to pat a bright purple shadow in the center and at the inside of your lids (the side closer to your nose). Aim for blending the purple into the black and gray gradient from the previous two steps. I used Urchin, the purple shade from the Pacifica Enlighten Palette in step 3.
  7. Next, line your upper lash lines with a black gel liner, like L’Oreal’s Infallible Gel Lacquer Liner in Blackest Black ($7).
  8. Then line your lower water lines with a vibrant teal blue pencil, like Pixi No. 6 True Teal Endless Silky Eye Pen ($15).
  9. To intensify the effect, sweep a bright teal shadow along your lower lash lines. I like L’Oreal’s 24HR Infallible Eye Shadow in Endless Sea ($7) for this…
  10. Lift your brows a bit by drawing a line beneath them using a flesh-toned matte liner like Rimmel’s Scandal Eyes Waterproof Kohl Kajal in 005 Nude ($5), and blend.
  11. Buff a beige shadow just beneath the arch of each brow to appear to lift them even more. I chose Skinnydip, a shimmery beige from the Pacifica Enlighten Shadow Palette.
  12. Finish your eyes with a couple coats of black mascara. I’m using COVERGIRL LashBlast Clump Crusher Mascara ($7) here.
  13. Now for your cheeks and lips! Blend a shimmery bronze blush, like Bronzed from Pacifica’s Radiant Shimmer Coconut Multiples Palette ($12), on the apples of your cheeks, and tie a ribbon around the entire look with a bright fuchsia gloss like Physicians’ Formula Sexy Booster Sexy Glow Glossy Stain in Hot Pink ($9).
Cat lady says “meow!” to these white cat eye sunglasses, which are only $12 at Target

Blue, Teal and Pink

Mermaid eyes! A blue and teal gradient will dance across your lids like dolphins dancing across a beautiful blue lagoon, while coral and pink serenade your cheeks and lips.

  1. Begin by blending a shimmery peachy pink cream shadow like Pixi Lid Last Shadow Pen in Shell Sheen ($18) all over your lids.
  2. Next, darken the outer corners of your lids with a matte black shadow pencil. I used Rimmel’s Scandal Eyes Eye Shadow Stick in Blackmail ($5) here.
  3. Deepen your outer corners by patting a black eye shadow, like the black shade from Maybelline’s Eye Studio Palette in Sapphire Siren, directly on top of the black shadow pencil.
  4. Pat a shimmery blue in the center of your lids and at the inner corners, and then drag a small amount of it into your crease to connect the two areas.
  5. Then, creating a gradient with the blue from step 4, pat a shimmery bright teal in the center of your lids. I used a teal from Maybelline’s Sapphire Siren Palette.
  6. Soften the edges of the blue and teal on your lids by sweeping a matte brown shadow, like the lid shade from the ELF Beautiful Browns Flawless Eyeshadow quad ($2), into your crease.
  7. Now, give your brows a lift by lining the arches with a flesh-toned matte liner like Rimmel Scandal Eyes Waterproof Kohl Kajal in 005 Nude ($5), and blend.
  8. Dust a beige on top of that, like the pearly base shade from ELF Beautiful Browns.
  9. Line your water lines with a black liner (can’t go wrong with L’Oreal’s $7 Voluminous Smoldering Eyeliner in Black, a true black without any blue or green undertones), and give it some depth by lining the outer third of your lower lash lines with the same pencil.
  10. Line your lower lash lines with the same shimmery blue shadow you used on your lids (layering it directly on top of the black liner from the previous step).
  11. Make your eyes the focal point of the look by lining the inner corners along your lower lash lines with the teal shadow you used a moment ago on your lids.
  12. Coat your upper and lower lashes with a good black mascara like COVERGIRL LashBlast Clump Crusher Mascara ($7).
  13. Now, get cheeky by blending a bronzer just below your cheekbones for definition, and then buff a coral blush on the apples of each cheek for color. I used Sonia Kashuk’s Chic Luminosity Bronzer/Blush Duo in Glisten ($13).
  14. At this stage, I was going to say, “Don’t gloss over your lips,” but that’s exactly what we want. Slick a pink gloss like Sonia Kashuk’s Ultra Luxe Lip Gloss Prettiest Pink ($9) on your lips to wrap things up. 🙂
Mint green glasses! These are the Gelato Sunglasses in Mint ($12), available now at Target stores and target.com


[Continue reading…]

There are 63 comments on this post. Leave yours.

Categories: Drugstore Beauty Finds, Makeup Tips/How To, Sponsored Post

10 Things You May Find Yourself Doing After Trying the MAC 109 Small Contour Brush for the Very First Time

May 23rd, 2013 by Karen 17 Comments

MAC 109 Small Contour Brush
Behold! The mighty MAC 109 Small Contour Brush! ($35; lens flare not included)
  1. Standing in the spotlight on a massive stage in front of thousands of adoring fans, with your cheekbones contoured like WHOA! — as confetti, balloons and glitter rain down upon your glorious form
  2. Wondering how you ever lived without it
  3. Marveling at how perfectly the diminutive, rounded brush head fits into pans of MAC Eye Shadow singles and the hollows of your cheeks
  4. Contemplating how strange it is for you to want different 109s for bronzer, blush, another one for powders, highlighters, two more for foundations (one for liquids and another for creams, both of which it easily applies) and another one strictly for buffing…
  5. Considering time travel, specifically going back in time 10 years to gift yourself with a 109 and a pan of MAC Refined Golden, and while you’re there, reassuring yourself that you’re doing just fine, so keep up the good work
  6. Singing Debbie Gibson’s Only in My Dreams at the top of your lungs in the shower (using a bottle of shampoo as your microphone, of course) and yelling, “That was for you, 109!!” at the end of the song
  7. Blurting out, “Whoa there, cowgirl!” to no one in particular after you get a look at how many bristles it leaves on your face, because it sheds A LOT — more than any other MAC brush you’ve ever tried
  8. Questioning your sanity after spending $35 on a makeup brush, good or not, that sheds as much as the 109…
  9. Sighing with relief after washing and drying it for the first time, which dramatically cuts down on the future shedding
  10. Gushing to all your girlfriends and makeup-lovin’ guy friends about how great the 109 is, but also warning them about the shedding and suggesting that they give it a good washing beforehand

MAC 109 Small Contour Brush with 116 129
From the left for size: 109 Small Contour Brush, 116 Blush Brush and 129 Powder/Blush Brush

MAC 109 Small Contour Brush with shadow
The brush head perfectly fits into pans of MAC Eye Shadow singles as if it were designed for ’em

MAC 109 Small Contour Brush in hand

PRICE: $35
AVAILABILITY: A permanent collection product available now at MAC counters, stores and also online
MAKEUP AND BEAUTY BLOG RATING: B+ (an A if it didn’t shed so much at first)

Pretty stoked about…

This purple cauliflower. 🙂

Stopped by the farmers’ market yesterday and picked it up on a whim.

Have you ever tasted one of these before? I haven’t, but I’m going to steam it and toss it in some lemon vinaigrette and capers tonight.

It’s supposed to be sweeter than regular cauliflower… We shall see!

Your friendly neighborhood beauty addict,

Karen

There are 17 comments on this post. Leave yours.

Categories: MAC Makeup, Makeup Tips/How To, Makeup Tools, Product Reviews

A Two-Brush Makeup Tutorial: An Easy Look With Golden Brown Eyes, Peach Cheeks and Coral Lips to Wear to Brunch, a Hot Date or the Office

May 14th, 2013 by Karen 25 Comments

Two Brush Makeup Tutorial
T-minus two brushes to dazzling!

Guess who didn’t realize that she left all of her makeup brushes at home until she was two hours into a three-hour drive to Redding from the Bay Area last weekend?

Go on, guess. Her name starts with “K.”

“Kar…”

Here’s a hint: she was supposed to be going to a fancy schmancy Mother’s Day brunch with her hub’s family.

“Kare…”

Yup! Yours truly. So when we got into town I had El Hub take me to the nearest MAC counter to pick up some emergency supplies, namely a Veluxe Brow Liner in Deep Dark Brunette, a 224 Tapered Brush and a 109 Small Contour Brush.

Seeing as how I usually use at least half a dozen different brushes for most of my real-deal makeup looks, it was actually kind of fun seeing what I could do with just one eye brush and a face brush.

Didn’t turn out half bad! — so I thought I’d write it down. 🙂

A two-brush makeup tutorial for a Mother’s Day brunch-tested look with gold, brown and coral.

If you’re blazing through your makeup without a minute to spare and have to apply multiple products with the same brush…

  • Begin by applying the lightest products first
  • Quickly clean the brush head a bit between products, swiping it back and forth across a dry paper towel
  • Try to stick to products with similar formulas — powders with powders and creams with creams

You most definitely do not have to use these same brushes or products for something like this. If you don’t have anything here, swap it out for a product from your stash.

Two Brush Makeup Tutorial products
Products used in this look, clockwise from the pan in the lower left: Bobbi Brown Corrector in Peach (under-eye concealer), Bobbi Brown Stick Foundation in Honey, MAC Face & Body Foundation in C5, MAC Powerchrome Eye Pencil in Rich Glance (gold eye shadow stick), MAC Powerchrome Eye Pencil in Copper Strip (copper eye shadow stick), MAC Veluxe Brow Liner in Deep Dark Brunette, Dolce & Gabbana Smoky Eyeshadow Quad (gold and brown powder eye shadows), Dolce & Gabbana Instense Khol Eye Crayon in Graphite (liner), COVERGIRL Clump Crusher Mascara (black mascara), Guerlain Terra Nerolia Bronzer (matte bronzer), MAC Ripe For Love Blush (peach blush), Giorgio Armani Summer Collect Face & Eye Palette (highlighter), MAC Studio Careblends Pressed Powder in Medium Dark (face powder), MAC 224 Tapered Blending Brush (tapered eye brush) and MAC 109 Small Contour Brush (face brush)

Two Brush Makeup Tutorial

  1. Apply your foundation and concealer with your fingers
  2. Apply a base all over your lids with your shimmery copper eye shadow stick
  3. Blend! — with a finger
  4. Highlight the inner corners of your eyes with your shimmery light golden eye shadow stick
  5. Fill in your brows
  6. Load a tapered blending brush with face powder to set your under-eye concealer
  7. Sweep your shimmery golden powder eye shadow all over your lids with the same brush
  8. Blend your shimmery dark brown powder eye shadow into the outer corners of your eyes with the same brush
  9. Line your upper and lower water lines
  10. Coat your upper and lower lashes with mascara
  11. Cut down on the shine by loading your face brush with face powder and applying that to your forehead, nose and chin
  12. Sweep a matte bronzer below your cheekbones and around the edge of your face and jawline with the same brush for contouring
  13. With the same brush, apply a peach blush to the apples of your cheeks
  14. Still with the same brush, dust a peachy bronze highlighter on your upper cheeks
  15. Add a coral lipstick…
  16. Now give yourself a hand because you’re done! 🙂

[Continue reading…]

There are 25 comments on this post. Leave yours.

Categories: Makeup Tips/How To

5 Tips to Step Up Your Eye Makeup Game: New on Gloss Daily

April 24th, 2013 by Karen 5 Comments

Gloss Daily Secrets of the Eye Makeup Mavens: 5 Tips to Step Up Your Eye Makeup Game

I have a new post up over at the Ladies’ Home Journal beauty blog, Gloss Daily.

5 Tips to Step Up Your Eye Makeup Game

If you have a second, pop on by, and if you like it, please Tweet, Like and/or leave a comment. 🙂

Your friendly neighborhood beauty addict,

Karen

There are 5 comments on this post. Leave yours.

Categories: Makeup Tips/How To

Here’s a Tip to Save Blending and Buffing Time With Your Twist-Up Cream Shadow Sticks

April 1st, 2013 by Karen 21 Comments

A quick eye makeup tip to try with cream eye shadow sticks

Years from now when we look back and pour over the beauty history books, I think spring 2013 could be remembered as the Era of the Cream Shadow Stick.

Seems like every time I pirouette or sashay around a corner in my teal Franco Sarto platform sandals, I trip over a display gleaming with twist-up shadows…

They’re everywhere!

The idea isn’t necessarily new, but with so many lines putting their own twist on it this season, there’s a good chance you’ve already been tempted by a stick or two.

Laura Mercier Caviar Stick Eye Colour closeup
Laura Mercier’s Caviar Stick Eye Colours in Seashell, Grey Pearl and Sand Glow

Jouer Crème Eyeshadow Crayons
Jouer’s Crème Eyeshadow Crayons


Bobbi Brown’s Long-Wear Cream Shadow Sticks

Neutrogena Crease Proof Eye Shadow
Neutrogena’s Crease Proof Eye Shadows
[Continue reading…]

There are 21 comments on this post. Leave yours.

Categories: Eyes, Makeup, Makeup Tips/How To

Take Your Look to the Next Level With 5 Makeup Tips From Bobbi Brown Manager of North American Artistry Marc Reagan

March 29th, 2013 by Karen 25 Comments

“As you can see, Karen’s not wearing any makeup at all…”

There I sat, feeling totally and completely naked and blinking wildly under the bright studio lights, as a layer of perspiration glistened on my forehead.

I’ve attended one-day makeup classes — sometimes called master classes — like this one before. Brand-sponsored classes usually held in large department stores. I really enjoyed the ones put on by MAC and Chanel, and yesterday’s, led by Bobbi Brown Manager of North American Artistry Marc Reagan, at the Saks Fifth Avenue in San Francisco, was just as interesting and fun.

It followed a similar set up. There’s a fee to attend, in this case $100 (my attendance fee was covered by the company), which is then redeemable toward the purchase of products at the end of the class.

Marc, a seasoned pro on Bobbi’s elite Beauty Team, has worked his magic on celebs and backstage at Fashion Weeks all over the world. At yesterday’s class, he demonstrated a bunch of different techniques and products on a model and answered questions while the attendees followed along, applying the techniques and trying the looks on themselves.

This time was a little different for me, though, um, because I was the model.

When I was asked, first thing I thought was, “FUN!” Second thing I thought was, “Oh, gawd! He’s going to have to take off all my makeup first! Holy sh*t!”

I’m the type of gal who applies concealer and gloss just to go get the mail outside, so I was a little nervous at first to be up there in front of the class without my “armor.”

But once I got used to it (as much as that’s possible), it was actually kind of liberating…akin to wearing a crazy cool shirt or something and just not giving a hoot.

The two-hour class was jam packed with tips. Marc did a two-phase makeup look on me, first walking the class through a natural, everyday look with the basics before cranking up the drama with more color, and between turning my head left and right at Marc’s direction, I typed a few notes on my phone.

1. Ramp up the wear time of your favorite Bobbi Brown foundations by layering them with one of Bobbi’s facial moisturizers

Ever notice that Bobbi’s line doesn’t include a face primer? It turns out, that’s because all of the brand’s facial moisturizers contain a primer in the formula.

So smart, right? Layering one of Bobbi’s facial moisturizers under your fave foundation not only helps to hydrate and protect your skin, but it also extends the wear time of the products you apply next.

bobbis skincare luxuries
A few of Bobbi Brown’s moisturizers from her Skin Care Luxuries travel exclusive kit

2. Keep two brushes on standby to apply under-eye concealer

When applying under-eye concealer, Marc recommends first applying with a flat brush before using your ring finger to pat and blend in the edges. The flat brush places the concealer where you want it on your skin, as opposed to just pushing it around.

Then, to set your concealer and ensure that it lasts through the day, fully load a tapered fluffy brush with plenty of powder (don’t be shy!), and gently pat that on top.

3. Bring a Bobbi Brown Foundation Stick with you in your makeup bag

Does Marc have a go-to Bobbi Brown product? As a matter of fact, he does! Bobbi Brown’s Foundation Sticks, and he says, “every woman needs one in her makeup bag.”

With the sticks, which Marc says always look natural and never heavy or cakey, you can build them up for heavier coverage, or sheer them out wherever you need less. You can also wear them alone or set them with a powder, and if you want to touch-up during the day, the Foundation Sticks even layer well atop powder.

Bobbi Brown’s Foundation Stick in Honey (for reference, I wear MAC NC42)

[Continue reading…]

There are 25 comments on this post. Leave yours.

Categories: Beauty Tips, Bobbi Brown, Eyes, Face, Makeup, Makeup Tips/How To

  • « Go to Previous Page
  • Go to page 1
  • Interim pages omitted …
  • Go to page 48
  • Go to page 49
  • Go to page 50
  • Go to page 51
  • Go to page 52
  • Interim pages omitted …
  • Go to page 93
  • Go to Next Page »

Primary Sidebar

Welcome to Makeup and Beauty Blog

Welcome to Makeup and Beauty Blog! My name is Karen, and I’m a freelance writer obsessed with makeup.

Makeup and Beauty Blog features daily product reviews, makeup tips and beauty news — like an interactive version of a monthly print magazine, except with occasional pictures of my cat.

Recent Posts

Sundays With Tabs the Cat, Makeup and Beauty Blog Mascot, Vol. 878

Makeup and Beauty Blog Monday Poll, Vol. 894

Makeup and Beauty Blog Monday Poll, Vol. 893

Makeup and Beauty Blog Monday Poll, Vol. 892

Makeup and Beauty Blog Monday Poll, Vol. 891

/* real people should not fill this in and expect good things – do not remove this or risk form bot signups */

Social

  • Facebook
  • Instagram
  • Pinterest
  • Twitter
  • YouTube

Featured Posts

Sundays With Tabs the Cat, Makeup and Beauty Blog Mascot, Vol. 771

Lady Unicorn

Weird Things I Like to Do

brows fill out beforehand

Before You Pluck or Wax Your Brows, You Must Do This

current bare skin status

What’s One Thing That Drastically Changed Your Skin for the Better?

Copyright © 2025 Makeup and Beauty Blog. Get in touch.