Whether to use a brush or a puff to apply powder depends on the kind of coverage you’d like (click here to see the video).
Your friendly neighborhood beauty addict,
Karen
Makeup and Beauty Blog | Makeup Reviews, Swatches and How-To Makeup![]()
A beauty blog blooming with fresh makeup reviews, swatches and beauty tips from your friendly neighborhood beauty addict
Whether to use a brush or a puff to apply powder depends on the kind of coverage you’d like (click here to see the video).
Your friendly neighborhood beauty addict,
Karen

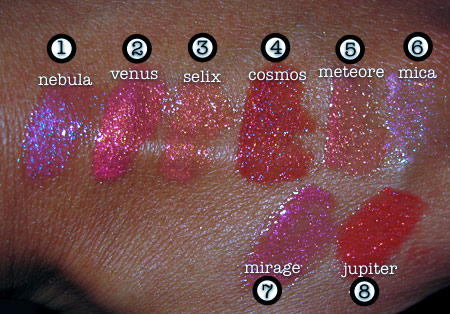
Can I ask you to recommend some lip glosses which have good color payoff? My natural lips are kinda plummy-pink…
Cheers,
Kewal
Hiya Kewal,
I love lip gloss more than Spencer Pratt loves his creepy, fleshy beard!
Here are some of my favorite pigmented lip glosses, in no particular order.
Do you have any other pigmented lip gloss suggestions for Kewal?
Your friendly neighborhood beauty addict,
Karen
When should you use loose powder, and when should you use pressed (click here to see the video)?
Your friendly neighborhood beauty addict,
Karen

What makes the MAC High-Light Powders so special?
If you’re looking for a flexible powder that can be worn on a wide range of skin tones, the new MAC High-Light Powders ($25) got yo back.
According to MAC Senior Artist Fatima Thomas, “Every skin tone, from your fairest porcelain girl to your ebony girl, can use one of these powders if not both.”

Embossed with a raised honey comb pattern (soo pretty!), these limited edition pressed powders will add a dreamy touch of pearly glow to your skin.
Both new shades — Honey Light (a light peachy gold with shimmer) and Golden Nectar (a muted, golden tan with shimmer) — go on sale next month as part of MAC’s Naked Honey collection (don’t miss Christine’s breakdown of the collection over at Temptalia.com).

At first I thought both of the powders were just straight up highlighters, but it turns out they’re more than meets the eye!
Fatima has some suggestions on ways to put them to use…
A lot of bronzers have orange undertones that can look muddy on super pale skin.
“If you’ve ever seen somebody that’s really fair using an orangey bronzer,” says Fatima, “you know what a hot mess that can turn out to be.”
Fatima thinks pale beauties should try using the MAC Naked Honey High-Light Powders as bronzers to add dimension to their skin and to sculpt the face.
Unlike other bronzers, both the Honey Light and Golden Nectar colors have olive undertones, which look natural on even the lightest shades of skin.
Brush recommendation: MAC 168
When applying the MAC Naked Honey High-Light Powders as a bronzer, Fatima likes the MAC 168 Large Angled Contour Brush ($32). With soft bristles and a slightly angled brush head, it effortlessly hugs the contours of the cheeks.
Application tips
Dust the High-Light Powder along the hair line, back behind the ears and then along the lower jaw line. To finish, sculpt the cheek bones by first placing the brush next to the ear and then sweeping it along the curve beneath the apple of the cheek.
For girls with darker skin tones, Fatima likes using MAC High-Light Powder as a highlighter to brighten the skin, enhance bone structure and to create a sculpted look.
Brush recommendation: MAC 224 or 225
She recommends either the MAC 224 Tapered Blending Brush ($28) or the MAC 225 Tapered Blending Brush ($36). Both have soft fibers and fluffy brush heads, making them great for the precise application of sheer layers of color.
Application tips
Try applying High-Light Powder on the skin where light would naturally bounce/reflect off the face.
One last note on brushes: When it comes to applying the High-Light Powders, less is more.
“Most people I find are heavy handed when they’re doing their own makeup,” says Fatima. “They tend to pick up way too much product, and then they over-apply and don’t blend.”
Fatima suggests applying these powders with very soft, fluffy brush heads like the MAC 168, 224 and 225, which deposit very little color, helping you avoid the over-application trap.
“You have to work really hard to overload these brushes. They allow you to get a softer, blended effect with less effort.”
The more I hear about MAC Naked Honey, the more I can’t wait for June 11! What do you think so far?
Your friendly neighborhood beauty addict,
Karen

Homies, no matter how busy you are, try to take care of your teeth. For serious. After yesterday’s deep cleaning sesh with the evil Silver Hook of Doom, I feel like someone tenderized my jaw with a hammer.
Thank goodness for Advil, right?
Never again will I skip those annual cleanings… Tartar shall not defeat me!
Now, on a less painful note, how do you feel about makeup primers? 🙂
They’re commonly used to create a smooth surface upon which foundation and powder can adhere.
Many are gels, and beyond improving the staying power of makeup, primers help to control oil and prevent creasing. A few of ’em even double as anti-aging products or add extra hydration to skin.
MBB reader Kerry is looking for some help with her quest to find a good makeup primer.
What are your recommendations for a makeup primer (something to keep down the shine)? When I use the MAC ones, oil comes through on my skin, and my face looks greasy. HELP!
One Love,
Kerry
Hi Kerry,
When my skin was super oily a few years back, summertime was always the toughest season for me. By mid-morning, my forehead and face would always take on what I liked to call THE SHINING!
Today Aisha gives us a few tips on how to wear eye makeup with glasses.

Okay ladies, let’s start this post with a short quiz for those of you who wear glasses:
If you answered yes to … well, ANY of the above questions, you’ve come to the right place. With some creativity, your awesome eyeshadow collection and a few rules of thumb, you, too, can look as spectacularly sexy in spectacles as Jennifer Garner did in Alias.
Before I show you some evening looks, here are 10 basic tips for wearing glasses with makeup.
Now that you have some basic guidelines, here are a few dramatic evening looks to spark your creativity!

My first model, Q, has a simple dark frame — nothing too overpowering. She’s wearing a light but vivid pearly color, strong black eyeliner and mascara, dark brows, and a dark, shimmery, glossy lip color. She also has dramatic false eyelashes on her lower eye line.

First, I applied Hourglass Oxygen Foundation Powder No. 3 and then used Shu Uemura Cover Crayon as concealer and eyeshadow base.
Next, I applied MAC Naked Lunch (a pearly light peach) all over the lid before applying Shu Uemura Cream Eye Shadow in P Light Green (a pearly lime green) to the lower part of the lid and inner corner of her eye.
I think a synthetic brush works best for blending this cream shadow.
The top semi-hardened layer of the eyeshadow in the pot should be wiped off prior to each use. Here, I used MAC Cloudbound (pearly ivory) to highlight.
Finally, I blended the upper area and curled the upper eyelashes, applying Fresh Supernova Mascara to the ones on top.

I used a nail clipper to trim the four end sections of a set of Darkness false eyelashes in style X-up6 in Black. Darkness can be found in some beauty supply stores and is available online, but the styles vary among sellers. Other inexpensive false eyelash brands will work just as well; that’s what experimentation is for. 🙂
Since I used an eyelash intended for an upper lid, I removed the sticky residue from the band with makeup remover.
[Continue reading…]
Today Rae of theNotice shows how to rescue a broken pan of pressed powder from the brink!

Hi there, ladies! It’s Rae from theNotice. I just wanted to take a moment to say “thanks!” to Karen for letting me guest blog. Makeup and Beauty Blog is definitely one of my favourites, so this is pretty much the best. thing. ever.
Okay. Moment’s over!
It’s happened to us all: you go traveling, or you move, or you take a compact with you on your way out the door. When you open up your traincase or cosmetic bag, there’s a thin film of powder everywhere, and then you just know — one of your pressed powders broke in transit, and it’s completely unusable in its current state.
But it’s not the end of the world, because this is a problem that’s easily fixed! Seriously, folks. It’s easier than making toast to fix a hungry stomach or tempting children with candy or Jell-O.
We start our endeavor with one of the Smashbox Brow Tech duos from my makeup kit (this one’s Blonde). The powder portion had completely broken in transit — crumbles and chunks everywhere!
You know how when you get to the bottom of your Special K Cinnamon Pecan, there’s just… dregs? Well, it was like that. And for all of you who don’t obsessively eat that stuff, just check out the photo below (and add the cereal to your shopping list, because it’s like heaven. But in cereal form. And edible).

So because this was a duo, I started by scraping off the top layer of the wax with a clean cosmetic spatula and using an eyedropper to moisten the powder half with alcohol.
Use a damp towel or Q-tip to clean up around the edges a little, but it doesn’t have to be perfect — trust me, it’s easier to clean it up at the end, when more doesn’t tip out every time you move the pot!
For the wax, I just wiped off the top with a tissue after scraping, and it was pretty much good to go. But for the powder (or for a single pan) it’s a little harder. To fix this one, you have to keep putting in alcohol until it turns into pudding. I know. SO much harder, right? Oh, my god! I can’t do this! It’s too difficult!
…aaaand I’ll pretend you recognize the sarcasm in my, erm, font.

Anyhow, that’s really all you need to do! Once it’s mushy, all you have to do is let it dry (the stronger the alcohol, the faster it’ll be ready for the next step). Because this was a half-pan, re-pressing was a little harder. But for a normal 26mm MAC shadow pan, all you have to do is wait until it’s just barely damp, put a paper towel or handkerchief on top, stack a couple quarters on that, and apply pressure!
SHAZAM! Just like that, you’ve got a like-new pan again — clean up the edges, let it dry overnight before closing it, and you’re ready to face the day. If you have a half-pan like mine, and not a full circle, just press it with your fingers. The result won’t look new, but unless you’ve found a way to get a half-quarter, it’s the best you can do!
TIP: if you’re pressing something large — like a foundation, powder or blush — the bottoms of glasses work wonderfully instead of quarters!

One last thing, though. The pans in this were a little loose (if by “a little loose” you mean “totally not connected with the pot anymore”), which I’m thinking was the reason for their demise. So I took ’em out with tweezers, applied a couple drops of Krazy Glue, put them back in, and after about 10 seconds, they were secure again!


For loose pans, plain ‘ole Krazy is a lifesaver. It’s my number-four beauty tool, preceeded only by my Tweezerman tweezers, lash curler, and Q-tips. Just please don’t use it as cosmetic glue, alright? 🙂

Is it just me, or did this turn into a lesson about how you shouldn’t blog while hungry, instead of one about re-pressing broken powders?
This post was written by Rae, the beautiful brains behind theNotice. Beauty blogger, student and makeup enthusiast, Rae can’t remember a time when she didn’t love makeup.
Today Bethany North (aka San Antonio’s best makeup artist) of Face By Bethany shows us what the pros keep in their makeup kits.

For all you beauty divas out there looking for flawless makeup application every time, it helps to stock your beauty kit like a pro.
This army of supplies will never leave you lacking. Pencils ready?
Many pros carry their moisturizers in small plastic jars, or they look until they find smaller sample sizes of their favorite products.
“You’re going to want to have an eye makeup remover, eye cream, face moisturizer, shine control lotion, lip balm, and a body lotion.”

To be a pro makeup artist, you’ll need a wide range of foundations to choose from, so get several shades of correctors, concealers, foundations in different varieties and formulas, tinted moisturizers, and loose powders.
If you’re using solid foundation sticks, you can slice off pieces of them to place in your foundation palette.
Here’s a great foundation palette choice from Amazon.
You’ll definitely want a full range of cheek colors, too, along with different varieties like powders, creams, gels, or shimmers. You can also mix in a blush with a clear lip color for a dramatic hue.
When it comes to doing eyes, you’ll want to have a huge number of eye colors and pigments at your disposal. Make sure that you arrange each palette by shade family so that you’re not getting lost when you’re doing a makeup application, and always include cotton swabs.
Look to get a variety of eye pencils, gel eyeliners, both black AND brown mascaras, false eyelashes, eyelash glue, brow gels, brow pencils, alternate eyeliner colors, and darker shadow shades that you can use as liners.
Make sure that you always have some alternate colors with you, like black lipstick, to spice up any occasion. Look to have at least 20 different shades of lip colors in your kit, which you can mix to create even more. Include in that lip shimmers, lip glosses, and lip pencils.
“To easily carry a huge collection of lipsticks with you, simply slice pieces off and place them into the palette.”
You can learn how to make your own clever lip palette from this YouTube video, even better! 🙂

You’ll need a complete set of brushes, a spray-on brush cleaner, makeup sponges, cotton swabs, cotton pads, tweezers, an eyelash curler, disposable mascara wands, and brow trimming scissors.
Here are some extras to help you always be prepared…
“Be sure to include a hand disinfectant, baby wipes, breath mints, nail polish, nail polish remover, a hand mirror, and eye drops — just to make your life that much easier!”
Did you get all that?
And make sure that you bring some Ziploc bags to store things and rubber bands to hold your lip glosses and pencils together. You can also get extra nerdy and use a label maker to make sure that all of your supplies are in clear order.
Take time to practice your applications over and over again to find what works best for you, and you’ll never be lost among your army of beauty goodies.
Good luck and Godspeed! 🙂
This post was written by Bethany North of Face by Bethany, a San Antonio makeup artist and licensed esthetician who specializes in bridal makeup. She’s loved makeup her whole life but became even more passionate about it when she started working in the skin care field. She lives with her boyfriend and five-year-old Chihuahua Frankie (who’s not very nice to strangers).
