• Skip to main content
  • Skip to primary sidebar

Makeup and Beauty Blog | Makeup Reviews, Swatches and How-To MakeupMakeup and Beauty Blog | Makeup Reviews, Swatches and How-To Makeup

A beauty blog blooming with fresh makeup reviews, swatches and beauty tips from your friendly neighborhood beauty addict

  • Home
  • About
    • About
    • Contact
    • FAQ (Frequently Asked Questions)
    • Advertising & Media
  • Categories
    • Product Reviews
    • Makeup
    • Skincare & Fragrance
    • Style & Fashion
    • Hair
    • Nails
    • Tips & Tutorials
    • Just for Fun
  • Brands
  • Store

Makeup Tips/How To

Designer Impostor: A High Fashion Look from the Marc Jacobs Runway

May 16th, 2009 by Karen 21 Comments

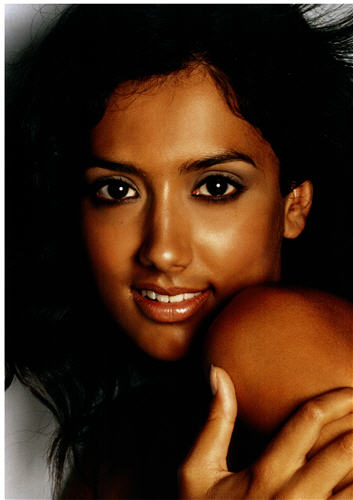
Today EV of Almost Daily Inspiration shares a wild runway look inspired by Francois Nars.

Hi, folks! I thought I’d try something a little different for you all and offer up a tutorial for my version of a wild runway look created by Francois Nars. It’s not exactly what you’d call “work appropriate,” but as Nars himself said, “You want to play with makeup.” So let’s have some fun, shall we?

First, a little background. Allow me to take you back to February’s Fall 2009 New York Fashion Week. Sure, most of the clothes were boring (thanks, recession-inspired conservatism!), but the makeup was consistently incredible: gray lips, fierce smoky eyes, and splashes of neon all made an appearance. And the absolute biggest, juiciest beauty story of the week was Francois Nars’ return to the runway after 10 years. He was lured back by none other than the wildly creative Marc Jacobs (he of the blue hair and the man skirts and the in-your-face attitude) and his collection of ’80s club-kid clothes. Nars was so inspired, in fact, that he took on the challenge of designing individual looks for all 60 models in the show. Wow.

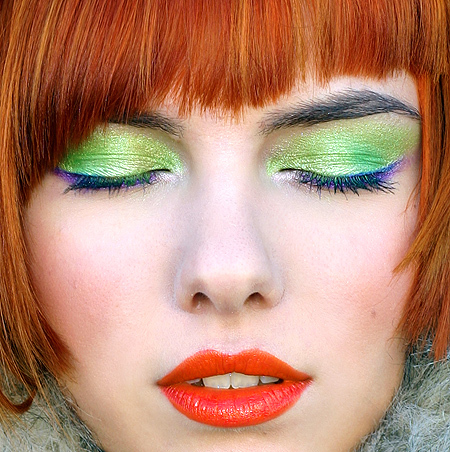
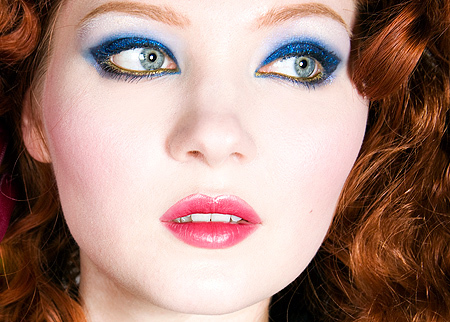
Each look started with a bold black eye shape, which was then paired with a splash of whatever color he felt would best bring out the model’s features. Check it out:

pic-1-1
style.com, photo by Greg Kessler

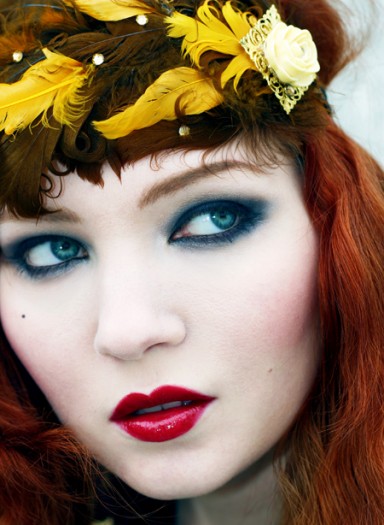
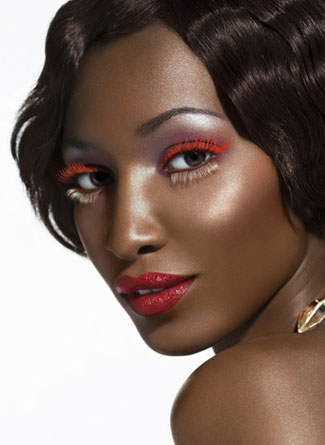
Such simple shapes and colors yet with a major impact. While purusing the show’s gallery on style.com (which I highly recommend doing, by the way), I found myself totally fixated on this red, orange, and black exaggerated cat eye.

pic-2-1
style.com, photo by Greg Kessler

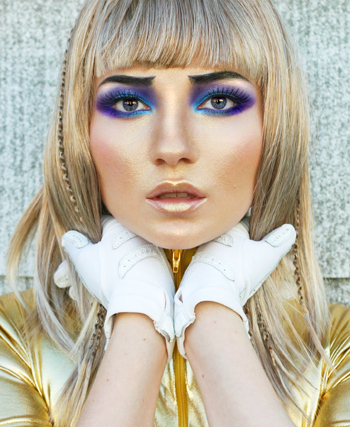
Of course I had to try it on, so this is the basic look we’ll be working from for the tutorial.

Products used

  • Urban Decay Primer Potion
  • MAC Paint Pot in Painterly (nude tan)
  • Urban Decay 24/7 eyeliner pencil in Zero (black)
  • MAC eye shadow in Firespot (vivid orange with gold and red undertones)
  • Aromaleigh loose pigment in Helterskelter (rich red with a little sparkle)
  • Fyrinnae loose pigment in Fool’s Gold (true gold with sparkle)
  • Urban Decay eye shadow in Zero (shimmering black)
  • DuWop Payoff Eyeshadow Intensifier
  • Dior Iconic Mascara
  • CARGO The Reverse lip liner (fair-nude skin tone)
  • MAC lipstick in Dubonnet (deep claret red)
  • MAC lipstick in Ladybug (bright true red)

Tools used

  • Posh smudger brush (sponge tip smudger)
  • MAC 239 (firm bristled eye shader brush)
  • MAC 219 (firm bristled pencil brush)
  • MAC 224 (soft tapered blending brush)
  • MAC 266 (small angle brush)
  • MAC 187 (duo fiber “skunk” brush)
  • Sephora retractable lip brush

Let’s start with the basics

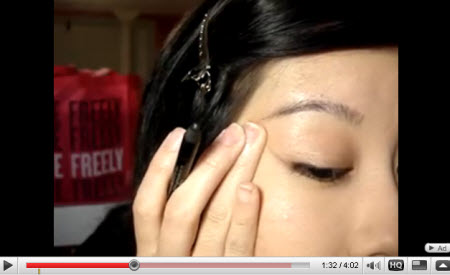
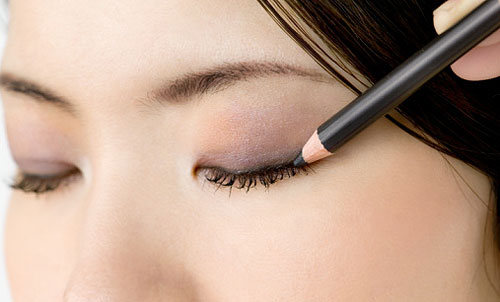
I apply a thin layer of Urban Decay Primer Potion with my fingers, and let it dry. Now, the secret to doing crazy exaggerrated looks like this one is giving yourself a map to follow.

Break down the individual components of the look, and pay attention to where the lines begin, end, and curve. I like to cheat a little and play connect the dots: I use my Urban Decay 24/7 Liner in Zero to place small marks at the outside points of the wing I want to create. This way, I can make sure I’m happy with the placement before I go and smear ten pounds of black paint on my face. Here is the basic layout of my wing:

pic-3-1

I want this black to be intense, so I’m going to apply a base layer of color by using Zero to shade in the whole shape. You could also use Blackground Paint Pot or even a shadestick for this step, but I prefer the Urban Decay pencils as bases because they’re easy to control and blend for precise work like this. With my weapon of choice, I carefully connect the dots to outline the shape of the wing, and then use the side of the pencil to shade in one patch at a time. I use my Posh smudger brush to blend the shaded patches together. It now looks like this:

pic-4-1

You don’t need to be concerned about uneven color saturation or perfect lines at this point; we’ll go over it again later. Think of this as your rough draft wing.

Now for the color!

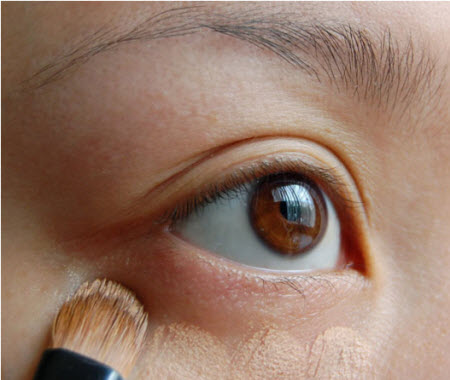
First, I use my finger to apply MAC Paint Pot in Painterly from my crease, up to my browbone, and out to my temple to even out any discoloration and provide a sticky base for the shadows. With the 239 shader brush, I apply MAC Firespot eye shadow starting at my crease (where the black wing ends) and extending a little above my eyebrow and out to my temple, following the curves of the wing. You want to build the color slowly, and blend out your edges so the color fades in to your skin.

pic-5-1

Aromaleigh’s Helterskelter is really an amazing color, and I highly recommend picking it up! The technique for using loose mineral shadows is the same as for pigments: use a dense, firm brush (like the 239 or 252), and “pack” or “dab” the shadow on to your eye rather than swiping it. Work slowly and gently, and you won’t have any fallout to clean up.

Using my 239 brush, I pat Helterskelter on top of Firespot, concentrating on the inner and outer corners of the shape I’ve created with the orange. Then, I pat a tiny bit of Fyrinnae Fool’s Gold on top of Firespot in the center of each browbone, just to brighten up the look a bit. I blend the three colors and all the outer edges with the 224 blender brush. Use a very light hand here because you don’t want to make the color disappear!

pic-6-1

Now let’s go back and clean up the black

I add a drop of Duwop Payoff to my Urban Decay Zero eye shadow pan, and let the liquid sink in. (Payoff is a great product for getting the wet application look but with much better staying power!) Using my 219 pencil brush and working slowly, I shade in the black wing and clean up my edges. I wanted to leave it a bit smokey, but you could go over the outer edges with a black gel or pencil liner if you prefer a sharper look.

I black out my brows…

…with my 266 angled brush and the Urban Decay Zero shadow. You want to exaggerate your brow shape a little bit, but without making it look too fake. The trick is to focus on drawing a sharp line at the bottom of your brows from the inner to the outer corner, then flick and blend the color up through your brows with your brush.

Dior Iconic Mascara

Last step is some Dior Iconic Mascara, and we’re done with the eyes! This photo is taken with flash to better show off the colors.

pic-7-1

Finishing the look

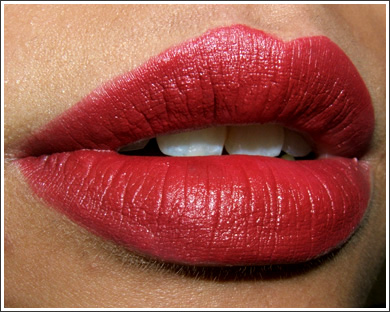
The rest of the face is pretty basic. I do a verrrry light sweep of Helterskelter across my cheekbones with the 187 and blend well. For the lips, I’ve mixed two red MAC lipsticks to get a glossy, deep red pout. Using the Sephora lip brush, I first apply Dubonnet, then gently dab Ladybug on top. When wearing lipstick, I like to sharpen up my lip line by applying a quick swipe of CARGO’s The Reverse lip liner all around the edges, and then blending it in. It isn’t necessary, but it helps my red lips “pop.”

Here’s the finished look! This is my best disaffected model vacant stare:

pic-8-1

Okay, Miss Tyra would totally yell at me for losing my neck, but you have to admit that’s a pretty fierce cat eye!

Sure, this is in no way an everday look, but I still encourage all of you to break out the most colorful shadows in your makeup kits and try it out! It doesn’t really matter if you just wear it around the living room and practice your runway strut for your cats; just think about how badass you’ll feel with a fearless splash of color on your lids.

On that note, I’d like to leave you with one of my favorite warm and fuzzy quotes about beauty, which just happens to be from Francois Nars: “Follow your instinct. Wear whatever makes you happy. Mix and blend and mix some more.” That may as well be my makeup mantra. You don’t need to be a master of blending or own 387 colors of eye shadow; you just need instinct and attitude and colors that make you happy!

This post was written by EV, who blogs about makeup and makeup artistry at Almost Daily Inspiration. When she isn’t finding killer deals on the interwebz, she’s working as a research assistant at a breast cancer clinic, drooling over Urban Decay and MAC, or playing with her two kitty kids.

There are 21 comments on this post. Leave yours.

Categories: Makeup, Makeup Tips/How To Keywords: guest post

Makeup for Photography: What Are Your Favorite Tips?

May 15th, 2009 by Karen 43 Comments

051409-makeup-for-photography

Good morrow, my Liz Lemons. I have a confession. Prominently displayed all around my parents’ house are pictures from my high school years, and my makeup looks GAWD AWFUL. The worst one pic is on the fridge, a snapshot of me sitting next to my mom at my 16th birthday party.

That night I decided to wear a translucent face powder, and in every flash picture my skin was an unearthly shade of gray.

Tragic!

Since then, I’ve learned a thing or two about makeup and flash photography…

And I bet you’ve got some tricks up your sleeve, too. 🙂

Are you ready to put on your makeup thinking caps to help out a fellow beauty junkie in need?

MBB reader Lesley wrote in yesterday asking for help with photography makeup tips for a few upcoming events.

I’m graduating next week (on the 22nd to be exact), and I’ll be having my graduation AND engagement pictures taken soon in an indoor studio.

It’s been great that you have been putting up a lot of tutorials and how-tos lately, so I’ve been getting ideas, but I was wondering if you have any recommendations or tips for makeup options and/or absolute dont’s for portrait makeup?

Any help would be greatly appreciated as I’ve only really gotten into makeup this past year.

What’s up, Lesley? Congrats on graduation and getting engaged. Talk about two mega milestones — WOOT!

Last November my BFF Jen asked me to be one of her bridesmaids, and I did my own makeup.

Here are a couple handy tips regarding makeup and photography:

  • Reach for your mattes. Opt for matte, rather than shimmery finishes for eye and cheek makeup. Shimmery eyeshadows and powders can give skin a greasy look under flash.
  • Apply your makeup in natural light. At Jen’s wedding, I noticed that the first thing her makeup artist did was set up shop next to the window with the brightest natural light. I’ve applied makeup in both bathroom and natural lighting, and I think I look my best in pictures when I apply makeup in the latter.
  • Opt for a powder with a yellow tint, rather than a translucent powder, to set your makeup. I learned this from my friend Melissa Street over at In My Professional Opinion. Transparent powders tend to leave a white cast when the flash goes off. I use MAC Select Sheer Loose Powder in NC 30 for pictures.
  • Practice your look and takes pics with a digital camera before your event. Then you can evaluate your work beforehand. You’ll be able to see and correct your mistakes. Before I started doing face of the day posts and taking a ton of pictures I never realized my tendency to apply heavier makeup to my right eye (I’m right handed and usually start with my right side), and I wasn’t lining my bottom lip evenly.
  • If you plan to wear undereye concealer, blend the hell out of it to remove any harsh lines. For serious. Even if you feel like you’ve blended out all the edges, blend some more; otherwise, you risk your concealer looking too obvious. I learned this the hard way, sigh!

For even more makeup tips, check out the interview I did with my friend Jen’s wedding makeup artist, Lynette. The tips are labeled as Wedding Makeup Tips but apply to all occasions where photography is up in the mix. Also, check out How to Look Your Best in Pictures, which gives advice on how to pose for pictures. 🙂

Ladies, I know you’ve got some good advice for our girl Lesley. When it comes to doing your own makeup for pictures, what are your favorite tips?

Your friendly neighborhood beauty addict,

Karen

There are 43 comments on this post. Leave yours.

Categories: Just For Fun, Makeup, Makeup Tips/How To

Yet ANOTHER 21 Makeup Tutorials

May 12th, 2009 by Karen 16 Comments

Yet Another 21 Makeup Tutorials

Good morning, ladies. I’m feeling professorial today, LOL! Not really, but I am in the mood for makeup tutorials, which leads me to this morning’s post: Yet ANOTHER 21 Makeup Tutorials.

I think this may be the last batch for a while. 🙂

If you enjoyed this post, you may also like…

  • 21 Makeup Tutorials
  • Another 21 Makeup Tutorials
  • 101 Wedding Makeup Looks
  • 101 Hairstyle Tutorials
  • 10 Fantastic Smokey Eye Tutorials
  1. The Flapper Makeup Look: Red lipstick was all the rage back in the 1920s, a time when ladies might have said of this tutorial, “It’s the bee’s knees.”
  2. flapper_sm

  3. Rainbow/MAC Makeup Tutorial: In this series of three videos by YouTube’s QueenofBlendingMUA, you’ll learn how to do a funky rainbow eyes look using a bunch of cool products from MAC.
  4. rainbow

  5. Colors to Suit Blue Eyes: This is just a quick list of colors that go well with blue eyes and which ones blue-eyed beauties might want to avoid.
  6. blue

  7. Yellow and Black Eyes Tutorial: Here’s an edgy rocker look to add to your bag o’ tricks.
  8. yellow

  9. Lime Crime Makeup Look: This is the perfect look for all the fiery redheads out there who want to add some sizzle to their daily makeup routine!
  10. katafter1

  11. Glitter Cat Eye Look: Add some glitz to your everyday eye makeup with this foxy feline look.
  12. cateye
    [Continue reading…]

There are 16 comments on this post. Leave yours.

Categories: Makeup Tips/How To

Another 21 Makeup Tutorials

May 10th, 2009 by Karen 19 Comments

Another 21 Makeup Tutorials

Happy Mother’s Day, ladies (and gents)!

Makeup cheerleader: “What do we want!?”

Beauty addicts: “Makeup tutorials!”

Makeup cheerleader: “When do we want ’em!?”

Beauty addicts: “NOW!”

I think you’ll lurve this new batch of makeup tuts. Some of them are real gems. I can’t believe I almost forgot to include tutorials from Doe Deere Blogazine, yikes!

Without further ado, let us begin.

If you enjoyed this post, you may also like…

  • 21 Makeup Tutorials
  • 21 MORE Makeup Tutorials
  • 101 Wedding Makeup Looks
  • 101 Hairstyle Tutorials
  • 10 Fantastic Smokey Eye Tutorials
  1. Barbarella Makeup Tutorial: Here’s an AMAZING makeup tutorial featuring a look ’60s Jane Fonda could have worn.
  2. barbarella_sm

  3. Cabaret Makeup Tutorial: They say that life is a cabaret (old chum). Well, it can be now. Va-va-va-voom!
  4. thehat

  5. Holiday Makeup Looks: Whether you’re going on summer vacation or just planning ahead, it helps to have a repertoire of holiday looks.
  6. Holiday makeup looks

  7. Get Great Eye Makeup Every Time: The artist in this video starts by applying eye makeup before the rest of the products she uses on a face.
  8. fantastical

  9. Summer Glow Look: A great look for fair-skinned ladies wanting to get all “Giselle” up on the catwalk. Meow!
  10. gisele

  11. Summer Glow Makeup Look for Dark Skin: Here’s a lovely, glowing summer look for brown-skinned girls. Surf’s up!
  12. dark
    [Continue reading…]

There are 19 comments on this post. Leave yours.

Categories: Makeup Tips/How To

21 MORE Makeup Tutorials

May 8th, 2009 by Karen 10 Comments

21 More Makeup Tutorials

Good morning, glories! 🙂 I hope you had a great week. Mine wasn’t bad at all, but I couldn’t be happier that it’s Friday.

TGIF!

My first post of the day is a batch of 21 more makeup tutorials. These are just ones that moved me for one reason or another. I hope you find them useful.

If you enjoyed this post, you may also like…

  • 21 Makeup Tutorials
  • 101 Wedding Makeup Looks
  • 101 Hairstyle Tutorials
  • 21 Ways to Store Your Makeup
  • 10 Fantastic Smokey Eye Tutorials
  1. How to Get Perfect Lips and Cheeks: This video really cuts to the chase. It contains a lot of information in a short 5-minute clip. To quote the artist in the video, “So now she looks sunny and gorgeous!”
  2. Perfect pout

  3. Sizzlin’ Summer Makeup Looks: Want some ideas for makeup looks to wear over the dog days of summer? Me, too! Here we go. 🙂
  4. introduction

  5. Daring Beauty Colors: This one links to a nice gallery article with product recommendations in some dramatic colors. Just for ideas.
  6. mayswl_introduction

  7. Keira Knightly Makeup Tutorial: This short article shows how to get one of Keira Knightley’s most famous looks.
  8. Keira Knightley makeup look

  9. 6 Easy Makeup Looks: The name says it all — not one but six new makeup looks to try!
  10. dior_makeup_visuall-a4

  11. Winged Eyeliner with a Pencil: Here’s a creative way to change up the way you may normally wear your eyeliner, and it’s not as hard as it looks!
  12. winged
    [Continue reading…]

There are 10 comments on this post. Leave yours.

Categories: Makeup Tips/How To

What Makeup Would You Start with if You Had to Start from Scratch?

May 7th, 2009 by Karen 29 Comments

makeup-case

How’s it going, ladies? I just got back from the pet store because Tabs lost yet another collar, grr!

I picked him up the cheapest replacement I could find, a red nylon breakaway for $2.99. No more $18 fashion collars until he proves he can be responsible.

Oh, I got some more bad news today. MBB reader Jackie sent a heartbreaking e-mail this afternoon. She explained how all of her makeup was stolen, and now she’s looking for advice to rebuild her collection from scratch.

“I’m heartbroken… all of my makeup, gone! I want to ask you for a list of your favorite basic makeup for daily use. I like Shu Uemura, but I’m open. I’m a basic kind of gal.”

Hey, Jackie. I’m so sorry. I’d be crushed!

I’m sure karma will come back and bite that makeup thief in the butt. Until then, try to see this as a chance to start fresh, like a makeup phoenix rising from the ashes! You don’t need a lot of different products to look great and put together.

Face

I’d start with my tried-and-true favorite face products, the ones my skin tolerates well and that look natural.

First, there’s Laura Mercier Oil-Free Tinted Moisturizer ($42), and a tube of MAC Select Moisturecover Concealer ($15) (to even out my skin and to cover up my dark circles).

mac prep prime transparent finishing powder

Then, I’d get a good powder, one that doesn’t cake, like MAC Blot Pressed Powder ($21), MAC Prep + Prime Transparent Finishing Powder ($21) or MAC Select Sheer Loose ($21).

Cheeks

For some color…

mac a rose romance just a pinch gel blush

… I might go with MAC’s Gel Blush in Just a Pinch ($21). It’s a sheer berry that creates a lovely natural flush.
[Continue reading…]

There are 29 comments on this post. Leave yours.

Categories: Just For Fun, Makeup Tips/How To

21 Makeup Tutorials

May 5th, 2009 by Karen 23 Comments

21 Makeup Tutorials

Hi, ladies (and gents!). Here are 21 makeup tutorials and guides showing some of my favorite application techniques.

My favorite tutorials aren’t necessarily the ones with the highest production value, aka the sharpest looking videos and pictures. I like tutorials that stand out for some reason because that helps me remember the material.

When I find a particularly helpful new makeup tutorial, I’ll copy/paste some of the pictures (or take screenshots if it’s a video, or save pics to my phone) into Word or something and print them out with notes.

A BIG thanks to the people who put these tutorials together. Keep up the great work!

If you enjoyed this post, you may also like…

  • 101 Wedding Makeup Looks
  • 101 Hairstyle Tutorials
  • 21 Ways to Store Your Makeup
  • 21 MORE Ways to Store Your Makeup
  1. Undereye Concealer Tutorial: Raquel13 has a lot to offer (like a great smokey eye tutorial, a sultry red lip tutorial and a tutorial that shows how to tightline your eyes), including this pictorial tutorial showing how to banish those dreaded raccoon eyes. No one has to be the wiser!
  2. r

  3. How to: An All-Day Flawless Finish: Armed with these tips, your makeup won’t give up on you before the end of the day.
  4. 298x232_lb_skin_makeupmyth_st

  5. The Sophisticated Eye Look: Got a dinner date or an important meeting at work? Wear this eye look and show ’em who’s boss!
  6. eyeshadowsolent_468x695

  7. Elegant, Dramatic Eyes: Make the kind of entrance no one forgets with the help of this show-stopping eye look.
  8. jenniferlopez_2

  9. Natural Looking Eyeliner: Sometimes all it takes is a single finishing touch to bring an entire makeup look together.
  10. eyeliner

  11. Eyebrow Shaping and Shading: Never struggle with angry eyebrows again with the help of this tutorial.
  12. eyebrow480

  13. A Simple Guide to Applying Red Lips: POP! This fantastic red lip how-to really breaks it down for beginners.
  14. tutorial_redlips013
    [Continue reading…]

There are 23 comments on this post. Leave yours.

Categories: Makeup Tips/How To

How to Get a Natural Lash Curl

May 2nd, 2009 by Karen 49 Comments

Good morning, ladies! I hope your weekend got off to a good start. I’m not sure what I’ve got going on today, which is good in that it probably means there’s nothing I absolutely HAVE to get done.

For this post I’ve done a quick video (click here for the video) showing how I curl my eyelashes. I apologize for not putting up any videos lately, but I’ll get back into the habit again.

Enjoy your weekend! Let me know what you’re up to.

Your friendly neighborhood beauty addict,

Karen

There are 49 comments on this post. Leave yours.

Categories: Makeup Tips/How To, Video Keywords: howto

  • « Go to Previous Page
  • Go to page 1
  • Interim pages omitted …
  • Go to page 76
  • Go to page 77
  • Go to page 78
  • Go to page 79
  • Go to page 80
  • Interim pages omitted …
  • Go to page 93
  • Go to Next Page »

Primary Sidebar

Welcome to Makeup and Beauty Blog

Welcome to Makeup and Beauty Blog! My name is Karen, and I’m a freelance writer obsessed with makeup.

Makeup and Beauty Blog features daily product reviews, makeup tips and beauty news — like an interactive version of a monthly print magazine, except with occasional pictures of my cat.

Recent Posts

Sundays With Tabs the Cat, Makeup and Beauty Blog Mascot, Vol. 878

Makeup and Beauty Blog Monday Poll, Vol. 894

Makeup and Beauty Blog Monday Poll, Vol. 893

Makeup and Beauty Blog Monday Poll, Vol. 892

Makeup and Beauty Blog Monday Poll, Vol. 891

/* real people should not fill this in and expect good things – do not remove this or risk form bot signups */

Social

  • Facebook
  • Instagram
  • Pinterest
  • Twitter
  • YouTube

Featured Posts

Sundays With Tabs the Cat, Makeup and Beauty Blog Mascot, Vol. 771

Lady Unicorn

Weird Things I Like to Do

brows fill out beforehand

Before You Pluck or Wax Your Brows, You Must Do This

current bare skin status

What’s One Thing That Drastically Changed Your Skin for the Better?

Copyright © 2025 Makeup and Beauty Blog. Get in touch.