• Skip to main content
  • Skip to primary sidebar

Makeup and Beauty Blog | Makeup Reviews, Swatches and How-To MakeupMakeup and Beauty Blog | Makeup Reviews, Swatches and How-To Makeup

A beauty blog blooming with fresh makeup reviews, swatches and beauty tips from your friendly neighborhood beauty addict

  • Home
  • About
    • About
    • Contact
    • FAQ (Frequently Asked Questions)
    • Advertising & Media
  • Categories
    • Product Reviews
    • Makeup
    • Skincare & Fragrance
    • Style & Fashion
    • Hair
    • Nails
    • Tips & Tutorials
    • Just for Fun
  • Brands
  • Store

Makeup Tips/How To

Fashion Week Runway Tips: Smokey Eyes 101

February 3rd, 2008 by Karen 42 Comments

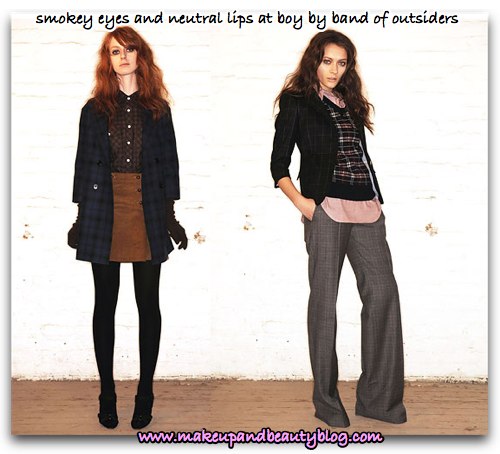
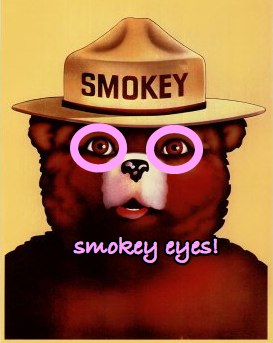
Smokey eyes are all over the frickin’ place at NY Fashion Week. Check it: warm brown smokey eyes and neutral lips at the Boy By Band of Outsiders show.

boy-by-band-of-outsiders-final.jpg

Le sigh… I both love and hate this at the same time. Love it because it’s really pretty and sexy (and dare I say, smoldering); hate it because for the life of me I can’t get it right. I’ve got two left feet (hands?) when it comes to doing smokey eye looks. I aim for “stylish rave vampire” but end up more “barefoot Britney walking into a gas station restroom.”

There are times when I feel like your friendly neighborhood beauty addict won’t ever prevail over the elusive smokey eye. She’ll be forced to hang up her brushes to live a life of smokey eye-free debauchery.

Despite my proclamations of klutziness, Gordon Epsinet, Vice President of Makeup Artistry for MAC Cosmetics, insists that just about anyone (even me) can do a hot smokey eye.

How to get the look

“To do a beautiful smokey eye you must start with a fabulous dark pencil,” says Gordon. “You have to have MAC Smolder [eyeliner]. “It blends beautifully together with shadows and cream colors and MAC paints as well.”

“Start with lots of black pencil on the eye,” says Gordon. “Apply the pencil around the rim of the eye first, then blend it with the #219 brush, which looks like a fat little pencil.”

smokey-eye-tut-2.jpg

“You’re going to blend that, smudge it in a bit, so it looks like a smokey stain.”

smokey-eye-tut-3.jpg

Next, blend a dark brown eyeshadow into the black liner to create a mix of brown and black colors. Blend the brown shadow over the black pencil stain you just created. Gordon suggests using…

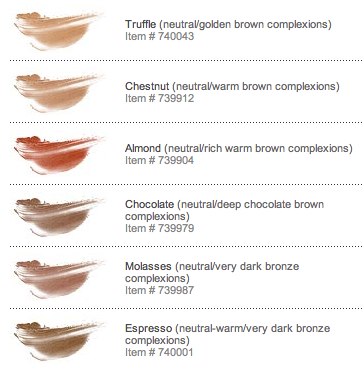
    MAC Espresso – muted golden brown (matte)
    MAC Brun – muted blackish brown (satin)
    MAC Mystery – muted plumish brown (satin)

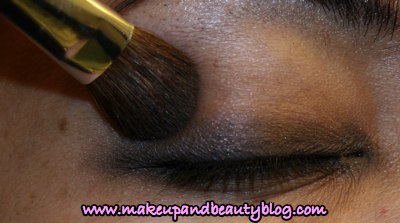
For this I chose MAC Brun, and here’s what it looks like after I blended it on top of Smolder.

smokey-eye-tut-4.jpg

Gordon then suggests using a MAC #224 brush (a soft, fluffy, tapered brush), to blend a lighter eyeshadow into and above the dark brown layer you just created. His favorite colors are…

    MAC Kid – beige cashmere (veluxe)
    MAC Soba – golden brown flecked with golden shimmer (satin)

I have a MAC #224 but find it gets shadow all over the place, so I ended up using a Billy B Paint Brush #6 to apply Soba over the Brun/Smolder mix.

smokey-eye-tut-5.jpg

Ultimately, says Gordon, the final look should have the darkest colors at the lash line, and the colors should transition into lighter colors the farther you get away from the lashline.

smokey-eye-tut-6.jpg

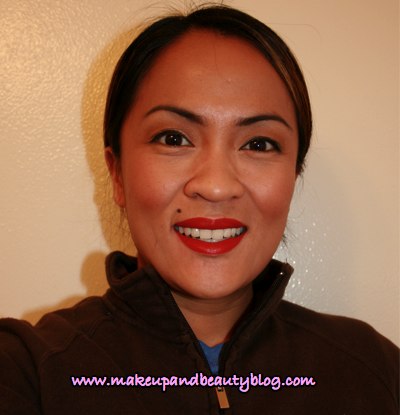
And here I am in the final look. The only thing missing from this picture is a black beret and a copy of On the Road.

smokey-eye-look-final-karen-1-13.jpg

Okay, okay, this wasn’t as hard as I thought it was going to be. With a lil’ bit of practice, I think I’ll be able to get the color transitions to look more subtle and smoother. Come fall I’ll be ready to rock it with the other trendsetters.

smokey-eyes.jpg

Speaking of smokin’, the other night I watched Donnie Darko for the umpteenth time and was reminded of how totally unfair it is for Jake Gyllenhaal to be so hot. Why doesn’t he call and ask me to make out with him?

jake-g.jpg

Of course I’d say no (married, hi), but it would still be nice to be asked.

Anyway, if you’re hunkered down in front of a TV watching the Superbowl, I’ll be with you in spirit. Besides the tight pants and the prospect of eating profound amounts of junk food, I don’t care much for the big game, so I’ll be out and about running errands today. Eat a hot dog for me!

Your friendly neighborhood beauty addict,

Karen

P.S. Your weekend ain’t over yet! Here are the best posts o’ the week from the Beauty Blog Network…[Continue reading…]

There are 42 comments on this post. Leave yours.

Categories: MAC Makeup, Makeup Tips/How To

Fashion Week Runway Tips: Achieve a Perfect Dark Lip

February 1st, 2008 by Karen 42 Comments

It’s NY Fashion Week, ya’all, and rich lips and smokey eyes have already made appearances on the runway.

rich-lips-final-final.jpg

Don’t be scurred to wear a dark lip in real life. With a little help from Gordon Espinet, Vice President of Makeup Artistry for MAC Cosmetics, you can pull it off.

How to get the look…

Begin by lining your lips with a lip-colored pencil. If you’re tempted to use black liner (LOL, like I did in the early 90s), resist. “You’ll have a monster of a time trying to blend it away,” says Gordon. “Use a lip pencil that’s the natural color of your lip but slightly darker. I always recommend something like MAC Spice or Stripdown.” What you want is a neutral, forgiving color that’s easy to work with.

Choose a dark burgundy or brown lipstick like…

  • MAC Photo – Golden brown
  • MAC Film Noir – Intense brown
  • MAC Diva – Intense reddish burgundy

What’s Gordon’s favorite dark lip color? “There’s one lipstick that I absolutely adore,” he says, “and it’s called Paramount. It’s one of those lipsticks that got parked for awhile there because browns and dark lips fell out of favor.” But Paramount is back with a vengeance!

mac-cosmetics-paramount-lipstick-swatches-final.jpg

Use a lip brush. The lip brush is your best friend, especially when doing dark lips. Gordon advises against applying directly from the tube because it creates the tendency to over-apply. “If you have on too much dark lipstick it can look, well, threatening!” Gordon’s lip brush of choice? — the MAC #316.

Start brushing from the center of your mouth, right where your lips touch. It’s where you’ll want the strongest color. To avoid harsh lines, spread the product from the center of your mouth, up or down, fading toward the lip line.

mac-cosmetics-paramount-tut-final.jpg

Take care not to build an overly dark lip outline, says Gordon. “You know you don’t want to look like a goth vampire. It’s really about having a mouth that may be dark but still sensual.”

Ultimately, the look you want is somewhere between matte and shiny. If you’re struggling with excessive shine, blot with a tissue to take it down a notch.

Straight off the runway! Just kidding… more like straight from my living room!
mac-cosmetics-paramount-final-kare-fotd.jpg

In the pic above I only used one layer of MAC Paramount. If you want a deeper lip, you can always add more layers to intensify the color.

What do you think? Sexy or scary? Discuss.

Your friendly neighborhood beauty addict,

Karen

There are 42 comments on this post. Leave yours.

Categories: MAC Makeup, Makeup Tips/How To

MAC Makeup Tutorial: Russian Red, an Ode to Madge

January 22nd, 2008 by Karen 77 Comments

I’m not shy about my obsessions — Christian Bale (marry me!), the MAC 266 brush and the Terminator series (more on this later) — but by far the deepest of my frivolous obsessions is for our Madge-esty almighty, Madonna, an obsession I’ve harbored since the tender age of eight.

madonna-confessions.jpg

When I finally got my hands on MAC’s Russian Red lipstick from the MAC Originals collection, I had a minor Madonna fan freak-out moment. Madge rocked the Russian Red in her late-80s Blonde Ambition era. Remember the Express Yourself and Vogue videos? I taped them on MTV and replayed the sh*t out of both until my mom yelled at me to “turn it off!” Parents just don’t understand.

For Madonna’s Blonde Ambition Tour, Russian Red accompanied all the over-the-top costumes designed by Jean Paul Gaultier.

madge-blonde-ambition-tour.jpg

I remain 1,343,555,432,543 degrees of separation from Madonna, but at least I can wear her lipstick. So, in honor of my favorite pop star of all time, here’s a tutorial of a look I did with MAC Russian Red lipstick, along with other products from the Originals Collection (Daisychain eyeshadow, Ochre Style eyeshadow and Melon Pigment).

Here’s the finished look (complete with mole)! I call it the “Ode to Madge.” LOL!

mac-russian-red-fotd-25.jpg

Step-by-step tutorial: “Ode to Madge”

First, grab your brushes, your products and find a nice spot to work. [Continue reading…]

There are 77 comments on this post. Leave yours.

Categories: Face of the Day (FOTD), MAC Makeup, Makeup Tips/How To

MAC Pigments Made Easy

January 4th, 2008 by Karen 33 Comments

I can’t be the only one out there intimidated by MAC Pigments. For years I overlooked their brightly colored, loose shadows. They look so professional and no-nonsense in their sexy little jars. I assumed there was no way a klutz like me could use them.

Seasoned MAC junkies seem to love ’em though, so in the name of Makeup and Beauty Blog science I decided to give them a chance. I figured the worst that could happen would be I’d drop a jar on the bathroom floor and end up with purple-stained towels, a purple toilet, sink and floor. But other than that, what could go wrong?

But surprise surprise! — even I couldn’t muck this up! Using the steps below, I managed to avoid both 1) a big mess in the bathroom and 2) looking like a rabid clown.

MAC Pigments the easy way

Start by grabbing a stiff eye brush, like the MAC 252 or the MAC 239. Stiff brushes are easier to use with pigments than fluffy brushes because stiff brushes provide more control over color application. Using a fluffy brush results in a lot more color going all over the place. Trust me, you don’t want this to happen.

mac-pigment-brushes.jpg

All the pigments come with a plastic “stopper.” You’ll see this when you open the lid of the jar.

Sidenote: please excuse the broke-ass manicure. I did swatches of Essie’s new spring collection and over the Christmas break had five different colors on the nails of my left hand.

mac-pigment-how-to-1.jpg

I then placed this plastic stopper onto the lid with the powdery side up.

mac-pigment-how-to-2.jpg

Dipping the brush directly into the jar loaded it with too much product, so instead I grabbed just the right amount of the product from where it collected on the plastic stopper.

mac-pigment-how-to-3-1.jpg

Tap off excess color against the rim of the jar or swipe the brush head across a Kleenex.

mac-pigment-how-to-4.jpg

Voila! Now you can use the pigment as a shadow or highlighter!

Take note

Not all pigments are suitable for eye use, so if you plan to use a pigment around your eyes make sure it’s rated safe for use there. The packaging or the insert included with the pigment should let you know!

The MAC artist who taught me this application trick discouraged me from using concealer as a base and recommended I use MAC Paints and the MAC Paint Pots. I’ve tried all three as bases and prefer the Paint Pots as a base because they emphasize the richness of the pigment’s color and have excellent staying power.

MAC’s pigment jars are totally huge, and one jar will take you into your next few lifetimes. If you are on a budget then grab a friend and head to the MAC counter together to share a jar. There’s plenty enough for both of you, and you’ll save yourself a pretty penny.

Are you ready to start collecting pigments with me? Let’s do this!

Your friendly neighborhood beauty addict,

Karen

There are 33 comments on this post. Leave yours.

Categories: MAC Makeup, Makeup Tips/How To

Makeup and Beauty Blog Looks Back on 2007

December 31st, 2007 by Karen 29 Comments

fussytabby-champagne-glass-best-of-2007.jpg
Ahhh, the last day of 2007. I always get a little sad when I know something is coming to an end; I guess it’s the thought of a part of my life ending and knowing I’ll never be able to go back (unless I drop $10 million for those time travel plans on eBay).

When I started this blog, I never imagined how much fun it would be. This year has been, to quote my eighth grade East Bay self circa 1989, “hella cool.”

Dita Von Teese – Interviewing MAC Viva Glam spokesperson Dita Von Teese at the Macy’s Passport fashion show was a trip. She was so stunningly beautiful and I was so nervous. The other day, I listened to the audio recording of the interview and laughed because I even SOUNDED sweaty.

Paris Hilton – The Dita experience really helped, though, when the time came to interview Paris Hilton for the release of Can Can, her new perfume. It was a level of celebrity that I’d never experienced before — body guards, press folks, rabid fans foaming at the mouth. It was the first time I’d interviewed a really high profile celebrity AND the first time I had to do it in a room filled with people watching me. What a learning experience.

SF Fashion Week – But my favorite event of the year was hanging out with MAC backstage at SF Fashion Week. I fell in love with a few products, learned a lot and met other beauty bloggers, like Erika and Christine.

Laura Mercier – There was plenty of Laura Mercier love last spring.

Tokidoki bag – The Tokidoki bag fit all my stuff AND rocked my world.

Neutrogena Body Clear Body Wash – Unfortunately, I experienced getting pimples on my butt for the first time. Fortunately, Neutrogena Body Clear Body Wash saved my ass (pardon the pun).

43 makeup things – Thanksgiving was an excuse to eat turkey, wear stretchy pants and think about the 43 makeup things I’m thankful for.

43 non-makeup things – Thanksgiving also provided an opportunity to give thanks for everything else.

Chanel Glossimers – I became a fiend for Chanel Glossimers.

Philosophy’s Purity Made Simple – And Purity Made Simple simply rocked my world.

Chanel Garden Party Quad – Chanel’s National Artist John Fussell helped me fall in love with the Chanel Garden Party Quad, and now there’s no turning back!

Smashbox’s Lori Taylor – Smashbox’s Lori Taylor gave some backstage tips from L.A. Fashion Week.

Billy B. – I met and interviewed one of the nicest guys in the beauty biz.

MAC’s awesome Louise Zizzo – Louise Zizzo saved me from myself when the MAC Mattene collection came out.

Celebrity makeup artist Bruce Grayson – Bruce Grayson’s makeup tips from the Emmy’s red carpet.

Dear Makeup and Beauty Blog – I heard from Shy in Chi-town.

Guide to Smart Clubbing – You asked for tough love, and in the Guide to Smart Clubbing I gave it to ya (hey, I’ve had a lot of practice).

Curiositease – And my number one makeup love, MAC, didn’t let me down.

Pigments and Glitters – Remember when I was grouchy about Pigments and Glitters?

MAC Loose Beauty Powder – I fell in love.

Smoke Signals – It rocked my world.

MAC Mad Libs – We had a lil’ fun together.

MAC Mattene lipsticks – Where’s my plaid shirt and my Pearl Jam CD? MAC Mattene lipsticks took me back to the 90s.

A quick smokey eye with MAC shadow – Oh, this is old school.

But the best thing that happened to me this year was meeting all of you. It’s been fun getting to know you and learning about your lives. You’d think that it would be hard to make a connection behind a computer screen, but sometimes I feel like we’re all just having a cup of coffee together and gabbing about makeup.

I hope you make the most of this fantastic last day of the year!

Your friendly neighborhood beauty addict,

Karen

There are 29 comments on this post. Leave yours.

Categories: Beauty Tips, Drugstore Beauty Finds, Just For Fun, MAC Makeup, Makeup, Makeup Tips/How To, Product Reviews, Skin Care

Get Green with L’Oreal, Maybelline and Lancome Eyeshadows

December 23rd, 2007 by Karen 12 Comments

Green is good

Oh, oh, oh! Ever since MAC Parrot eyeshadow entered my life I’ve been a little obsessed with greens, and I’m not talking collards or peas, girl. Behold my current green shadow crushes, from the left to the right: Maybelline Antique Jade Expert Wear Eye Shadow, Lancome Ombre-Eclair in Emerald and L’Oreal’s Pure Pigment Shadow Stick in Mesmerizing.

maybelline-lancome-loreal-green-shadows.jpg

If you’re still green-shy, then consider Maybelline Antique Jade Expert Wear Eye Shadow (about $3.50), a very pretty true green with no blue undertones. Its soft, pearl finish gives it a subtle shimmer, and in my experience shimmer shadows are easier to blend than mattes and more forgiving.

Because the shadow isn’t as pigmented as MAC or Shu Uemura eyeshadows, you have lots of room for error. I like lining both my upper and lower lashlines with a creamy liner like MAC Technakohl, and then applying Antique Jade to “set” it in much the same way that loose powder sets foundation. Layering the shadow on top of your eyeliner gives eyes a different texture and color than using eyeshadow or eyeliner alone.

Didja ever make chalk drawings on the sidewalk when you were a kid? I dig L’Oreal’s Pure Pigment Shadow Stick in Mesmerizing ($9.99), an olive-green shadow that comes in a stick, not only ’cause it looks like chalk, but also for its flexibility. My lazy beast self likes to use it when I’m in a hurry because it leaves out the middle man, aka the brush. I apply the stick color directly on my lid along the upper lash line, and then smooth out the edges with my fingers for a sheer, shimmery green lid. Two coats of mascara and I’m done!

If I want a bolder look I run the stick briefly under water. Wetting it intensifies the color, turning it into a metallic gold-green. Don’t you love having options?

Last but not least there’s Lancome’s Ombre-Eclair eyeshadow pencil in Emerald ($20.00), a bold green shadow with color punch that comes in an easy-to-use pencil. Soft and creamy, it glides onto my lids without any tugging; just one swipe over my top lid leaves a bright, shiny burst of color.

Be warned: because the formula is smooth like buttah, it does have a tendency to migrate into the crease, so I use it with an industrial strength lid primer like Urban Decay Potion Primer on my top lid. I usually don’t like Potion Primer because it makes shadows hard to blend, but if I’m only going to use one swipe of color it’s fine.

Another option is to layer a dry powder shadow like Antique Jade or MAC Vex on top to prevent color from migrating and create lotsa different effects.

Are ya ready to go green? 😉

Here I go again on my own, going down the only road I’ve ever known…

I don’t have to go to work tomorrow, so it doesn’t feel like Sunday at all! Not having the gnawing feeling of “Here I goooooo again!” in the pit of my stomach sure helps my mental health.

Mega super props if you can name 1.) the video this pic is from and 2.) the woman who made gymnastics on automobiles an art form
white-snake-here-i-go-again-final-1.jpg

Today I did a *ton* of cleaning and then went for a looooong run in the cold (LOL, it’s 55 degrees here in Northern California. I know that’s practically tropical compared to most parts of the country). Now, El Hub and I are off to the movies to elevate our minds with the fine feature film, Walk Hard: The Dewey Cox Story. Marcello Mastroianni it ain’t, but I need a good mindless flick from time to time!

Are your stockings stuffed? What are you hoping Santa will bring you this Christmas? I’m really wishing for a vat of peppermint ice cream from Baskin Robbins.

Your friendly neighborhood beauty addict,

Karen

P.S. Your weekend isn’t complete without the weekend round up of the best posts from the Beauty Blog Network!

I know you didn’t miss Bag Balm Udderly Fantastic[Continue reading…]

There are 12 comments on this post. Leave yours.

Categories: Drugstore Beauty Finds, Makeup, Makeup Tips/How To, Product Reviews

Makeup Tips: MAC Parrot Face of the Day

December 20th, 2007 by Karen 43 Comments

MAC Parrot rocks down to Electric Avenue

mac-cosmetics-parrot-eyeshadow-comic

Face of the Day with MAC Parrot

mac-cosmetics-parrot-eyeshadow-fotd-2

mac-cosmetics-parrot-eyeshadow-fotd-eye

This is a really easy face of the day that I wore to work today. It took just five minutes to do my eyes.

To get this look I used:

Eyes
Brows – MAC Concrete
Brow bone – MAC Ricepaper eyeshadow
Crease – MAC Woodwinked eyeshadow
From lashline and then barely into crease, with the color most concentrated on lashline – MAC Parrot eyeshadow
Outer V – MAC Club eyeshadow
Top lashline and on waterline – MAC Jadeye Fluidline eyeliner
Inner corner – MAC Vex eyeshadow
Lower lashline – MAC Woodwinked eyeshadow
Underneath eyes and on lids – MAC Select Moisturecover Concealer in NW 25
Upper and lower lashes – Elizabeth Arden Ceramide Mascara in black

Cheeks
NARS Torrid blush

Lips
MAC Princely lipstick
MAC Enchantress lipgloss

mac-cosmetics-parrot-eyeshadow-fotd-1

Other ways to modify this look:

– Line top lashline and/or waterline with Blacktrack Fluidline liner, and then liner bottom lashline with Jadeye Fluidline.
– Line top lashline and/or waterline with Blacktrack and leave lower lashline bare!
– Line top or bottom lashline with Uppity Fluidline.
– Use Jadeye Fluidline as a base on from lashline into crease instead of Select Moisturecover concealer to intensify Parrot’s color.
– Using a wet 266 brush, apply Club (the color, not the weapon) onto bottom lash line.
– Make the look smokier using Club in the crease.

Yup, it’s official. Me likes the MAC Parrot.

Your friendly neighborhood beauty addict,

Karen

And if you enjoyed this post, give this one here a try: MAC Makeup – MAC Russian Red Lipglass Face of the Day

There are 43 comments on this post. Leave yours.

Categories: Face of the Day (FOTD), MAC Makeup, Makeup Tips/How To, Product Reviews

Makeup Tips: Becca Cosmetics Foundation for Neutral Skin Tones

December 20th, 2007 by Karen 22 Comments

When it comes to finding foundation colors that match my skin tone, I sometimes feel like a brown Goldilocks. Paul & Joe foundation? Too yellow. Maybelline Pure Makeup? Way too pink.

I’ve struggled to find the right in-between shade that doesn’t make my face look ashy or sallow. If you have the same foundation color woes, then you just might dig my two new fave foundations, Becca Luminous Skin Colour tinted moisturizer ($40.00) and Becca Stick Foundation ($39.00). Both create a perfect, natural foundation look for neutral skin tones.

Becca Luminous Skin Colour in the shade Nut, with Becca Stick Foundation in Coffee
becca-cosmetics-luminous-color-stick-foundation

Becca Cosmetics, an Australian line known for its extensive range of foundations and powder shades, can help you achieve a flawless, natural-looking and long-lasting foundation look. But be forewarned, Becca believes you’ve got to use multiple products: primer, tinted moisturizer, stick foundation and powder.

In addition to foundation for neutral skin tones, Becca has a wide range of foundation colors — pink, yellow and warm shades — for other skin tones. If you have skin with a neutral tone like I do, with skin that’s neither pink/red nor yellow/gold dominating your skin color, it can be really hard to find a foundation because so many of them are rarely true neutral.

Combining several $40 products seems like an expensive, time-consuming endeavor. The skeptic in me originally thought this was just clever marketing, but after a few weeks of using both the Luminous Skin Colour tinted moisturizer and the Stick Foundation, I’m really digging this combination because the color matches my skin perfectly. They’re also easy to use and don’t break me out.

How to work it


I’m a total lazy beast, so here’s my quick and dirty guide to how I use Becca foundation. These steps take about four minutes if I’m in a hurry.

1. Prep skin with moisturizer and sunscreen.
2. Blot excess.
3. If I have time, I’ll start by applying a layer of Laura Mercier Oil-Free primer, but I usually skip this step.
4. Apply 1-2 pumps of Becca Luminous Skin Color all over face with fingers.
5. Put a few dabs of Stick Foundation on fingers and rub between fingers to warm up product. Apply only to areas where color needs to be evened out; on me that’s the red patches around my nose, on my cheeks and between my brows. Smooth and blend into skin until obvious lines are covered.
6. Apply Laura Mercier Translucent Loose Setting Powder all over to set foundation.

When applying foundation, I usually like using the MAC 182 brush, but, with Becca products, fingers work better. The Luminous Skin Colour has a thinner consistency and matches my skin tone more closely than Laura Mericer’s Tinted Moisturizer does. It doesn’t look like it’s sitting on top of my skin the way Laura Mercier’s tinted moisturizer does, and I don’t need to worry as much about blending the product with my 182 brush to create a natural look. The Stick Foundation has a thick and waxy consistency, but, again, the color matches my skin so well that warm fingers are all I need to blend it easily and perfectly into my skin.

Neutral Territory

switzerland-map

For me, the defining difference between the Becca foundations and Laura Mercier’s tinted moisturizer is color. I’ve always known that Laura Mercier’s “Almond” shade was close to my natural skin tone (albeit a touch too pink), but I liked the coverage and just assumed I’d never find anything closer. But Becca’s Stick Foundation in the Coffee shade is truly neutral, with no dominant yellows or pinks, and melts right into my skin.

Other neutral colors in the Becca Stick Foundation line are:

Light to fair
Latte – pink-neutral/light to fair complexions

Fair to medium
Praline – neutral/fair complexions
Banana – neutral/fair to medium complexions
Tahini – neutral/fair to medium complexions

Medium
Macadamia – neutral/medium complexions
Brulee – neutral/medium complexions
Mallow – neutral/medium complexions

Tan
Toffee – neutral/light tan complexions
Coffee – neutral/tan complexions
Honeycomb – neutral/light tan complexions

Golden Brown
Truffle – neutral/golden brown complexions
Chestnut – neutral/warm brown complexions
Almond – neutral/rich warm brown complexions
Chocolate – neutral/deep chocolate brown complexions

Dark Bronze
Molasses – neutral/very dark bronze complexions
Espresso – neutral-warm/very dark bronze complexions

becca-cosmetics-stick-foundation-swatch
becca-cosmetics-stick-foundation-swatch-2
becca-cosmetics-stick-foundation-swatch-3
becca-cosmetics-stick-foundation-swatch-4
becca-cosmetics-stick-foundation-swatch-5

You can peep all the Becca shades on Sephora.com, where the massive Becca blowout sale continues.

Side note: Don’t the makeup gods have a sick sense of humor? I finally find foundation that matches my skin perfectly and snag it on sale at a deep discount (SCORE!) on Sephora.com … but, of course, the only reason I get it so cheap is ’cause Sephora’s phasing out their entire Becca inventory. CRAP! I did find a few online sites still carrying the line, though, like Dermstore, and the Becca Web site, so all is not lost.

Stick Foundation: Easy, like Sunday morning

I’ve only used liquid foundations in the past, so I thought a stick foundation would be hard to use. I was wrong. I love that I don’t have to spend a lot of time blending. Another thing that surprised me is how the formula can be so thick yet feel so light on my skin. It doesn’t migrate or streak, and it never cakes. I like sheer to medium coverage, so I don’t use much, but if you like a heavier foundation look you can easily layer the product to achieve more coverage.

Even if you don’t have a neutral skin tone, the Becca foundations are worth checking out. They perform well, have a great color selection and are easy to use. With so many colors, you’re bound to find something that works for you!

Pretty young things, repeat after me, say “Nah, nah, nah nah!”

Why are you staring at this old school pic of MJ?

michael-jackson-old-school-2

Today I have Michael Jackson’s “PYT” stuck in my head:

Now it’s stuck in yours too, isn’t it?

Your friendly neighborhood beauty addict,

Karen

There are 22 comments on this post. Leave yours.

Categories: Makeup, Makeup Tips/How To, Product Reviews Keywords: becca

  • « Go to Previous Page
  • Go to page 1
  • Interim pages omitted …
  • Go to page 87
  • Go to page 88
  • Go to page 89
  • Go to page 90
  • Go to page 91
  • Interim pages omitted …
  • Go to page 93
  • Go to Next Page »

Primary Sidebar

Welcome to Makeup and Beauty Blog

Welcome to Makeup and Beauty Blog! My name is Karen, and I’m a freelance writer obsessed with makeup.

Makeup and Beauty Blog features daily product reviews, makeup tips and beauty news — like an interactive version of a monthly print magazine, except with occasional pictures of my cat.

Recent Posts

Sundays With Tabs the Cat, Makeup and Beauty Blog Mascot, Vol. 878

Makeup and Beauty Blog Monday Poll, Vol. 894

Makeup and Beauty Blog Monday Poll, Vol. 893

Makeup and Beauty Blog Monday Poll, Vol. 892

Makeup and Beauty Blog Monday Poll, Vol. 891

/* real people should not fill this in and expect good things – do not remove this or risk form bot signups */

Social

  • Facebook
  • Instagram
  • Pinterest
  • Twitter
  • YouTube

Featured Posts

Sundays With Tabs the Cat, Makeup and Beauty Blog Mascot, Vol. 771

Lady Unicorn

Weird Things I Like to Do

brows fill out beforehand

Before You Pluck or Wax Your Brows, You Must Do This

current bare skin status

What’s One Thing That Drastically Changed Your Skin for the Better?

Copyright © 2025 Makeup and Beauty Blog. Get in touch.