• Skip to main content
  • Skip to primary sidebar

Makeup and Beauty Blog | Makeup Reviews, Swatches and How-To MakeupMakeup and Beauty Blog | Makeup Reviews, Swatches and How-To Makeup

A beauty blog blooming with fresh makeup reviews, swatches and beauty tips from your friendly neighborhood beauty addict

  • Home
  • About
    • About
    • Contact
    • FAQ (Frequently Asked Questions)
    • Advertising & Media
  • Categories
    • Product Reviews
    • Makeup
    • Skincare & Fragrance
    • Style & Fashion
    • Hair
    • Nails
    • Tips & Tutorials
    • Just for Fun
  • Brands
  • Store

Product Reviews

Origins Spring Makeup Colors – Leafy, Lush and Natural

January 17th, 2008 by Karen 26 Comments

Origins’ new spring makeup colors remind me of the time I hiked through a thick bamboo jungle on the island of Kauai in Hawaii. Each nature-inspired shade harkens back to the tall stalks of bamboo that surrounded me, reaching high into the sky above, and the rich, brown earth beneath my feet.

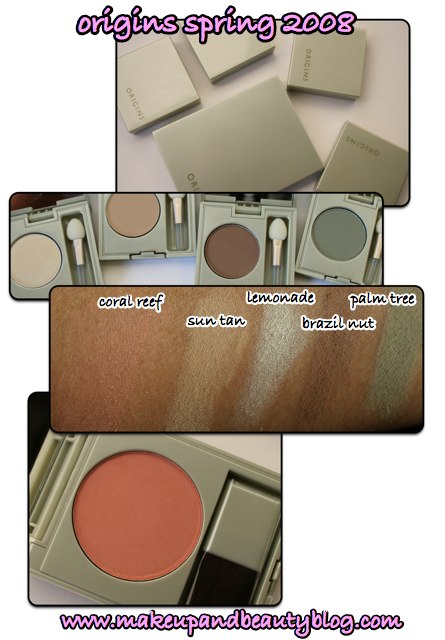
The release contains four lush eyeshadows ($13.50 each) and one juicy blush ($17.50).

  • Coral Reef Brush-on Color blush – pink-orange with a touch of gold sparkle
  • Brazil Nut Origins Eyeshadow – gold-brown matte
  • Sun Tan Origins Eyeshadow – warm beige matte
  • Palm Tree Origins Eyeshadow – light khaki green matte
  • Lemonade Origins Eyeshadow – cool beige-yellow shimmer

origins-spring-2008-1.jpg

What to buy, and what to skip…

Girrrrl, I *hate* matte shadows, but I loved the mattes in this release. Brazil Nut, Sun Tan and Palm Tree are the best matte shadows I’ve ever used, hands down. I used to think I was missing a special makeup gene because for the life of me I could never blend matte shadows properly, but the creamy formula and smooth application of these shadows makes it very easy for even a klutz like yours truly to transition colors seamlessly into each other. No harsh lines, hooray!

Be warned: if you like intense eye color, then with these bad boys you’ll have to apply multiple layers. Brazil Nut reminds me of a slightly darker matte version of my holy grail MAC Soba eyeshadow, and Sun Tan is a perfect neutral shade for browbones. My favorite one, though, is Palm Tree, a rich khaki green that really made my brown eyes pop.

The color I expected to fall in love with, Lemonade, actually ended up being my least favorite eyeshadow of the bunch! Its grainy texture left me uninspired.

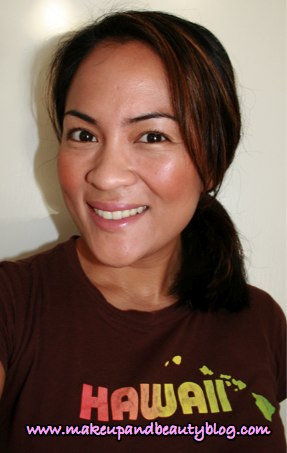
Last, but not least, there’s Coral Reef, a worthy addition to my blush collection. I know in the swatch above it looks a little sheer, but after a couple layers it produced that “I’m hiking through a bamboo jungle” flush.

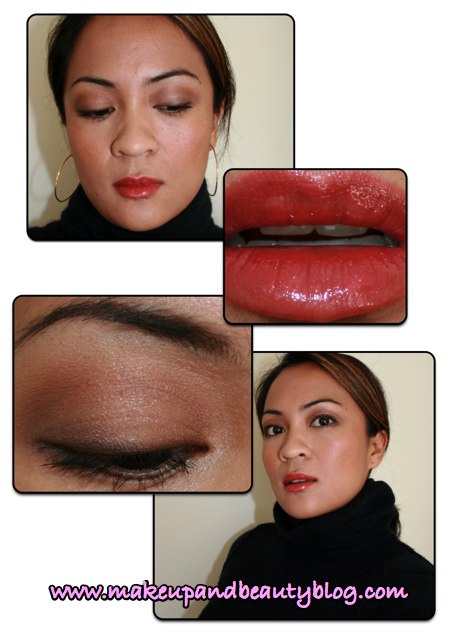
Here’s a shot of me wearing Coral Reef…

origins-makeup-spring-2008-fotd.jpg

On the eyes in this look I used Sun Tan on the browbone, Brazil Nut in the crease, Palm Tree on the lid and Lemonade in the inner corner of the eye. On my lips I used MAC Lychee Luxe lipglass.

I’m totally enamored with these shadows and think this natural look is going into heavy makeup rotation for the next few weeks. It might be winter outside, but at least I can feel like spring on the inside, yes?

The Origins spring colors will be available at Origins Retail stores, select department stores and online at Origins.com next month.

Are you ready for Friday? I sure am. Tomorrow night, El Hub and I are going to watch Cloverfield, the new monster movie. That should be … interesting. And hopefully this weekend, if it’s sunny and not too cold, I’m going hiking through the thick, bamboo jungles of Marin. Okay, just kidding about the bamboo jungle part, but I will look for a few nice waterfalls to admire (there are a few in Marin, who knew?) ’cause they’re the closest I can get to Hawaii right now.

I hope you had a faboo day and that you’re smiling.

Your friendly neighborhood beauty addict,

Karen

There are 26 comments on this post. Leave yours.

Categories: Makeup, Product Reviews

Makeup Brush Lust – Billy B Paint Brushes Rawk!

January 16th, 2008 by Karen 44 Comments

For years, the only brushes in my life were toothbrushes, hairbrushes and random brushes with destiny. I was content using the sad lil’ sponge applicators and teeny standard issue brushes that came with eyeshadows and blush. When I look back at my pictures from high school and college (aka, “the brush drought years”) my makeup didn’t look bad … but it definitely didn’t look good, either. My application was splotchy, and there was no blending to be had within a three-mile radius. *Cringes*

Fast forward a few years: it was 2002; I bought a few basic MAC brushes (252, 266, 217, 224, 129, 190) on a whim and my makeup life changed forever. ‘Twas a whole new world for your girl. Now, I love brushes so much that I’ve looked beyond MAC into other brush lines as well, and there are a lot of great brushes out there!

Product: Billy B’s Master Paint Brush Collection
Price: $249
Use: To apply makeup on eyes, face and lips
Makeup and Beauty Blog Rating: A-

biopic.jpg

Makeup artist Billy B’s Master Paint Brush Collection is one such line of fantastic brushes. It offers excellent quality at an affordable price. With all the brushes you need for eyes, face and lips, at $249, Billy’s set of 13 brushes is one of the best values around. I know that $249 seems like a lot of duckets, but it breaks down to about $20 per brush, comparable to MAC eye brushes averaging $25 dollars each.

I know it; you know it too. Yes, brushes can get expensive, but the right makeup brush can mean the difference between looking hella broke or looking super hot.

billy-b-brushes-2.jpg

Why a new line of brushes?

Billy created the set when he got tired of tweaking brushes to suit his needs. “I would find them [brushes] in the oddest places,” says Billy, “like a drugstore in Paris or some out-of-the-way beauty supply in Mississippi. I’d modify them with little cuticle scissors and stuff. And when I lost them I’d be so frustrated.” So he decided to make his own brushes from scratch.

What makes Billy’s brushes different?

The quality of the brush heads (the actual brush part of the brush) is what make this set outstanding. The bristles are so soft to the touch, not scratchy at all. The eye brushes feel great against my lids, and they’re actually softer than some of the MAC eye brushes that I own.

Billy gave a lot of thought to the design of each brush, and it shows in their performance. Take the eye brushes, for example. They are the standout performers in the set. With their domed shape and full brush heads, each applies color smoothly and evenly, making it so easy for me to layer and blend eyeshadows. Whether I’m doing a simple eye look with two eye shadows, or a complicated one with five, I find myself constantly reaching for numbers six, eight, 12 and 13.

billy-b-brushes.jpg

I love number 12 for smudging eye liner at the lash line (a job previously given to my MAC 219 pencil brush). Number 12 and the MAC 219 look nothing alike. The 12 is angled and thin, and the MAC 219 is stubby and pointed, but Billy’s number 12 does the job better. When I use the MAC 219 to smudge liner, the brush head feels rough and scratchy and so big and bulky that I often just end up smudging the liner completely away. Billy’s number 12 is smaller, thinner and softer than the 219, giving me more control and making it easier to create subtle fades and transitions of color, even with thin lines.

One last eye brush side note: Ya’ll know I’ve got a borderline scary obsession with the MAC flat angled 266 brush (BOW DOWN!). Billy’s equivalent to MAC’s 266 is his 11. While it does a decent job of filling in my brows, I am not giving up my 266 any time soon. Score one for MAC.

A unique brush head design…

What I appreciate most about Billy’s brushes are their smaller brush heads, a concept quite different than most of the brushes currently on the market. Billy believes that many of the brushes out there are just too big for a woman’s small face. He’s well known in the industry for being a master of fine detail, and he wanted to create smaller brush heads that would be able to handle finer detail work, especially around the nose and eyes. “If you’re really doing beautiful makeup,” says Billy, “then obviously detail is important. A gigantic brush isn’t going to fit into the corners by your nostrils. It’s getting powder into your hairline and on your hair and on your clothes and on your lashes.”

Light, short handles…

While I’m not crazy about the short birchwood handles, I do appreciate the reason behind their design. Billy spends a lot of time flying between New York and LA (celeb clients he services include Mary J. Blige — Holla! — and Paula Abdul), so he needed brushes that wouldn’t add extra weight to his makeup kit.

Billy’s Paint Brushes are available online at www.billybbeauty.com.

Do you have a brush obsession? What can’t you live without?

Your friendly neighborhood beauty addict,

Karen

There are 44 comments on this post. Leave yours.

Categories: Makeup Tools, Product Reviews

Be Brown, Not Boring, with MAC Originals

January 15th, 2008 by Karen 55 Comments

What can brown do for you?

If I had a nickel for every time I rocked the brown eye shadow back in the day I’d be a rich woman. Even though I’ve recently ventured into brighter colors like blues and greens, I’ll always have a place in my heart for my first eye shadow love — beautiful, basic brown.

Brown may be neutral, but it doesn’t have to be boring. Brown doesn’t mean you can get away with yawn-worthy makeup, young lady. The face of the day below, inspired by the Avarice face chart from MAC’s Originals collection, shows that brown can still be fun.

mac-cosmetics-avarice-face-of-the-day.jpg

Get the look…


Eyes

  • Brows – MAC Concrete eyeshadow
  • Browbone – MAC Bare Canvas Paint and MAC Daisychain eyeshadow
  • Lid – MAC Groundwork Paint Pot
  • Outer corners – MAC Clue eyeshadow
  • Crease – MAC Ochre Style eyeshadow and MAC A Little Folie eyeshadow
  • Upper lashline – MAC Coffee eye pencil
  • Lower lashline – MAC Clue eyeshadow
  • Lashes – MAC Plushlash in Black

When I wear different shades of brown at the same time, I choose browns in the same tonal family (cool browns with cool browns, warm browns with warm browns) that don’t have a lot of contrast between them. This makes them easier for me to blend.

The only semi-difficult part about this eye look was getting the darkest brown, A Little Folie, into the crease with a MAC 219 brush, a brush I have a love/hate relationship with. Used to apply a fine line of color in the crease or underneath the eye, the 219’s pencil tip-shaped brush head doesn’t always distribute color evenly. It could be faulty design, but more than likely it’s because I haven’t discovered the brush’s sweet spot yet. Using the 219 well takes a lot of practice.

Despite the range of products I used for this look, the whole thing took about 10 minutes because there wasn’t any complicated layering or lining of the waterline (which for me can take SO MUCH TIME).

Cheeks

  • Cheeks – Shu Uemura Glow on Blushes in M Brown 73 and P Gold 93D.

The original Avarice face chart called for Raizin blush (a gold reddish-brown matte) and Reflects Blackened Red Glitter, but I don’t own Raizin, and Reflects Blackened Red looks terrible on me, so I opted for two Shu Uemura Glow On blushes instead.

Lips

  • Lipstick – MAC Rozz Revival
  • Lipgloss – MAC Avarice Lipglass

I’m a total klutz, so it took me forever and a day to get this red lippy going. My biggest issue? I couldn’t get the Rozz Revival to apply evenly, and because I didn’t use a lip liner the Rozz was revival-ing all over the place. I resorted to applying two layers of it and one layer of Avarice Lipglass with a MAC 316 covered lip brush. Next time I’m going to use a lip-colored pencil, like MAC Pink Treat Cremestick Liner, to make it easier!

mac-originals-avarice-face-chart.jpg

Don’t miss…

Clue eyeshadow. When I first swatched this I wasn’t moved, but after I got it on my eye I totes fell in love. A mid-tone dirty grey with silver pearl, this eyeshadow has a pretty finish, soft texture and is very easy to work with. For a simple, subtle grey eye, I use Groundwork Paint Pot over the entire lid and then swipe Clue from the lashline into the crease. I give my lashes a quick curl, add two coats of mascara and I’m done!

Rozz Revival lipstick.When I think of red lipstick I usually think of sophisticated and serious looks, but Rozz Revival is a fresh, young and fun twist on red. With a high shine, lustre finish, this watermelon reddish pink lippie would look great with a tan! I can’t wait for summer!

Coffee eye pencil. This pencil is a fantastic deep brown with no red or orange tones. Even though it isn’t a Technakohl, I love it because it’s soft and easy to blend.

Are ya rocking the browns today, or did you go crazy with color?

I’m in the middle of my first cup of coffee and the caffeine is starting to work its magic – wheeeee! I hope you’re Tuesday is off to a fantastic start!

Your friendly neighborhood beauty addict,

Karen

There are 55 comments on this post. Leave yours.

Categories: Face of the Day (FOTD), MAC Makeup, Product Reviews

Glow in Style with Shu Uemura Glow On Blush

January 14th, 2008 by Karen 73 Comments

I was vegetating on the couch the other day, watching my upmteenth hour of the America’s Next Top Model marathon on MTV, when El Hub walked by and said, “Did you do something different today? Your face looks so bright and glowy.”

At the time, I was wearing something new, a mix of two Shu Uemura Glow On blushes, M Brown 73 and P Gold 93D.

Now, El Hub knows jack diddly squat about makeup, so the fact that he noticed was enough for me to conclude that Glow On blush lives up to its name. The products are so finely milled that that they’re absorbed into the skin, never leaving an obvious or painted look, to a degree rarely seen in a powder like this. They give me a just-pinched-your-cheeks flush, like I’m not wearing any makeup at all. I am in love with these blushes!

shu-uemura-blushes-2.jpg

How to get the glow…

Getting a natural but subtle glow with these bad boys is really easy once you get the hang of the application. For the look that got El Hub’s attention, I used two blushes: M Brown 73 (a warm, peachy-brown matte) and P Gold 93 D (a pearl gold shimmer).

First, I applied three layers of M Brown 73 on the apples of my cheeks and blended them upward into the hairline with a blush brush, like the Shu Uemura Natural Brush 20 cheek brush.

Then, using a cheek brush with a smaller brush head like the Shu Uemura Natural Brush 14, I applied two layers of P Gold 93 D to my upper cheeks (underneath the outer corner of each eye) with a smaller cheek brush to create a subtle highlight.

shu-uemura-glow-on-blush-fotd.jpg

Glow On matte blushes like M Brown 73 are highly pigmented, so every stroke of your brush across the pan will leave lots of color. To achieve a subtle look, I tapped excess color out of the brush before each application and used multiple layers to avoid overly dark, crazy clown cheeks.

To dilute the brown, I swiped the brush across the blush pan once and tapped it against the side of the sink (or brush a piece of tissue). Then, I carefully applied the blush to my cheeks with a light touch and blended out the edges. I did this two more times (you might have to do it less if you’re lighter than I am) until I got the flushed, natural color I was shooting for.

Glow On blushes with a shimmer finish, like P Gold 93 D, are slightly less pigmented than the mattes. They still have a lot of color, though, so remember to tap out the excess from your brush if you still want your cheeks to look natural.

Side note: I know that when I first started using blush I had the tendency to use a heavy hand. I’d always end up with too much color on my brush and on my cheeks, so if you’re a blush newbie, take extra care to apply the color lightly.

Packaging woes…

Although Shu Uemura blushes are superior for color, their packaging is another story. While the clear lids are handy (I never have to flip the blush over to read what color is on the label) and the blushes are compact and great for travel, the overall packaging is flimsy. I accidentally dropped Brown 73 once and the hinge broke. Now the jar doesn’t close properly, and I can’t travel with it unless I secure it wish a rubber band.

If more hinges break on more of Shu’s blushes (which is likely because I’m always dropping stuff), I’m going to transfer the blush pans to a palette. The process of removing a blush pan from its clear casing is easy. If you remove the sticker on the back of the blush jar, you’ll see two small holes, each located on opposite sides of the back of the blush pan. Working on one hole at a time, insert a push pin carefully and push until you release the pan from the package. Voila! Your blush is ready for repotting in its new home.

Fun facts about blush…

  • In the 1920s blush was called rouge, and the style of the day was to wear rouge on the apples of one’s cheeks in distinctive, cartoony circles clearly visible to the naked eye.
  • During the Victorian Age in Britain, makeup was associated with low morals (LOL!), so instead of wearing makeup, women of virtue would pinch their cheeks.
  • Thousands of years ago, the ancient Greeks used ingredients like crushed mulberries, red beet juice and crushed strawberries to make blush.
  • Both men and women wore blush during the English Regency period in the early-1800s.

What blush are you wearing today? Whatever it is, I hope you’re working it!

Your friendly neighborhood beauty addict,

Karen

There are 73 comments on this post. Leave yours.

Categories: Makeup, Product Reviews

MAC Moisturelush Cream: Say Buh-bye to Dry

January 13th, 2008 by Karen 30 Comments

Lately, my skin has been drier than the Sahara. In my 20s (*ahem!*), I never thought about moisturizing. I had oily skin. To protect against sun damage, I would apply a layer of Oil of Olay Complete SPF 15 in the morning, but that was it.

Now, however, I’m in my early-30s, and dry skin, especially on my face, is one of my top skin concerns. Turns out that as we get older, skin tends to get drier. The glands that produce oil under our skin don’t work as well as they used to; that causes skin cells to clump together in flakes and scales (oh, joy!) and dulls our complexion.

Everyone’s skin changes with age, but for women dry skin strikes earlier than it does for men. Guys experience moisture loss in their skin later in life than women do. A woman’s skin tends to become considerably drier after menopause. Thankfully, there’s moisturizer.

How to spot dry skin…

Ordinary dry skin is known as xerosis. It’s not serious but can be seriously not cute to look at, especially when it causes fine lines and wrinkles. The severity of one’s dry skin problems varies depending on age, hydration (drink that water, ya’all!), overall health, genetics, the climate where you live and the amount of time you spend outside.

Typical symptoms of dry skin due to normal aging are…

  • Skin tightness, especially after showering, bathing or swimming
  • Skin that looks dull or dehydrated
  • Skin that feels and looks rough
  • Itching
  • Slight to severe flaking, scaling or peeling
  • Fine lines or cracks
  • Unusual redness

Frequent causes of dry skin…

Some people inherit dry skin problems, so if mom and dad are always slathering on the lotion, chances are you’ll eventually find yourself in the same boat.

And a lot of people don’t realize that dry skin can be a worse problem in winter than it is in summer. The closer temps get to freezing, the lower the amount of moisture in the air outside, but indoors, central heating and air conditioners, wood-burning stoves, space heaters and fireplaces also lower indoor humidity and make dry skin even worse.

It’s raining moisture, hallelujah!

Here in NorCal, it’s chilly outside and the heater is on 24-7. Lately, the skin on my face has been so tight and uncomfortable, and I’ve developed a few red, dry patches that not even my tried-and-true Clinique Moisture On-line moisturizer was able to heal.

I was nervous to try MAC Moisturelush Cream because I had a bad incident with MAC Green Gel Cleanser last spring that left me with a less-than-stellar opinion of MAC’s skin care products. Lord knows I loves me some MAC, but I wasn’t a believer in their skin care line. Since “the incident,” I’ve been hesitant to try anything new from them.

But I sucked it up, took a chance, and I’m sure glad I did. Both Moisturelush Cream and its eye cream counterpart deliver the goods. Both have made a huge difference in my skin, and they haven’t broken me out (…yet, knock on wood!). If you need heavy duty moisturization with no anti-aging bells and whistles, then run — don’t walk — to your MAC counter and snag both of these moisturizing miracles ASAP!

mac-moisturelush-creme.jpg

Product: MAC Moisturelush Cream
Price: $30
Use: As a hydrating cream for face and neck
Makeup and Beauty Blog Rating: A+

Official Moisturelush Cream Product Profile:
A densely hydrating face cream that helps to moisturize and protect facial skin. This new formula provides immediate moisturization while creating soft and luscious skin. Provides rich lasting moisture, moisturizes dry, chapped skin and maintains skins natural barrier. Glides on easily with a a silky application and ample playtime. This comfortable, non-drying formula helps create an even surface for smothh, more perfect makeup application. Apply to face, morning and night, after cleansing.

Moisturelush Cream is half way between a face lotion and a face balm (thicker than Clinique’s Moisture Online, but thinner than Creme de La Mer). Because it’s thicker than a typical face cream, I have to spend a minute working it in. It has a light floral scent and feels great as it sinks in, so I don’t mind spending the time. Unlike most heavy-duty moisturizers, Moisturelush is smooth without being sticky, which means I can use it on my neck too!

My skin feels drenched in moisture after using it. Just a tiny bit of this on my face and neck and my skin feels happy.

mac-moisturelush-eye-cream.jpg

Product: MAC Moisturelush Eye Cream
Price: $28.50
Use: As a hydrating eye balm
Makeup and Beauty Blog Rating: A+

Official Moisturelush Eye Cream Product Profile:
A densely hydrating eye cream that helps to de-puff while it lifts and firms the area around the eyes. This new formula provides immediate cushion and luminous optics provide a rejuvenating glow. Opthamologist and dermatologist teseted. Non-Acnegenic. Apply to clean, dry skin under and around the eye, morning and night.

Moisturelush Eye Cream also really surprised me. I put it to the test by applying it to a dry, red patch that I’ve had on my left eyelid for the past two weeks. Within two days of using this the dry patch disappeared.

Moisturelush Eye Cream is thicker than the regular Moisturelush cream and more like an eye balm (which is thicker) than an eye cream. Because it’s so dense, I have to spend even more time working it into the skin than I do with the regular cream, but, like the regular cream, it has the same light, floral scent and soothing feeling, so I really don’t mind. Also like the face cream, it doesn’t leave a greasy film yet is still intensely hydrating.

A few heavy duty eye creams have left me with pimples on my eyelids, but so far my eyes have remained zit free. I haven’t noticed any de-puffing, though, but my eyes weren’t that puffy to start with, so that’s not a big deal for me.

I’m really hoping that both of these products continue to work as well as they have for me. If you have dry, sensitive skin like I do, I think you’ll love ’em both.

They’re moderately priced for department store creams, and because I only have to use a little bit of each, I’m guessing one jar of each will last at least eight months. If you’re on a budget and need to decide between the two, then go for the eye cream. It’s slightly more moisturizing than the face cream, and you can use it to spot treat dry areas like around the nostrils and mouth.

Thank you all for your well wishes while I was sick. I’m feeling sooo much better now, and I’m extra psyched today because the sun is shining and all I see are blue skies!

Hope your Sunday has been moisturized and mellow.

Your friendly neighborhood beauty addict,

Karen

There are 30 comments on this post. Leave yours.

Categories: MAC Makeup, Product Reviews, Skin Care

Chanel Teint Innocence Compact Foundation, Retail Therapy

January 11th, 2008 by Karen 55 Comments

Yesterday was brutal and I’m still sick as a dog, so after work I acquired goodies to bolster my immune system: a humongous bag of Ricola Cough Drops, Theraflu (blech!) and Chanel Teint Innocence Cream Compact Foundation, YES!

chanel-teint-innocence.jpg

Okay, okay, so I know compact foundation will do absolutely zip when it comes to clearing up my congestion, but the retail therapy ’twas priceless. For a very brief and shining moment, I felt almost like a real girl.

chanel-teint-innocence-compact-open.jpg

Chanel Teint Innocence Compact Foundation ($55) is the newest incarnation of Chanel’s award winning Teint Innocence liquid (in this case, cream) foundations. It comes in a signature Chanel black compact with a separate James Bond-esque secret compartment for the sponge applicator. Chanel might have saved us all a few duckets on the packaging, though, because every makeup artist at the counter advised me not to apply the product with the included sponge, which they said causes caking. Only use the included sponge if you’re on-the-go or for simple touch-ups. To really look like a star, use a traditional foundation brush, instead.

A few months ago I tried the liquid version of Teint Innocence in the Soft Honey shade but wasn’t moved by it because it felt heavy and gave my face a greasy, disco-ball glow. The color was also a little off (too yellow) for me.

disco-ball.jpg

But the compact foundation has the liquid beat. My shade, 50 Natural, matches my skin tone almost perfectly. It’s just the tiniest bit too yellow.

Texture wise, the cream version feels lighter than the liquid did. It’s weightless. I don’t feel it sitting on top of my skin. I also like light coverage, so I put on just enough to even out my skin tone, but if I want medium coverage for a more dramatic look, I can still put on multiple layers without it suffocating my pores.

Oh, and the greasy disco ball factor? Very low. There is a slight shimmer, but it’s subtle and pretty.

I usually set foundation with loose powder, but I’ve heard that some women skip powder entirely when using this product. My skin gets oily as the day goes on, so I’ll just have to experiment to see what works best.

I’m using a traditional foundation brush (the MAC 190) with this but can’t wait to try a few other brushes with it as well. Woo hoo! I’m starting to feel better already!

Free Lauryn Hill!

When I drove to the mall to pick up my compact yesterday it was pouring. Traffic was ugly. I was stuck in the car for an obscenely long time and popped in Lauryn Hill’s classic CD, “The Miseducation of Lauryn Hill,” which I haven’t listened to in years. The song Everything is Everything started playing, and it hit me that this CD is really freaking amazing.

lauryn-hill2.jpg

What is it with artists making brilliant, shining solo debuts only to disappear into oblivion afterwards? I don’t know what L Boogie as been up to (I suppose she’s raising her babies), but I wish she’d make more music for us (me!). Come on, girl, pick up that pen and start writing lyrics again!

Fake it ’til you make it

Over the past few days my cold turned me into a lazy beast. To at least look like I feel great, I’ve rubbed some color onto the apples of my cheeks using Prescriptives Blush More or Less Cream Blush ($21.50) in Nantucket Dune, a soft bronze with a faint golden shimmer. Even sick, we can still feel pretty.

prescriptives-blush-more-less-creamy-cheek-color-1.jpg

Prescriptives Blush More or Less in Nantucket Dune
prescriptives-blush-more-less-swatch.jpg

I really like this blush’s staying power. Some cream blushes feel slick and emollient and just slide off my cheeks, but Blush More or Less stays put all day long. I get a nice glow without looking overly made-up.

Just use clean fingers to apply it directly on your cheeks. The color glides on and isn’t splotchy at all. You shouldn’t have to do much blending, which is a big plus when you’re coughing and can’t hold a brush steady to save your life.

Mavericks, here I come (kinda)

mavericks.jpg

Ya’ll ready for the weekend? If I were feeling a little better, I’d love to go to Mavericks to watch the 2008 big wave surf competition. Cindy, my surfing buddy, is leaving at the crack of dawn tomorrow to watch folks ride dirty on those 20-foot waves. It’s in Half Moon Bay, which is just South of San Francisco. I, however, will be watching from the comfort of my couch via live webcast.

I hope you haven’t caught the nasty cold that’s going around. Stay healthy, please.

Your friendly neighborhood beauty addict,

Karen

There are 55 comments on this post. Leave yours.

Categories: Makeup, Product Reviews

Your Skin Care Cheat Sheet: Retinols and Retinoids

January 8th, 2008 by Karen 43 Comments

Retinoids, rentinol, Retin-A, Renova — you’ve probably heard of them before. They’re members of the growing family of anti-aging products on the market. Their names are similar (and part of that is smart marketing), but have you ever wondered how each one works?

The skinny

All of the above products fall under the umbrella of “vitamin A derivatives.”

The gentlest member of this family is retinol, a vitamin-A derivative commonly found in over-the-counter skin care products like Philosophy’s Help Me Retinol Night Treatment and Neutrogena’s Healthy Skin Anti-Wrinkle Cream.

philosophy-help-me-copy.jpg

Tretinoin, a retinoid, is retinol’s far stronger, souped-up cousin. It’s available by prescription only. Tretinoin creams like Retin-A and Renova are also referred to as topical retinoids. They’re frequently prescribed to treat acne.

While both Renova and Retin-A contain the same active ingredient, tretinoin, Renova is generally considered the more moisturizing of the two.

Why the fuss?

Healthy, youthful skin is smooth and resilient, supported by collagen and elastin. Skin loses its elasticity and strength as age and environmental damage (sun damage, chemical burns, etc.) occur, and the results are fine lines and wrinkles.

Vitamin-A derivatives have a molecular structure small enough to penetrate skin’s lower levels, where they strengthen and replenish collagen and elastin. Clinical research going back 20 years confirms the anti-aging properties of retinoids like Retin-A and Renova. They’ve been proven to smooth skin, unclog pores, regenerate collagen and may even prevent some types of skin cancer.

(Side note: Your girl *loves* scientific data. I was a biology major in college!)

While not as potent as retinoids, retinols still pack some anti-aging punch. Studies have shown their ability to moisturize, smooth, restore skin tone and color, and diminish the appearance of fine lines and wrinkles.

Things to think about when using retinoids or retinols

At night – If you plan to use them at night, apply product after cleansing but prior to moisturizing.

In the morning – If you plan to use them in the morning, add a broad spectrum sunscreen to your regimen because retinoids increase skin’s sensitivity to sunlight.

Things to avoid

1. Using too much product. Retinoids, in particular, are capable of burning skin if overused.
2. Using them in conjunction with products containing alpha hydroxy acids or bezoyl peroxide, either of which can reduce the effectiveness of retinoids and cause excessive drying.
3. Over-zealous waxing or exfoliation, which may irritate skin treated with retinoids.

Mark down the date in which you open a tube or jar of any vitamin-A product because they all lose potency over time.

My retinol experiment with Philosophy’s Help Me

I’ve been wanting to get on the vitamin-A train for a while now, but I didn’t want to jump right into the oh-so-potent retinoids.

Philosophy’s Help Me, when used at night, is supposed to minimize the appearance of fine lines and reduce discoloration and surface roughness. It also claims to keep pores clear. Retinol (not retinoid) in the product is encapsulated in a time-release technology Philosophy calls Microsponge, which stabilizes the retinol in the cream, releasing it gradually throughout the night.

For three weeks I used Philosophy’s Help Me Retinol Night Treatment ($45), alternating it with a benzoyl peroxide product every other night.

Here’s what I did on retinol nights:

1. Washed my face wish a gentle cleanser — Philosophy’s Purity Made Simple.
2. Used a small, pea-sized amount of Help Me on my face and neck.
3. Waited a few minutes before applying a layer of moisturizer.

And on benzoyl peroxide nights:

1. Washed my face with Purity Made Simple.
2. Swiped Clinique’s Mild Clarifying toner (contains salicylic acid, a betahydroxy acid) on my face and neck.
3. Waited a few minutes before applying a small amount of DDF’s Benzoyl Peroxide Gel 5% with Tea Tree Oil.
4. After letting the gel dry, I applied moisturizer.

Did this bad boy work?

The combo made my skin really clear, and I could actually see a tiny difference in the visibility of the expression lines on my forehead. I swear they seemed smoother and less visible. Also, the retinol didn’t worsen my naturally dry skin (always a good thing). I was also hoping the product would decrease the intensity of some of my hyperpigmenation spots, but I didn’t really see an improvement in that area (drat!).

I think that as an anti-aging product, Help Me works, but the effect is subtle. I am now convinced that retinoid/retinol products are the way to go when it comes to affordable anti-aging treatments, so after I finish this tube I’m going to visit the dermatologist to check out Renova (a retinoid).

Have any of you used Renova or Retin-A? What did you think of it?

Your friendly neighborhood beauty addict,

Karen


There are 43 comments on this post. Leave yours.

Categories: Product Reviews, Skin Care

Shu Uemura Phyto-Black Lift, Anti-aging Skin Care Collection

January 7th, 2008 by Karen 25 Comments

shu-uemura-phyto-black-lift.jpg
Product: Shu Uemura Phyto-Black Lift, anti-aging skin care collection
Use: A three-step anti-aging system to firm skin, smooth fine lines and moisturize
Cost: If you’re looking for a luxurious high-end skin care system, Phyto Black Lift’s got you covered. Budget friendly, it’s not, but in this case you get what you pay for.
Makeup and Beauty Blog Rating: B

It’s easy to fall in love with all three products in Shu Uemura’s Phyto-Black Lift anti-aging skin care system. With sleek black packaging, a light floral scent and smooth textures, the products are a skin care junkie’s luxury dream come true.

All three products in the collection are plant-based, with exotic sounding ingredients like lychee extract and Depsea water. Black Tea Ferment, a sweet tea believed by the Japanese to have mystical anti-aging properties, is the line’s star ingredient.

Each product in the collection performs a different step in Shu Uemura’s anti-aging regimen.

Step 1: Prepare with Radiance Boosting Lotion, $45

I believe exfoliating toners do help to clear my skin, but they’re often too drying for long-term use. Radiance Boosting Lotion, with fruit extracts and alpha hydroxy acids, exfoliates without leaving my skin feeling tight and dry. And after two weeks of testing, my skin seems clearer and less pimply. This is my favorite product from the collection.

Step 2: Treat with Lifting Anti-Wrinkle Essence, $95

You may have noticed that serums are a big trend in skin care lately. Serums are either thick liquids or light lotions designed to target specific skin care issues. Typically, they’re applied before moisturizers.

Lifting Anti-Wrinkle Essence serum contains an ingredient Shu Uemura calls micro-silica, which they claim fills in wrinkles to smooth skin and create a lifting effect.

The texture is like a hybrid between a light lotion and a foundation primer. After I smooth it on my face and neck, my skin does feel smoother, but I think that may be at least partly due to Dimethicone, an ingredient commonly used in skin and hair. I’m in my early-thirties, so I don’t have a lot of wrinkles yet and can’t really tell if my skin is being lifted or tightened when I apply the product. I like this serum, but I’m not 100% convinced of the degree of its impact.

Step 3: Moisturize with Firming Anti-Wrinkle Cream, $125

Ohhhh, yummy. My acne-prone, dry skin super loves this stuff. Packed with “Nutra-lipids,” a patented combination of natural oils that protect and rejuvenate skin, my face feels instantly hydrated after using this cream. I can see an immediate change from rough to smooth skin after one application. The jar I have is the dry skin mixture; if you have oily skin you’ll want the lighter lotion, called Smoothing Anti-Wrinkle Emulsion.

This cream hydrates like nobody’s business, and when I use it on my face, my skin feels drenched in moisture. The second thing I like about it is the texture. Moisturizers that target dry skin are often thick and greasy, but Firming Anti-Wrinkle Cream feels fluffy and light and doesn’t leave a greasy residue. I like that I can use it on my neck and not feel sticky.

Yes, at $125 it’s rather expensive, but if you’re plagued by dry skin and gravitate to high end brands, then I’d highly recommend giving Shu’s Firming Anti-Wrinkle Cream a try.

The final word

In general, I’m skeptical when it comes to anti-aging products, especially those that don’t contain clinically proven active ingredients like retinol or alpha hydroxy acids. Some compounds have lots of long-term scientific studies backing their anti-wrinkle claims. Shu’s Phyto-Black Lift collection doesn’t make those claims.

While I can’t conclusively say that this skin care system is effective when it comes to treating and preventing wrinkles, I can say with confidence that the products in steps one and three, Radiance Boosting Lotion Toner and the Firming Anti-Wrinkle Cream, do help with my big skin issues, pimples and dry skin.

If you’re interested in plant-based products and willing to spend top dollar for skin care, you should give the toner and cream a try.

I’ll be doing a ton of product reviews this week, including more stuff from Shu (my new makeup love), so please check back later today for more.

How’s your Monday going so far? I’m still a little sick but on the road to recovery, yay!

Your friendly neighborhood beauty addict,

Karen

There are 25 comments on this post. Leave yours.

Categories: Product Reviews, Skin Care

  • « Go to Previous Page
  • Go to page 1
  • Interim pages omitted …
  • Go to page 393
  • Go to page 394
  • Go to page 395
  • Go to page 396
  • Go to page 397
  • Interim pages omitted …
  • Go to page 414
  • Go to Next Page »

Primary Sidebar

Welcome to Makeup and Beauty Blog

Welcome to Makeup and Beauty Blog! My name is Karen, and I’m a freelance writer obsessed with makeup.

Makeup and Beauty Blog features daily product reviews, makeup tips and beauty news — like an interactive version of a monthly print magazine, except with occasional pictures of my cat.

Recent Posts

Sundays With Tabs the Cat, Makeup and Beauty Blog Mascot, Vol. 878

Makeup and Beauty Blog Monday Poll, Vol. 894

Makeup and Beauty Blog Monday Poll, Vol. 893

Makeup and Beauty Blog Monday Poll, Vol. 892

Makeup and Beauty Blog Monday Poll, Vol. 891

/* real people should not fill this in and expect good things – do not remove this or risk form bot signups */

Social

  • Facebook
  • Instagram
  • Pinterest
  • Twitter
  • YouTube

Featured Posts

Sundays With Tabs the Cat, Makeup and Beauty Blog Mascot, Vol. 771

Lady Unicorn

Weird Things I Like to Do

brows fill out beforehand

Before You Pluck or Wax Your Brows, You Must Do This

current bare skin status

What’s One Thing That Drastically Changed Your Skin for the Better?

Copyright © 2025 Makeup and Beauty Blog. Get in touch.