Holy, mackerel! I’m amazed (and sometimes intimidated, to be honest) by how complicated some YouTube makeup tutorials are, even when it comes to foundation and under-eye concealer.
Sometimes I don’t mind following a lot of steps, but it depends on whether I’m just having fun, or whether I’m watching the clock. When it comes to my basic face makeup aesthetic, though, which is effortless (looking) and natural, I don’t necessarily think that your face makeup routine needs to be complicated.
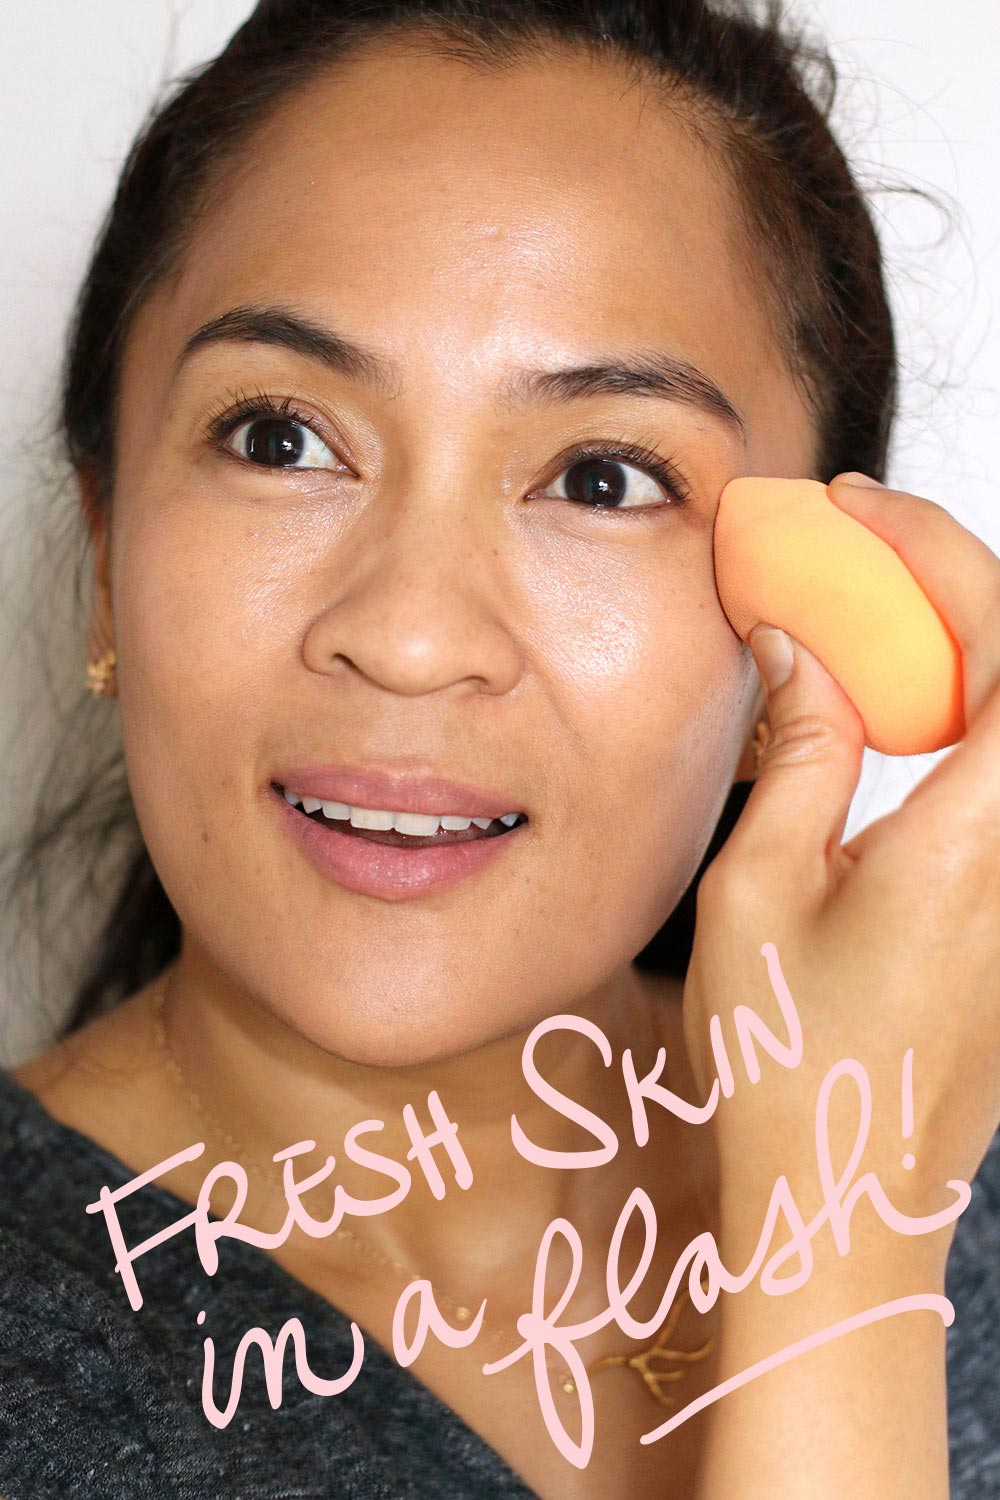
You can get fresh-looking skin in a flash with three products — a sheer foundation (or a BB cream, CC cream or tinted moisturizer), a full-coverage concealer and a face powder. You can even out your skin tone, keep the coverage looking light, and it doesn’t have to take forever.
Step 1: Prep
Start by applying moisturizer and/or primer to your skin to prep it and smooth your canvas for foundation.
Or…you can skip this step and just make funny faces ? in the mirror. Totally up to you. Your foundation might not look quite as smooth, but it’ll still look fine.

Step 2: Grab your favorite sheer foundation and a full-coverage concealer
Put one or two pumps of your favorite sheer foundation (or BB cream, CC cream or tinted moisturizer) on the back of your hand, then add one or two dots of full-coverage concealer, and mix them all together with a finger.
Adding the full-coverage concealer dots boosts the coverage of your sheer foundation to even out your skin a bit more, and it also saves you from having to apply and blend concealer on top of your foundation.


Step 3: Apply your foundation/concealer mix only where you feel like you need the most coverage
The key to this particular natural-looking approach that I like to use is that you aren’t applying face makeup everywhere. You’re just targeting specific areas, and I like to apply this mix on my cheeks, on and around my nose, around my mouth, on my chin and along my jaw. Then I put a smidgen right between my brows and in the middle area of my forehead.

Step 4: Pat a little under your eyes to vanquish dark circles

The less product I use under my eyes, the more natural I think the coverage looks (I mean, but I still need some help there), so I try to squeak by using as little product as possible.
Also, using a patting motion, instead of a swiping motion, to apply the foundation/concealer mix keeps it more where you want it so that you’re not swiping and wiping the product off your face as you work.
Step 5: Stipple with a sponge
Next, gently pat your face with a damp facial sponge (I’ve been using and liking the Real Techniques Miracle Complexion Sponge lately) to “take the edge off,” so to speak. I think it makes the coverage look much more natural, while blurring any marks left by your fingertips and lifting away any excess product.

Step 6: Set with powder

Then, load a small face brush with the faintest amount of face powder, and I use a small brush because it makes it easy to strategically apply the powder to very specific areas, which helps prevent the skin from looking overdone.
Finally, gently pat some powder on your cheeks, your nose, down the sides of the nose, around your mouth, in the middle of your forehead, and on your chin.
You’re all done!

You could stop right there, or you can keep going and add blush, bronzer, highlighter, etc. 🙂
Products used
- MAC Next to Nothing Foundation in Medium Plus
- Make Up For HD Concealer in Y41
- MAC Mineralize Skinfinish Natural Powder in Medium Golden
- Real Techniques Miracle Complexion Sponge
- NARS Charlotte Gainsbourg powder brush
Let me know if you have any questions. I’d love to help.
Your friendly neighborhood beauty addict,
Karen
Your skin looks so beautiful here! I’ll have to try this! I’ve been using a sample I got of the Nars Pure Radiant Tinted Moisturizer, and ended up picking it up with my Ulta coupon. The color match was a bit better than the BareMinerals Complexion Rescue I’ve been using.
I love using the smaller brushes for powder! I have dry skin so I apply powder very sparingly and strategically, and the small brush helps. I use it on the undereyes lightly and anywhere I’ve really concealed.
Hi Chelsea,
Using a small brush to apply powder was a game changer for me.
Glad you’re liking the NARS Tinted Moisturizer. It’s one of the best ones around, methinks.
I’m very disappointed, I have yet to make next to nothing work for me, it keeps peeling off after I put it on. I thought it’d be my new every day product and it isn’t 🙁
It’s not working for me either. I SO wanted to love it, but it makes my skin look positively fake.
Guess I’ll have to stick with the Lightful C tinted cream…..
Hi Sandra,
I wear Lightful C Tinted Cream and it’s amazing! You could use it with this trick.
I tried this trick this morning with my Lightful C and concealer (I’m currently loving It Cosmetics CC+ Eye Cream Correcting Full Coverage Cream Concealer), and I loved, loved, LOVED it!!!!!
I haven’t returned the Next to Nothing yet. . .I’m seriously tempted to give this a try to see if it works out for me. . .
Hi Sandra,
So happy that it worked for you! I have Lightful C and have yet to try it with it, so I’m going to do it soon. WOO HOO!
Hi Breyerchic04,
Are you layering any products underneath the foundation? Curious to know if that could be affecting the pilling issue. I haven’t experienced that myself.
I have been careful to not use primer with it after it happened the first time, but yeah I use my normal moisturizer, which is the MAC mineralize water gel cream. I will try it with something else, but I think I have tried something else, I do know i need to try it when I’m not in a rush and about to leave
Perfect! I love how hassle-free and simply this is done.
I usually stick with the lighter base and apply concealer on top on the larger areas wher extra coverage is needed (hyperpigmentation on my cheeks, redness around the nose) when the bb cream is still wet and then use a beauty blender. Kind of the same concept, but without the mixing beforehand. It is my go-to weekend look when I don’t want to spend a lot of time on my makeup.
Great minds think alike!
Happy Tuesday. 🙂
I’m all about the natural look, since I’m usually running around and sweating everything off in a few hours anyway. HAHA! Instead of concealer, I use strategic primer and then a BB cream all over. I’ve never had good luck with powder but will try the small brush since it’s been a game changer for you. 🙂
Hi Kim,
It also depends on the powder. Some look more powdery than others, I’ve noticed. Do you currently have one in rotation? I know you’re a Chanel fan. They have a loose powder that’s really beautiful.
Your skin is so nice without makeup! Wowza!
I do something similar on my face. I mix concealer, Kat Von D Lock It, with my moisturizer/sunscreen/primer, Paula’s Choice Youth-Extending Daily Hydrating Fluid (what a mouthful!) for a natural finish. I use more powder though, since I’m very oily. I mix Ben Nye Banana Powder and Graftobian HD powder together and it’s wonderful! Then I set it with Skindinavia Bridal Setting Spray. This spray will keep my face on when it’s 90 degrees and 90 percent humidity outside. It’s heavy duty stuff. Are you into setting sprays?
I also love the Real Tecniques sponge. I finally had to throw mine out after using it for way too long, and Real Techniques isn’t sold where I live. Wah! Thankfully, there’s online shopping. ?
Hi Tammy,
Yes, I’m into setting sprays. I bounce back and forth between a few! Right now I’m finishing up a bottle of Make Up For Ever Mist + Fix (it’s great). I also use and love Urban Decay Chill (I believe their setting sprays are by Skindinavia), the Shiseido one (can’t remember the name, but it’s great for a matte finish) and good ol’ MAC Fix+.
Where do you get your Real Techniques items online? I’ve seen them on ulta.com.
Happy Tuesday!
LOVE this!! I’ve been doing a version of this (only applying foundation to the spots that need it) after you mentioned it as a “tip” a little while ago. Love how easy, quick and low maintenance it is. <3 Thanks for making a legit tutorial for the idea!
I really need a smaller brush for powder!
Great idea about mixing the foundation and concealer. Never thought to do that, but I’ll give it a try.
I do this a lot! It’s nice for when I’m in a “more than tinted moisturizer but less than foundation” mood. What I like to do a lot is apply tinted moisturizer all over, and then mix what’s left on my hand with a drop of moisturizing concealer and applying to areas that need extra coverage. I also agree that avoiding too much product under the eyes is the key to making this look work. I’m assuming you’re still liking Next-t0-Nothing? I’ve been thinking about checking it out, although I did just buy the Laura Mercier TM (a repurchase from trying it a few years ago) in the Sephora sale and definitely don’t need another sheer, satin/dewy base product!
Hi Katie,
I do! I have it in my daily rotation bin, which is why I’ve been using it a lot lately. It holds up well throughout the day, and I like how I can’t feel it on my skin.
Did you buy anything else at the Sephora sale?
Hi Karen!
Just wondering about your opinion of the Nars Hydrating Glow Tint versus the MAC Next to Nothing Face Colour. They seem to be similar, and I see you’ve used the same technique with mixing concealer with both of them.
Thanks!
Hi Kate,
They’re both sheer, but they have different effects. NARS Hydrating Glow Tint is more skin-like and sheerer, while MAC Next to Nothing has a greater amount of pore blurring and coverage. If your skin is in amazing shape, do NARS Hydrating. If you like a little extra coverage and mellowing out of pores, then MAC Next to Nothing. I think of NARS Hydrating more as a vacation skin product, while MAC is something I’d wear more to work. Does that help at all? Let me know if you have any other questions. Happy to help!
Yes that’s very helpful. I wanted something work appropriate so I’ll try the MAC. Thanks again!
You’re welcome! Let me know if there’s anything else I can do to help.
Happy (almost) Friday!
How does the Real Techniques sponge compare to the Beauty Blender? I love the Beauty Blender but I’m always on the hunt for a more affordable option!
Hi Kristen,
I just started using it and I really like it. I was looking for a more affordable option, too. It doesn’t absorb a lot of product, and when I stipple it on foundation and/or concealer, it leaves doesn’t leave an obvious looking “spongy” pattern. The extra curves and edges are nice too!
Thanks! I may have to try it out. I like Real Techniques’ other brushes!