• Skip to main content
  • Skip to primary sidebar

Makeup and Beauty Blog | Makeup Reviews, Swatches and How-To MakeupMakeup and Beauty Blog | Makeup Reviews, Swatches and How-To Makeup

A beauty blog blooming with fresh makeup reviews, swatches and beauty tips from your friendly neighborhood beauty addict

  • Home
  • About
    • About
    • Contact
    • FAQ (Frequently Asked Questions)
    • Advertising & Media
  • Categories
    • Product Reviews
    • Makeup
    • Skincare & Fragrance
    • Style & Fashion
    • Hair
    • Nails
    • Tips & Tutorials
    • Just for Fun
  • Brands
  • Store

Makeup Tips/How To

Throwback Thursdays: Bright Blue Inner Corners and Ice Skating!

January 16th, 2020 by Karen 9 Comments

mac tilt inner corner

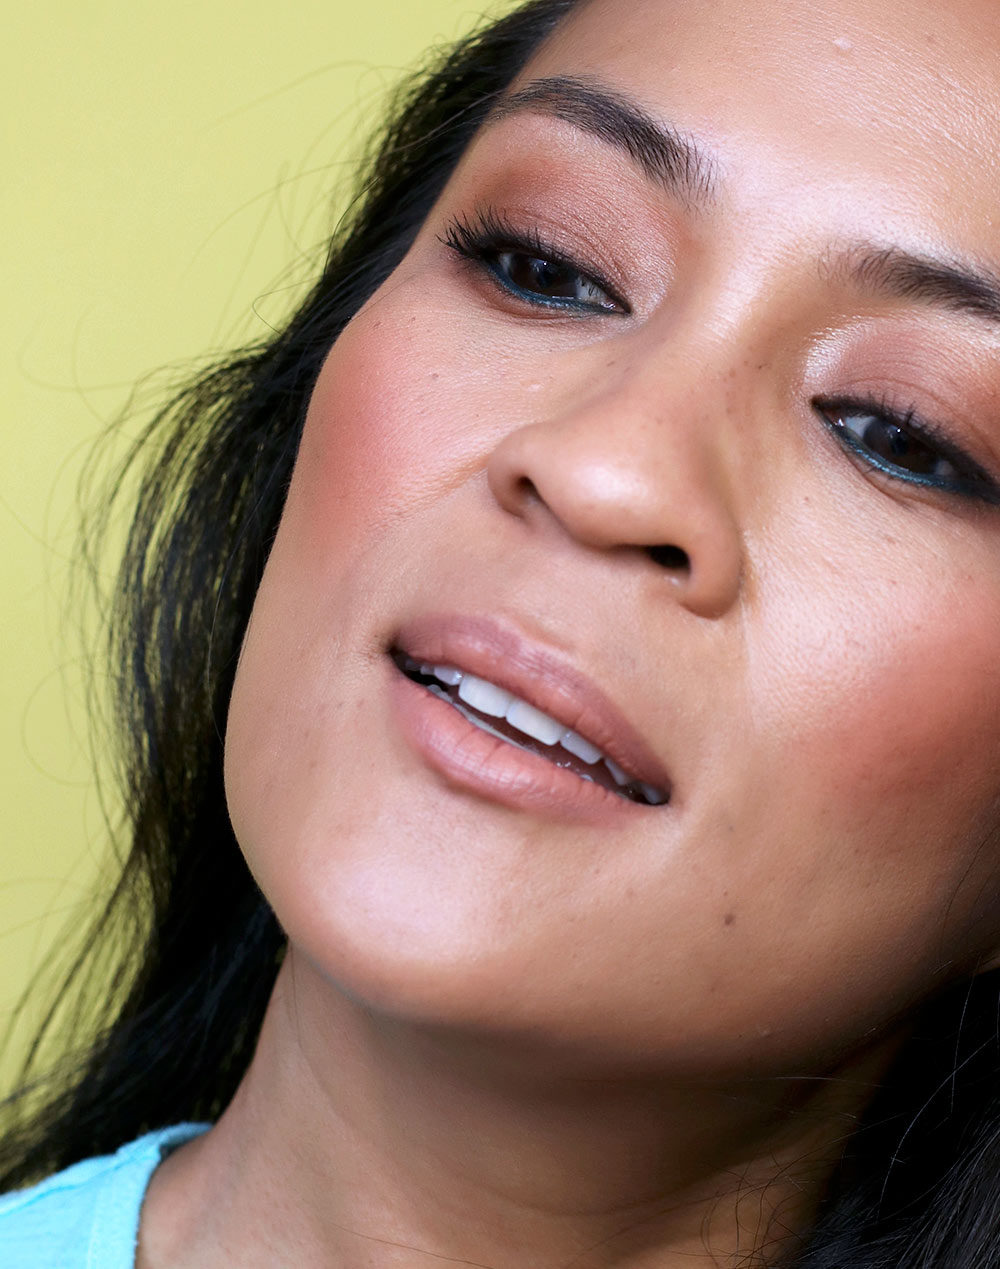
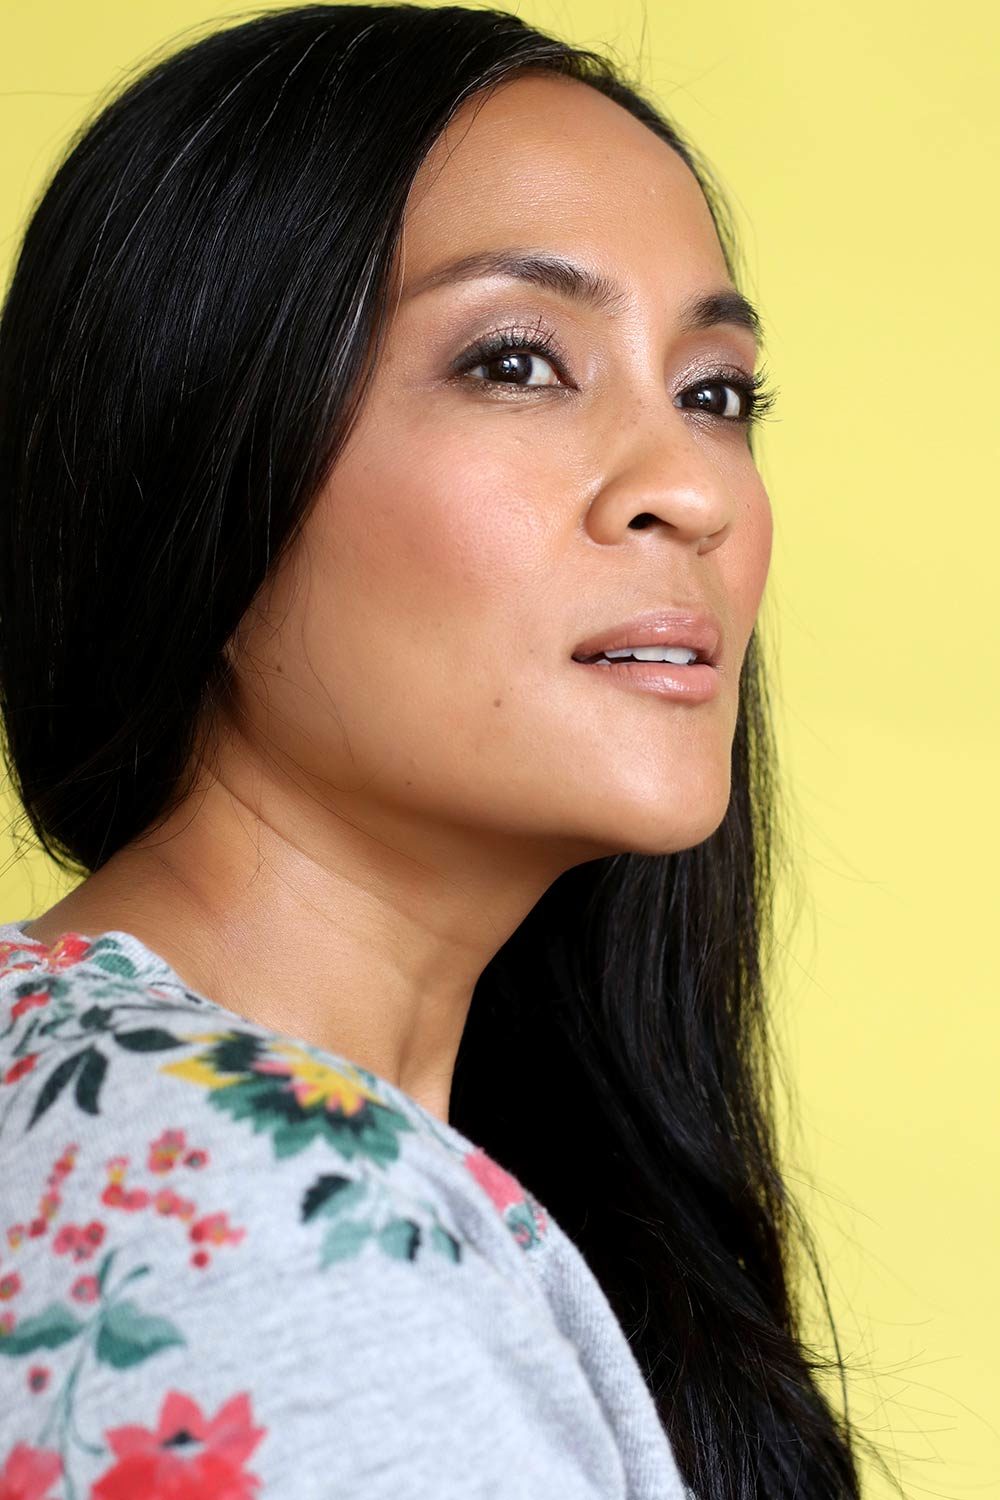
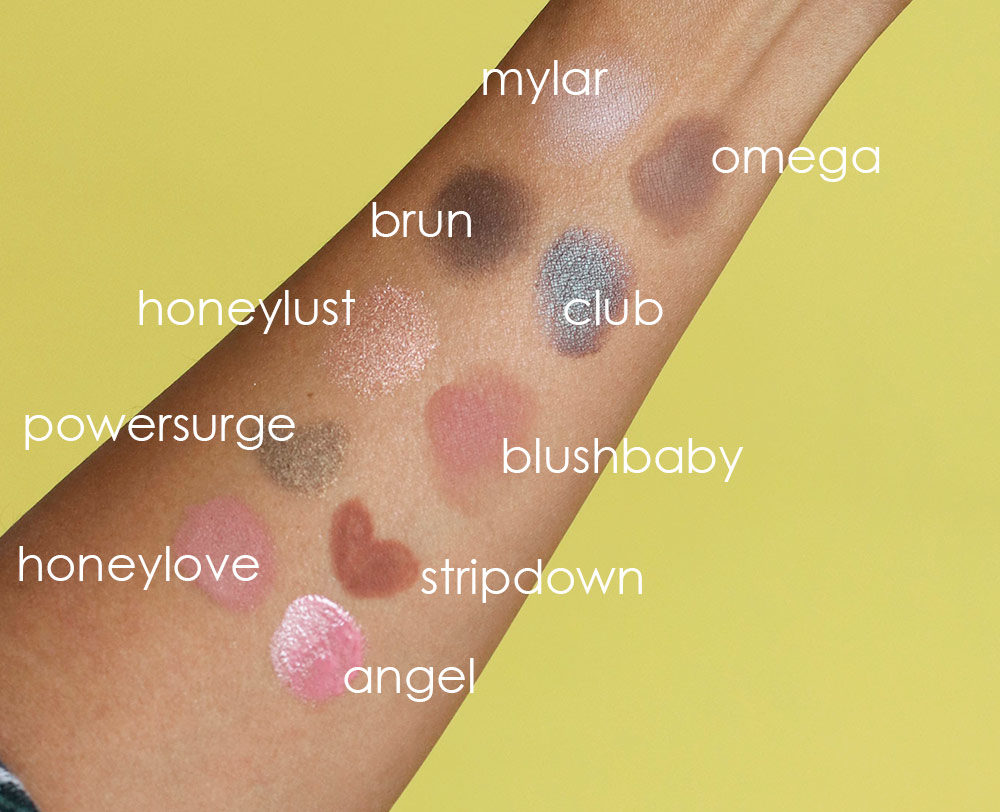
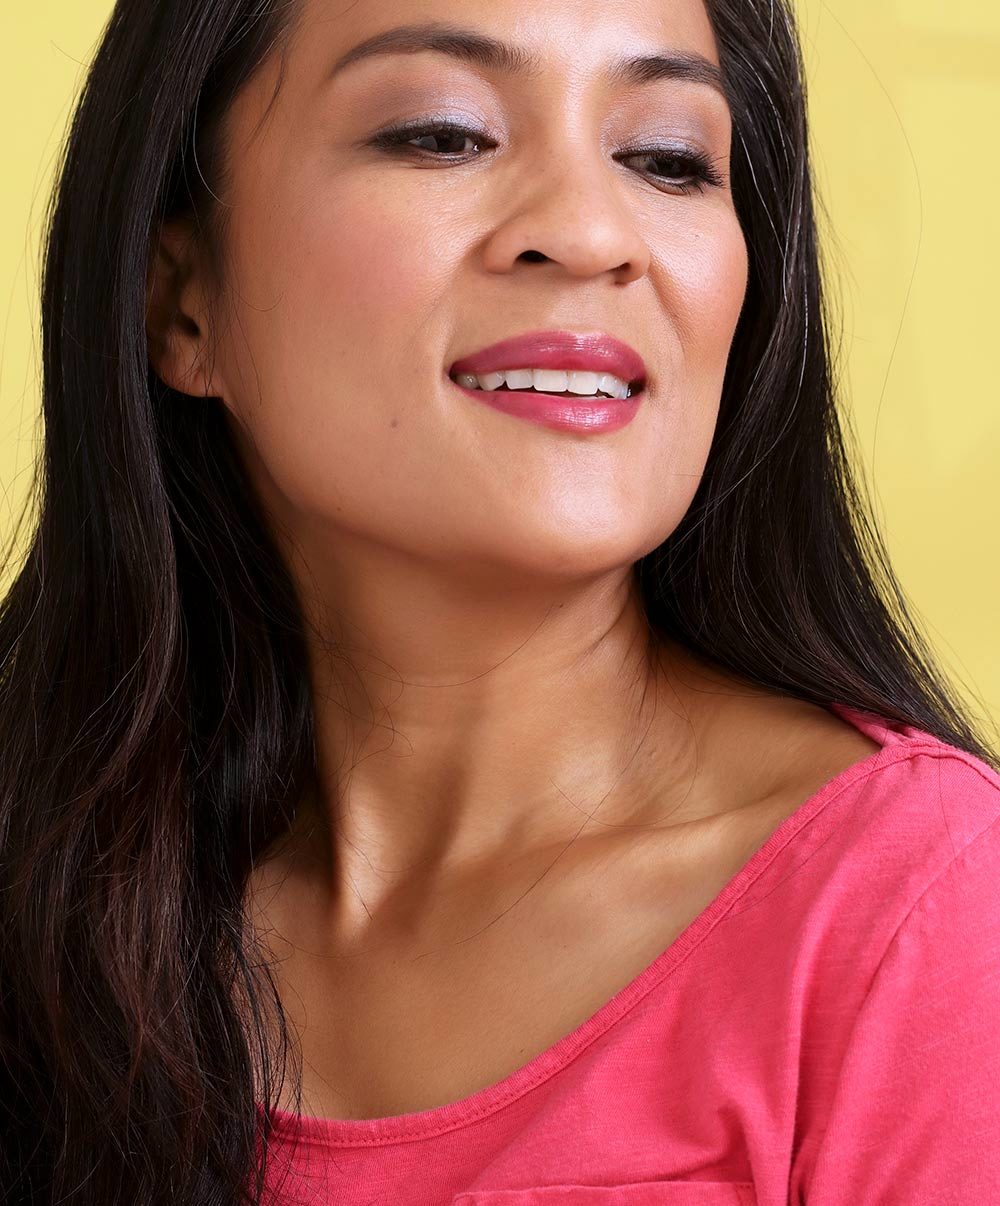
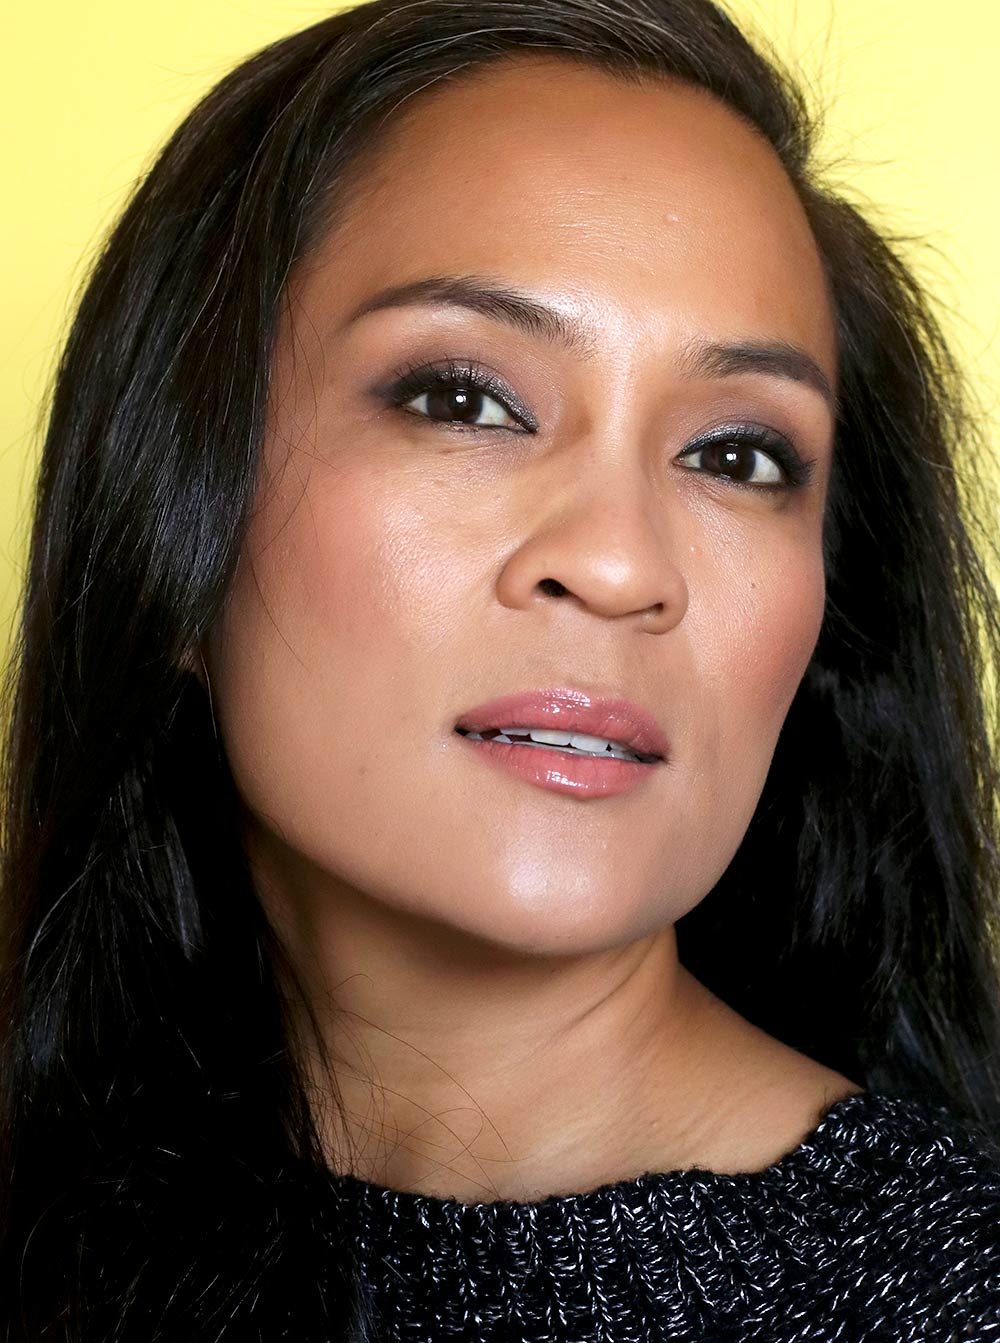
I got all the nostalgic feels with this late ’90s-inspired look with bright blue inner corners (thanks, MAC Tilt). Was anybody else obsessed with blazingly bright inner corner highlights way back when? I most certainly was. I usually rocked MAC Vex around the tear ducts. (Side note: normally accompanied by a frosty brow bone and HELLA SKINNY brows, OMG!)

I felt like revisiting old-school inner corner highlights with this look because I saw a character wearing something similar on a show I just started watching on Netflix called Spinning Out.

It’s a drama about some Olympic hopeful ice skaters (January Jones of Mad Men fame is in it), and if you start watching it, just FYI, 1) there’s more drama than actual skating, and 2) you won’t be able to look away, because something over-the-top happens to the characters every five minutes. It’s not Melrose Place in the ’90s caliber bat-sh*t cray, but it’s pretty close.

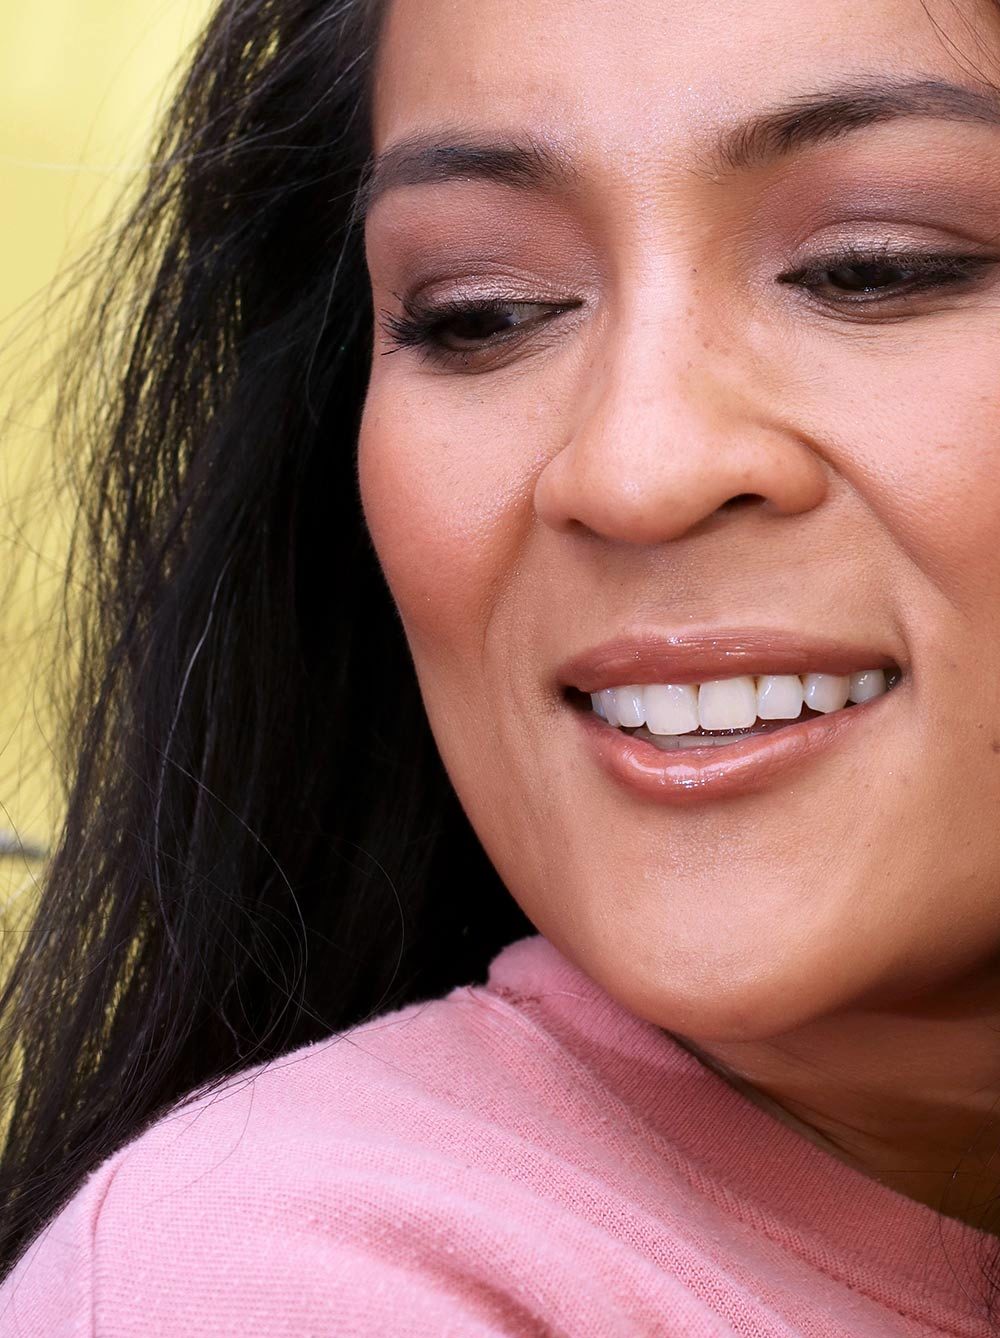
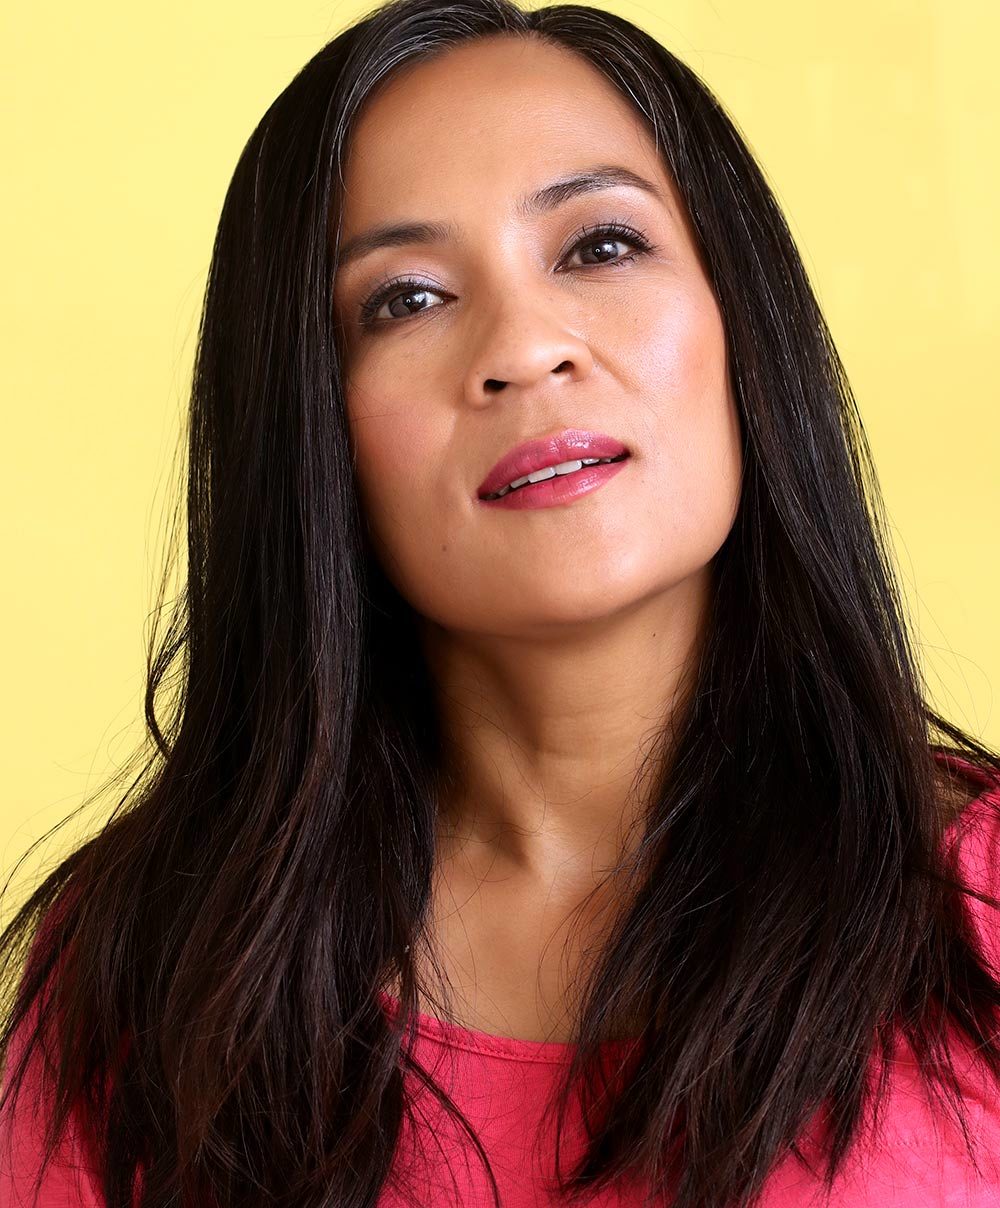
Anywho…like I was saying, one of the main characters wore a similar look with a shimmery blue inner corner highlight to a skating competition. I, on the other hand, wore it around the house to do laundry. 🙂 I did keep it on when I left to pick up Connor at preschool, but I buffed down the blue quite a bit to make it more wearable and less in-your-face.

mac tilt inner corner

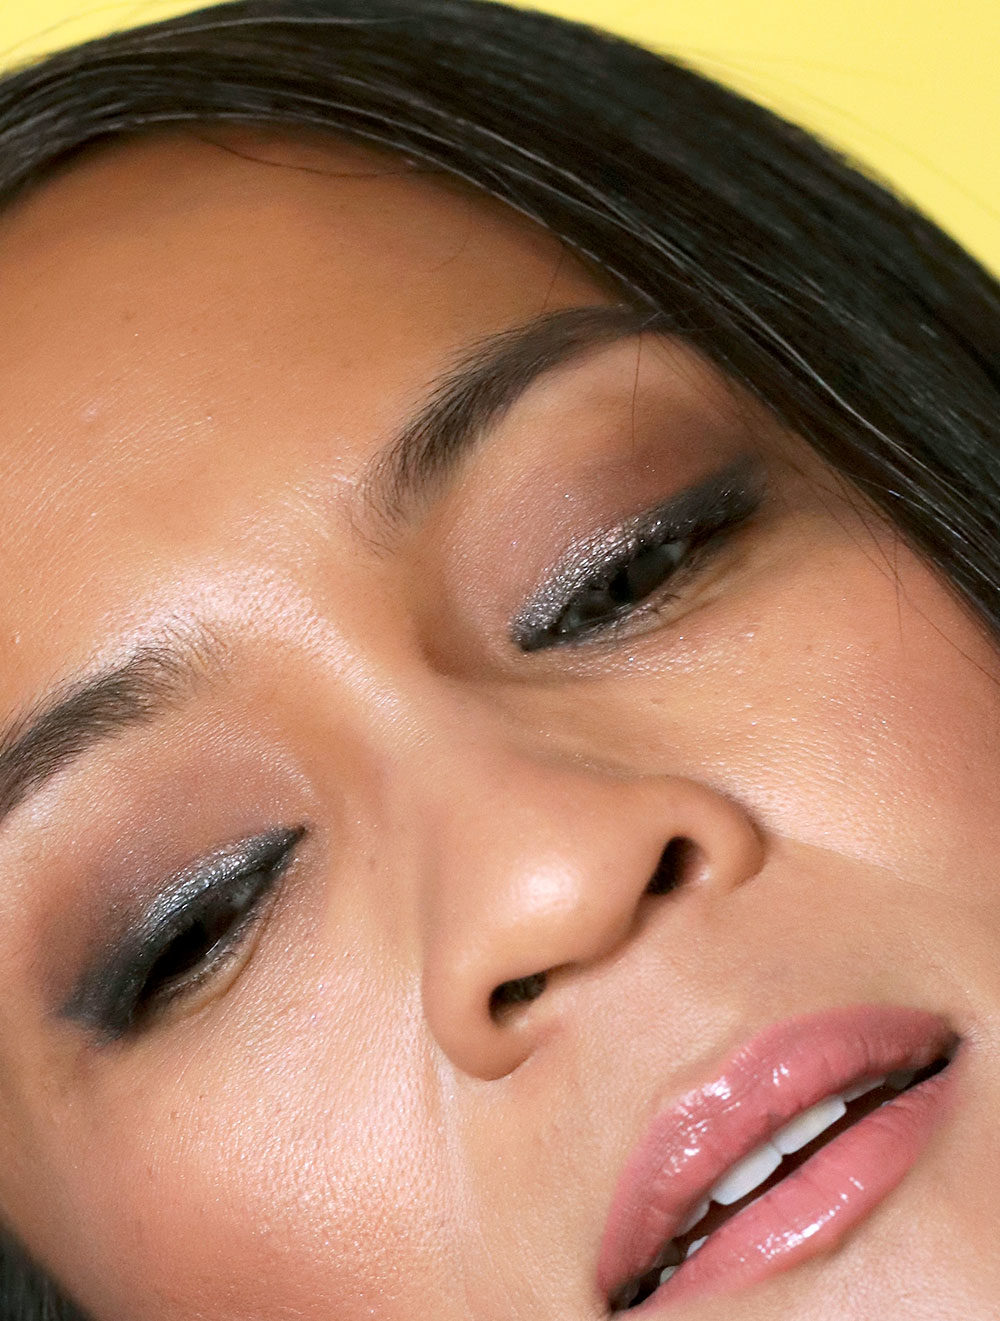
The pencil brush is your friend.

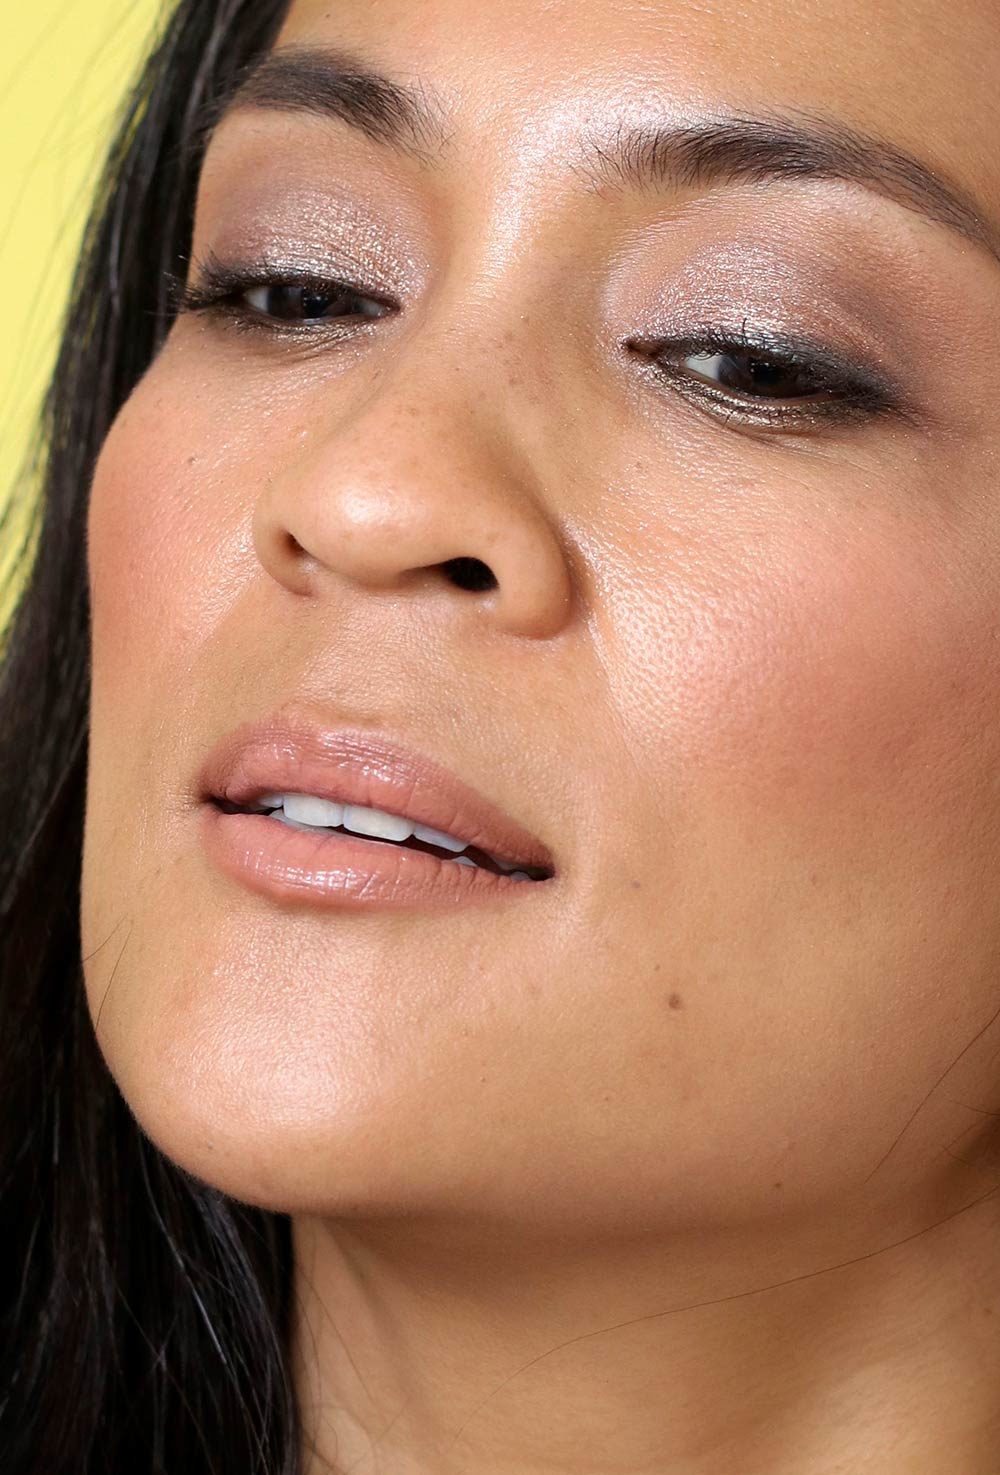
It had been a while since I wore such a bold statement inner corner, and doing so reminded me that a pencil brush is your friend, especially when you’re placing shadow in a tight space like the inner corner.

Sure, you could easily press some shadow there with your finger — and that’s something I do all the time with shimmery peaches, beiges and pinks for a soft highlight — but if you want concentrated, intense color, grab a pencil brush.

I like to start by applying the shadow around the inner corner with the pencil brush. Then I wet the brush head with a setting spray, dip it back into the same eyeshadow (don’t forget to tap off the excess), and apply the just around the tear duct to intensify the color and shimmer and create a subtle gradient.

Then, I take another pencil brush and soften out the edges.

I think this effect looks super cool with many different colors — blue, green, light purple, even pink!
[Continue reading…]

There are 9 comments on this post. Leave yours.

Categories: Eyes, MAC Makeup, Makeup, Makeup Tips/How To

Layering Bronze Eyeshadow on Top of Black Liner To Correct Wonky Liner

January 13th, 2020 by Karen 15 Comments

eye reflection shadow palette pixi natural beauty

Oh, my hooded lid ladies… I know you can feel me on this. There are days when my upper lash liner turns out perfectly…but then there are those other days when it does not. ?

And those days are baaaaad.

You know how it is. One minute, you’re applying your liner, oblivious to the disaster about to strike. Next thing you know, your liner has taken over half your lid. If you have hooded lids like I do, it also makes your eyes look smaller.

So, that’s what initially happened with this particular look here. Started out, I was in the mood for black cat eyeliner, but I was rushing, and things got out of hand quickly.

My liner was too thick, and the wings didn’t match. My eyes looked teeny, tiny.

Because I didn’t have enough time to remove everything and start again from scratch, I recalled the trick I’ve been using lately with light pencil liner to make my lids look less hooded, and I employed a similar technique to fix this mishap.

Here’s what I did.

I dipped a flat angled brush into a sparkly bronze eyeshadow, wet that brush head with a setting spray, and blended it directly on top of the black liner from the inner corner to about three fourths of the way out.

Why?

Well, just like how applying a light-colored liner on the upper lash line opens up the eye, layering a bronze on top of black also makes lids look more pronounced and larger than they really are.

Next, I cleaned the brush I used, dipped it into a dark brown, and blended that on the outer corner of the black liner to soften it and create the illusion of a little more lift.

eye reflection shadow palette pixi natural beauty

eye reflection shadow palette pixi natural beauty

I didn’t fully appreciate just how much larger it made my lids look until I got to Costco and started trying on prospective eyeglasses…

I took a pic of my face without frames so I could compare it to pics of myself wearing some of the new frames I was interested in (because I’m nerdy like that), and when I saw my makeup in the harsh overhead Costco lighting, I realized — OH, SNAP! — this eye makeup was actually working for me.

Yeah…I’m definitely gonna do this again, but, like, on purpose. LOL! 🙂

Key makeup worn in this look

Eyes: Pixi Endless Sikly Eye Pen in Black Noir, Pixi Eye Reflection Shadow Palette in Natural Beauty, MAC Omega and Brun (eyebrows), Chanel Dimensions de Chanel, MAC Brow Gel

Base: Estee Lauder Double Wear foundation in Honey Bronze, MAC Strobe Cream in Pinklight, Charlotte Tilbury Filmstar Bronze & Glow in Fair-Medium, MAC Sur Blush

Lips: MAC Boldly Bare lip pencil, MAC Candy Box Lipglass

This made me laugh so hard!

[Continue reading…]

There are 15 comments on this post. Leave yours.

Categories: MAC Makeup, Makeup, Makeup Tips/How To

A Triple Threat! — Blue Wings, Purple Waterlines and Peachy Glitter Eyes

January 9th, 2020 by Karen 9 Comments

blue wings purple waterline
A new look in one, two, three!

Do I miss the days when I had hours and hours to whisk my eyeshadows into clouds of fluffy color?

Yes and no.

Yes, because I’m in awe of myself — literally in awe — for ever having the patience to do elaborate eye makeup once upon a time.

But also no, because banging out these quick 15-minute makeup looks before I leave for work at the bakery has taught me all kinds of creative tricks!

One thing I’ve been doing lately is combining different elements I’ve worn in various looks to come up with something new.

For this look, I incorporated three makeup elements I’ve been wearing across quite a few bakery-day looks lately.

  1. A colorful lower waterline
  2. Colorful cat eyeliner
  3. Glitter

1. Work your waterline.

Lining your lower water line is an easy, low-stress way to add a pop of color to your look without committing to lots of intense blending. Here I’m wearing a dark purple liner, which is the same one I used in the aubergine look the other day.

2. Embrace your inner colorful cat eyeliner.

Not as low-stress as a colorful waterline because you have to map out your wings and line up the flicks evenly, which is never an easy task, but if you resolve to be cool with imperfection (I am these days… It’s a learning experience!), you’ll get a lot of bang for your buck. You can always keep it simple by using a single bright liner — pencil, liquid or an eyeshadow applied with a wet brush — or you can jooj it up by layering different products together. Here I’m wearing a blue liner, which I topped with a shimmery blue-green shadow mixed with a glittery black shadow.

3. Go for the glitter!

I know it isn’t for everyone, but in controlled amounts, glitter really adds a little something-something. I patted a peach glitter on my lids with a finger, and even though it ended up all over the place (hello, eyebrows!), I’m cool with it.

blue wings purple waterline

blue wings purple waterline

Key makeup worn in this look

  • Eyes: Maybelline Tatoo Gel Liner in Striking Navy (cat liner base) and ESUM Aubergine (lower waterline). MAC Now and Zen palette (I blended Soft Brown and Omega as a base, combined Tilt and Black Tie, and patted that on top of the blue liner before patting Honeylust on top for glitter.)
  • Cheeks: Hourglass Illume Sheer Color Trio in Sunset
  • Lips: MAC Velvet Teddy topped with Magically Delightful Lipglass

Your friendly neighborhood beauty addict,

Karen

There are 9 comments on this post. Leave yours.

Categories: Face of the Day (FOTD), MAC Makeup, Makeup, Makeup Tips/How To

A Quick Eye-Opening Tip for Hooded Lids

January 3rd, 2020 by Karen 16 Comments

urban decay light liner
Clockwise from the white on the upper left: Urban Decay Yeyo, Urban Decay Scorch, Urban Decay Goldmine, Urban Decay Heartless, Esum Rose and Urban Decay Cuff

Here’s a quick tip for my ladies with hooded eyelids, because mine are getting more and more hooded every day! Here’s what you can do to make your eyes and your lid real estate look a little larger.

You’ll need two things…

  1. A slightly shiny liner in a shade lighter than your natural skin tone. Mind you, it doesn’t have to be sequinned diva-caliber glittery. An essence of pearl is ideal, and apply this along your upper lash line.
  2. A darker liner with which to tightline, and a dark brown or inky black will work, but you could go with a dark purple or navy, too. Tightline your upper waterline with it, and really try to get in between the roots of your lashes.

With these two liners working together, the darker one will make it look like you’re wearing dark liner on your upper lash line (it also has the added bonus of making your lash base appear thicker, which is always a plus), and will also make that area look further away in 3D space, i.e. more recessed, while the shimmery lighter liner will catch light along your upper lash line and make it look more pronounced, completing the overall illusion of making your lid space appear larger than it is.

Pic on the left is with the lighter liner on the upper lash line and the darker line on tightline. Pic on the right is with a dark black liner on the upper lash line and waterline. See how my eyes on the left look much less hooded?

I’ve been doing this a lot lately with dark brown MAC Coffee and light, shimmery bronze Urban Decay Scorch, a combo that works well with my NC42 skin, and I think it makes my eyes look much less hooded than they do when I wear a straight-up black or brown liner on the upper lash line alone.

If you have a lighter skin tone, try a very light, shimmery peach like ESUM Dual Eye Pencil in Rose and Aubergine, and use the shimmery peach on your upper lash line and the dark purple to tightline.
[Continue reading…]

There are 16 comments on this post. Leave yours.

Categories: Eyes, Makeup, Makeup Tips/How To

Ringing in the New Year With Warm Browns and a Splash of Blue on the Waterline

January 1st, 2020 by Karen 12 Comments

urban decay stay naked threeesome in naked swatches
There’s a 100% chance I’m wearing pajamas right now.

First, hello and welcome to 2020, my friend! ? Hope you’re having a happy new year so far!

Second, I know there must be a scientifically explainable reason why warm orange browns look sooooo good with blues (is it because orange and blue are on opposite sides of the color wheel?), and my left brain knows this, yet when I see the two colors happening on my face, my right brain steps in and is like, GIRL, YES. My heart 
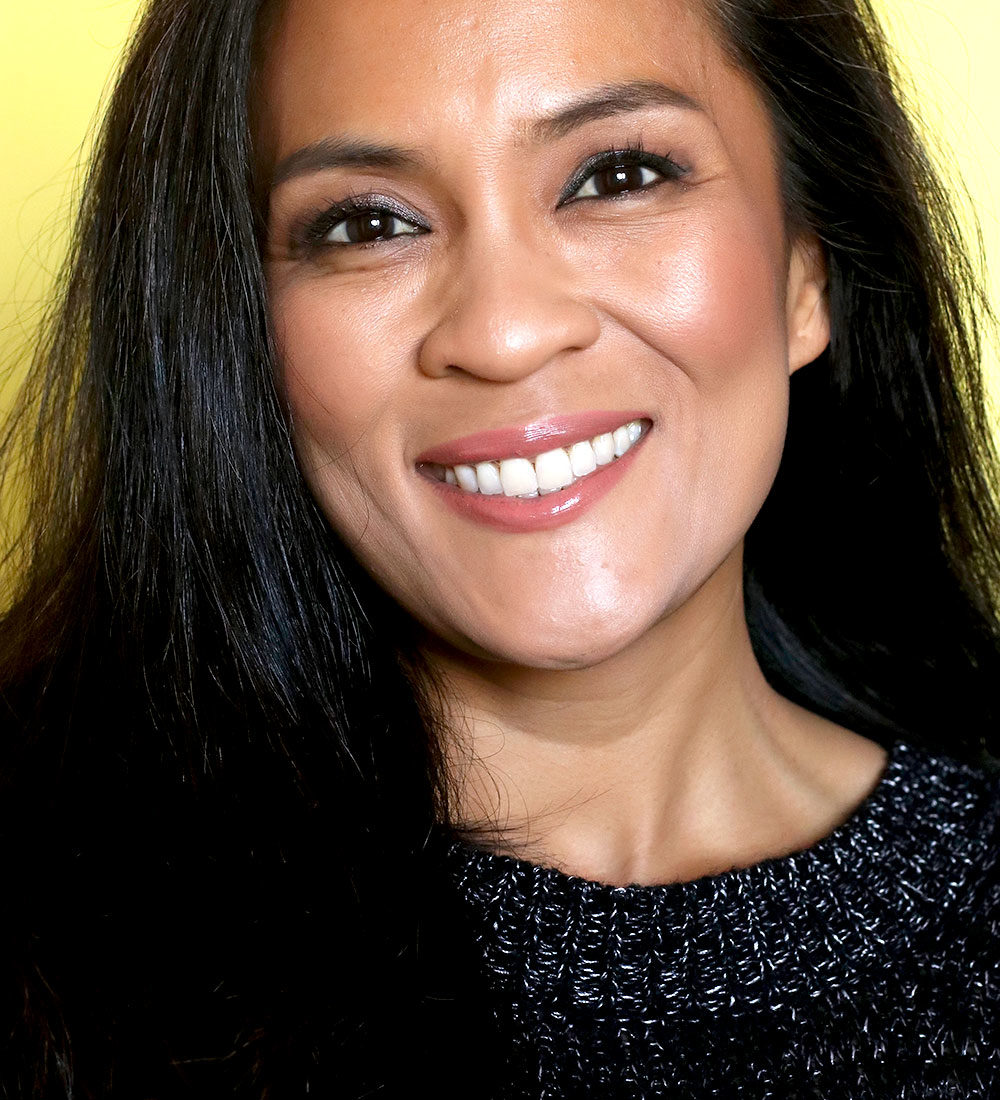
begins to flutter, and I get that tingly crazy makeup lady feeling in my toes! It’s one of those electric color combinations I love to wear.

I wore the combo yesterday to work at the bakery, where, speaking of color, I made the most beautiful blush pink buttercream frosting. Check it…

View this post on Instagram

Made the most beautiful blush-colored buttercream frosting at the bakery today! I would love this as an opaque pastel nail polish. ?? ? Also, watching the frosting get fluffier is the most satisfying thing.?

A post shared by Karen | Makeup and Beauty Blog (@karenmbb) on Dec 30, 2019 at 9:19pm PST

I KNOW. I’m going to shop my nail polish stash for a similar opaque pale pink today.

But first, back to the warm browns and blue…

urban decay stay naked threeesome in naked swatches
See the subtle blue on the lower waterline?

I knocked this out in about 10 minutes yesterday because, basically, it’s just a neutral look with a slice of color on the lower waterline.

If you’re wearing something like this and going about your business, most people won’t be able to tell that you’re wearing blue liner, but ya know, if I were to run into you at TJ’s and we’re chatting about the Mini Brie Bites, if you’ve got blue liner on like this, then I’m gonna be like, “BABES, whatcha got there? Tell me about this business on your waterline.”

mac texture
I see you!

This blue, by the way, is one of my MAC favorites. It’s called Take the Plunge, and it’s one of the Technakohls (which I love for the waterline because they don’t move), but (SAD PANDA) I just looked on the MAC website, and it appears to be missing in action. So, if you can’t find it, try something like Urban Decay Mainline, or really any of the dark blue/teal 24/7 Glide-Ons. Basically, if it’s a dark blue/teal, you’re good!

If you struggle to get bright colors to look bold on your waterline, you’re not alone. It’s common for blues like this to look muddy, especially if you wear liner on your upper lash line or upper waterline, because they can get mixed in with the blue and tone it down.

So here’s whatcha do…
[Continue reading…]

There are 12 comments on this post. Leave yours.

Categories: Face of the Day (FOTD), Just For Fun, MAC Makeup, Makeup, Makeup Tips/How To, Wander Beauty

Behind the Scenes at the Bakery…and a Chocolate Smoky Eye

December 26th, 2019 by Karen 11 Comments

zoeva cocoa blend and caramel melange eyeshadow palettes
Powered by chocolate cake

Since I started moonlighting as a professional (still novice!) cupcake baker last October, and have been working in the back of the house at a local bakery, I’ve been exploring ways to merge the wonderful worlds of cupcakes, and cookies, and cakes, and other kinds of baking…and also makeup.

For instance, there are ways in which cupcake and cookie baking are similar. Like, for instance, the basic process you go through to make cakes and cookies is the same. First, you pull together your dry ingredients and your wet ingredients, and then you alternate the wet the with dry.

It’s also the same things when I’m baking at for fun at home, with the biggest difference being that everything is scaled up to crazy high proportions at the bakery. Like, the other day, I baked 15 chocolate cake layers for a single day’s worth of orders! This is compared to at home, where I’ll maybe make three layers, at the most.

Working at the bakery has been really cool because I’ve been learning a lot, but I’m always kind of afraid that I’ll do something horribly wrong, like burn a big-@ss batch of 600 sugar cookies…

chocolate cakes
I baked these chocolate cakes!

Another difference between baking at home and baking at the bakery is how we perform prep tasks in piecemeal, and over the course of a few days.

At home, I’m the one who preps the ingredients, prepares the batter, bakes off the cakes or cupcakes, and decorates from start to finish.

chocolate batter
That’s *hella* chocolate batter!
You don’t even wanna know how much butter is in this big mixer right now…

But at the bakery, tasks are broken down into very specific subtask lists, so that at any point in time, one of the other bakers can pick up where another baker has left off. It’s incredibly efficient that way!

This look I’m wearing here, which I did with the Zoeva Cocoa Blend and Caramel Melange palettes, was inspired by that mega chocolate bake off I mentioned!

The Zoeva Cocoa Blend (left) and Caramel Melange (right) eyeshadow palettes

Oh, and here’s another big thing I’ve learned working at the bakery…and it’s likely incredibly obvious: people really, really, REALLY like chocolate cake.

Because we make a lot of chocolate cakes, and chocolate is considered one of the “foolproof” recipes. At the bakery, they give it to the newbies like me because, unless you’re a complete hot mess, you can’t muck it up. It’s an oil-based cake, so you just dump all of the ingredients into a container and mix them together, and you’re pretty much guaranteed to get a moist cake!

I used two food-inspired palettes by Zoeva in this chocolatey smoky eye… It turned out a bit pinker than I’d like, but you know, sometimes you get to that point and you can’t really go back, so you just go with it. LOL! 🙂

zoeva cocoa blend and caramel melange eyeshadow palettes

zoeva cocoa blend and caramel melange eyeshadow paletteszoeva cocoa blend

Your friendly neighborhood baking addict,

Karen

There are 11 comments on this post. Leave yours.

Categories: Eyes, Face of the Day (FOTD), Lips, Makeup, Makeup Tips/How To, ZOEVA

A Face Full of MAC Classics

December 24th, 2019 by Karen 7 Comments

mac classics
Sometimes you gotta go with the classics. ?

As a makeup hoarding enthusiast, I’ll be the first to admit that the thrill of the hunt — the quest itself — to find new makeup to fall in love with, is one of the motivating factors for why I like makeup and beauty so much.

There’s always something new to discover, right? A new technique to master? A new finish, new formula, a new plant-based ingredient discovered deep in the jungle, a brand new brand, a classic brand re-brand, a secret formula, an ancient skin care secret, a new GWP, BOGO, or a gorgeous LE palette?

At the same time, there are days when I just want to take it back to beauty “comfort food” — the old standards I know so well, and that I know work for me, and for me, that’s always MAC. I’ll always be a MAC girl at heart. ?

In this look, I’m wearing some classic MAC colors I’ve loved for more than this entire decade. It seems weird to say that, but I did the math; it’s true!

There’s a hint of color in the liner, but everything else on the lids, cheeks and lips is neutral.

I like this look because I can wear it anywhere and everywhere. The lids are softly defined with cooler-toned browns in the crease and a sparkling peach from lash line to crease (to create the illusion of more deeply set eyes, since mine are getting more hooded by the second!).

There’s also lash definition by way of the liner, which is *not* a stark, inky black, or even a brown. Instead, I’m wearing an eyeshadow called MAC Club, which is a beautiful shimmery peacock feather that goes from teal to green to gray to dark brown. It’s GORGEOUS.

So, yeah, I’m wearing that along my upper lash line.

mac classics

On the lower lash line, I’m wearing a pencil liner that I also consider a MAC staple, MAC Powersurge. It’s a warm, shimmery bronzed gold, and it adds a little something-something, but it doesn’t get all up in your face. It’s one of my favorites! I think it’s even subtler and less intense than a brown liner. I wore it every day for almost a year.

On my cheeks, I’m wearing the first MAC blush I ever fell in love with, MAC Blushbaby… It’s a matte pinkish beige.

And, on my lips, I’m wearing an updated take on an early-2000s lip. Yup, you know that light, glossy nude lip everyone was wearing back in the day (along with their low-rise jeans and camisole top, of course)? I got there with MAC Stripdown lip liner, MAC Honey Love Lipstick, and good ol’ Angel Lipglass.

Oh! — I just realized that I forgot to add a swatch of MAC Teddy liner, which I tightlined with.

I wish I could take credit for this combination of eyeshadows, but I can’t. It’s from the most unlikely palette from years and years ago, from, like, Halloween! I never thought I’d fall in love with it, but I use it almost daily. Remember the Monster’s Bride palette? I don’t use the green color (ever), but everything else is a workhorse, so if you’re building a MAC palette, I can recommend all of these colors 100%.

The lightest color — satiny beige Mylar — you can use as an all-over eyeshadow base to brighten your eye makeup, or, you can even use it as an eye or a cheek highlighter. (Side note: I just looked this up on the MAC website, and it’s MIA; sad panda. 🙁 But you can sub it with Shroom.)

The lighter cool-toned matte brown is Omega, which I’m wearing in the crease. It’s great for pushing a hooded lid back *and* for filling out brows (I’m wearing it mixed with Brun in my brows in this look). It’s great if you want a really ashy brown brow, but you don’t want it to look too gray or too harsh.

If you have any gaps in your brow, it’s particularly great for filling in sparse spots.

MAC Brun, LOVE OF MY LIFE. Wearing it in my brows and outer crease.

Club is the liner, which I applied with an angled brush wet with MAC Fix+.

Carbon, I’m not really wearing in this look, but it’s your standard-issue black that you can wear with anything and everything.

mac classics

While we’re on the subject of MAC classics, please list the MAC classics you love down below. I’m curious!

Your friendly neighborhood beauty addict,

Karen

P.S. I saw this earlier today, and now I can’t stop laughing! It’s a trailer for the Christmas movie Elf (one of my favorites), recut and reimagined as a thriller… 🙂

There are 7 comments on this post. Leave yours.

Categories: Eyes, Face of the Day (FOTD), Lips, MAC Makeup, Makeup, Makeup Tips/How To

Soft Holiday Glam With Plum Lips

December 18th, 2019 by Karen 4 Comments

mac art library nude model plum lips

Don’t you love it when you accidentally fall into a well of inspiration? That’s what happened when I stumbled upon makeup artist Mélanie Inglessis the other day. She’s a makeup artist who does a lot of work on celebs, including Olivia Wilde and Natalie Portman.

I love her style because it’s soft and approachable, with a sprinkle of glam.

View this post on Instagram

AMANDA Daylight Dreams.. @amandahearst ?

A post shared by Mélanie Inglessis (@melaniemakeup) on Oct 1, 2019 at 7:55pm PDT

View this post on Instagram

TAYLOR Starting the TIFF week press with this beauty @taylor_russell___ for her movie WAVES. #makeupbymél #taylorrussell

A post shared by Mélanie Inglessis (@melaniemakeup) on Sep 9, 2019 at 8:29am PDT

View this post on Instagram

PARIS It’s always a smoky eyes kind of night in my book.. Smoldering and gorgeous #parisjackson for Amfar Gala. #makeupbymél

A post shared by Mélanie Inglessis (@melaniemakeup) on Oct 10, 2019 at 10:45pm PDT

I just love the warm brown smoky eye on Paris Jackson.

UGH, SO GOOD!

You’d think this type of makeup would be easier than it is, because it looks so simple and elegant, but I dunno… In many ways, I think simple and elegant is way harder harder than full-on complicated, because it’s harder to your hide mistakes. Like, say, if you’re doing a neon green eye with lots of colors and blending, and you pair it with a bright, glossy hot pink lip…there’s a lot there to take in! If you fudge something, there’s a decent chance no one will notice, but with very streamlined makeup like Melanie does, there’s almost zero room for error.

Anyway…Mel’s style inspired me to do this soft holiday glam eye look with plum lips today.

I don’t feel like I totally “got there” with this, but I’m gonna keep working at it this week.

mac art library nude model plum lips 2

mac art library nude model plum lips 3

Key products worn:

EYES: MAC Art library Nude Model Palette and Chanel eyeshadow base (lids and lower lash lines), Maybelline Tattoo Studio Liner in Bold Brown (liner), It Cosmetics Superhero Mascara (lashes), Chanel Beryl liner (lower water line, sadly discontinued!), MAC Brun and clear brow gel (brows)

CHEEKS: MAC Give Me Sun MSF (bronzer), Clinique Plum Pop (blush), Laura Mercier Candleglow (highlight)

LIPS: Maybelline Superstay Ink Crayon in Accept a Dare, Chanel Rouge Coco Gloss in 172

BASE: MAC Mineralize Timecheck Lotion (primer), BECCA Backlight Primer mixed wtih Covergirl Trueblend Matte Foundation in Tan, Double Wear Instant Fix Concealer in Medium Deep, Chanel LoosePowder in 40 Dore

Throwback jams

OK, have you heard about the beef between Lizzo and Cece Peniston? Apparently, Cece (and other people in the music industry) believe that Lizzo intentionally used a line from Cece’s song, Finally. and she never credited Cece for it.

DRAMA FOR YOUR MAMA!

All this is to say that ever since I read that story, I’ve been listening to a lot of ’90s house music I haven’t heard in years lately, and I’ve been feelin’ it.

Remember this one?

This was my jam back in the day. ?

And of course, Cece’s Finally!

LOL. Totally #datingmyself, but I love dance music ? from this era.

In other news, it’s been raining hard all day today. If it’s raining (or snowing) where you are too, drive carefully! And stay dry!

Your friendly neighborhood beauty addict,

Karen

There are 4 comments on this post. Leave yours.

Categories: Face of the Day (FOTD), Makeup, Makeup Tips/How To

  • « Go to Previous Page
  • Go to page 1
  • Interim pages omitted …
  • Go to page 8
  • Go to page 9
  • Go to page 10
  • Go to page 11
  • Go to page 12
  • Interim pages omitted …
  • Go to page 93
  • Go to Next Page »

Primary Sidebar

Welcome to Makeup and Beauty Blog

Welcome to Makeup and Beauty Blog! My name is Karen, and I’m a freelance writer obsessed with makeup.

Makeup and Beauty Blog features daily product reviews, makeup tips and beauty news — like an interactive version of a monthly print magazine, except with occasional pictures of my cat.

Recent Posts

Sundays With Tabs the Cat, Makeup and Beauty Blog Mascot, Vol. 878

Makeup and Beauty Blog Monday Poll, Vol. 894

Makeup and Beauty Blog Monday Poll, Vol. 893

Makeup and Beauty Blog Monday Poll, Vol. 892

Makeup and Beauty Blog Monday Poll, Vol. 891

/* real people should not fill this in and expect good things – do not remove this or risk form bot signups */

Social

  • Facebook
  • Instagram
  • Pinterest
  • Twitter
  • YouTube

Featured Posts

Sundays With Tabs the Cat, Makeup and Beauty Blog Mascot, Vol. 771

Lady Unicorn

Weird Things I Like to Do

brows fill out beforehand

Before You Pluck or Wax Your Brows, You Must Do This

current bare skin status

What’s One Thing That Drastically Changed Your Skin for the Better?

Copyright © 2025 Makeup and Beauty Blog. Get in touch.