• Skip to main content
  • Skip to primary sidebar

Makeup and Beauty Blog | Makeup Reviews, Swatches and How-To MakeupMakeup and Beauty Blog | Makeup Reviews, Swatches and How-To Makeup

A beauty blog blooming with fresh makeup reviews, swatches and beauty tips from your friendly neighborhood beauty addict

  • Home
  • About
    • About
    • Contact
    • FAQ (Frequently Asked Questions)
    • Advertising & Media
  • Categories
    • Product Reviews
    • Makeup
    • Skincare & Fragrance
    • Style & Fashion
    • Hair
    • Nails
    • Tips & Tutorials
    • Just for Fun
  • Brands
  • Store

Makeup Tips/How To

Quick Blush Tip: Don’t Press Too Hard on That Brush

September 24th, 2015 by Karen 13 Comments

blush tip dont press too hard

blush tip dont press too hard

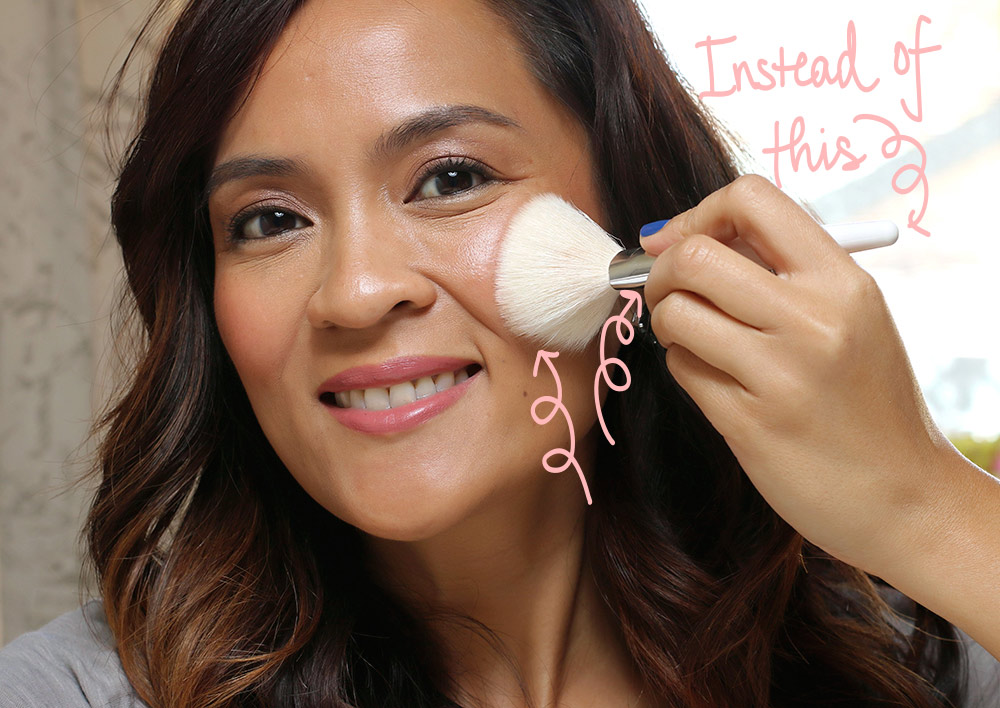
Just a quick blush tip that should also spare your wrist muscles. When you’re applying and blending blush, try holding your brush a little further back away from the tip. It should lighten the pressure you apply on the bristles (so you should see the bristles bending a little less).

And why don’t you want to press super hard on that brush? Well, when you press really hard, you tend to push the blush into a smaller area, as opposed to buffing and smoothing it around. It also just plain makes the job harder, and no one wants blush blending to be the bane of their existence.

Your friendly neighborhood beauty addict,

Karen

P.S. My in-laws are visiting the Bay Area tonight and tomorrow for a special visit because my mom-in-law just turned 70! She’s 70 and absolutely fabulous. 🙂 We’ll be treating them to a night at the San Francisco symphony tomorrow, which should be a lot of fun.

This’ll also be Baby Girl’s first time hearing her grandparents. I’ve read that at 16 weeks babies can hear voices outside the tummy, so I’m going to have her nana sing to her (once upon a time, she sang back up for The Beach Boys!) as much as possible.

There are 13 comments on this post. Leave yours.

Categories: Makeup Tips/How To

Sunday Brunch Makeup

September 24th, 2015 by Karen 17 Comments

sunday brunch makeup top
An easy Sunday brunch makeup tutorial, step-by-step (ooh, baby!)

I usually start thinking about Sunday brunch around Thursday…

Or Wednesday.

OK, you got me — Monday afternoon! 🙂 What can I say? I really, REALLY like Sunday brunch. I’ve said it before and I’ll say it again, brunch is my favorite meal of the day, and I look forward to it all week long.

Tee from Nordstrom
To brunch or not to brunch; that is the question (profound tee from Nordstrom)

As for my makeup for brunch, the effort I put into it varies, depending on whether I’m hungry enough to gnaw on my arm. Sometimes I’m so ravenous by brunch time that I don’t care about my makeup at all, and I’ll leave the house with a bare face, wearing stretchy pants and a sweatshirt covered in cat hair from head to toe (of course).

But when I’m not completely starving and have a little extra time to get ready, or when I’ll be meeting friends, I will try harder…but not too much harder. It is brunch after all. 🙂 And who wants to deal with falsies and winged liner on a Sunday morning? NOT THIS GIRL. Plus, I gotta save mental energy for the difficult brunch decisions like, “Should I get pancakes, French toast or both??”

sunday brunch makeup pancakes or french toast
Pondering the important questions…

blueberry-pancakes

french-toast-breakfast-2
[Continue reading…]

There are 17 comments on this post. Leave yours.

Categories: Makeup Tips/How To

Did You Know? | Sephora Beauty Classes

September 22nd, 2015 by Karen 15 Comments

Yes, ma’am, you’ll find me in the front row at a Sephora beauty class, taking notes like the nerd I am. 🙂 I’ll be the girl with the glittery purple notebook and the noisy four-color click pen, click-click-click-click!

I’ve mentioned these classes a few times on the blog since I started going to them this summer, and I’ve gotten quite a few questions. Long story short, they’re free, fun and highly recommended.

Picture a college classroom, except instead of learning about chair versus boat conformations of cyclohexane (which is about the only thing I remember from O-Chem), you learn about skin care and makeup. There’s a long list of different classes available, too (now in all U.S. stores). So far I’ve taken the Correcting and Concealing, Perfectly Paired Lips and Cheeks, and Daytime Smoky Eyes classes, and I learned some good stuff in each one.

sephora beauty class 1
[Continue reading…]

There are 15 comments on this post. Leave yours.

Categories: Makeup Tips/How To, Sephora, Video

Quick Blush Tip: When You Apply Blush, Angle Your Head to the Side, Instead of Looking Straight Into the Mirror

September 22nd, 2015 by Karen 19 Comments

Try this...
Try this…
...Instead of this
…instead of this

As the world turns…so turns my head! Now. When I apply blush.

I had a “forehead, meet desk!” moment when this occurred to me, as obvious as it sounds, but up until it did, I was usually looking straight ahead into a mirror when I applied my blush, starting with the brush at the apples of my cheeks and pulling back toward my temples.

For me, this made sense — looking straight ahead into a mirror — because it’s also how I apply my foundation, eye makeup and lip products.

So why wouldn’t it be any different for blush?

Well…when you think about it, how often does someone look at you from directly straight ahead like that? Sometimes, but not always, right? Chances are still good that when Nick Jonas sees you from across that crowded room, he’ll be admiring your blush blending skills from many different angles, and not just the front. He’ll be seeing you from the sides, too. (P.S. I expect an invite to your wedding.)
[Continue reading…]

There are 19 comments on this post. Leave yours.

Categories: Face, Makeup Tips/How To

Quick Makeup Tip: Before You Put on Makeup, Starting With Completely Naked Skin, Spray a Hydrating Mist

September 21st, 2015 by Karen 20 Comments

The hilarity that ensues when you're dousing yourself on camera with MAC Fix+...
The hilarity that ensues when you’re dousing yourself on camera with a gallon of MAC Fix+

Right at the very start of your makeup process, before you’ve put anything on, and starting with completely naked skin, try spraying a hydrating mist like MAC Fix+ or Mario Badescu Facial Spray With Rosewater all over your face to open up your pores, because it’ll help your skin absorb any other skin care products, like moisturizers and serums, that you layer on top.

Oh! — and if you already have your hair done and don’t want to get it wet (’cause nothing is about to mess up my blowout!), you can block the spritzes with a bath towel (magazines work great, too). I know it’s kind of MacGyver-ish, but it works! I’ll fold the towel into a square and hold that up next to my face to block the hair behind it, and then I’ll mist with the spray.
[Continue reading…]

There are 20 comments on this post. Leave yours.

Categories: Makeup Tips/How To

How to Do Perfect Red Lips

September 18th, 2015 by Karen 24 Comments

perfect red lips

Some things are really hard — climbing Mount Everest, saying no to the last French fry, learning how to breakdance when you’re over 30 and completely inflexible (particularly in the hamstrings) — but other things, like achieving a perfect red lip, aren’t that hard at all.

Smooth, symmetrical red lips with crisp, yet not harsh, edges are easy with the right tools, a few tips and a little practice. By the end of this post, you will NOT look like a demented clown about to go on a rampage at a children’s birthday party (although this happens sometimes when I try to do lip liner on bare lips). Pretty soon you’ll be doing ’em like a seasoned pro.

So, let’s start at the very beginning, which is a very good place to start. 🙂

Um…I think I may or may not have just quoted Sound of Music, but whatever!

1. Apply lipstick to the center area of your lips

lipstick

Begin by applying (directly from the bullet) the red lipstick you’d like to wear around the center area of your lips. The key here: don’t take the lipstick all the way out to the edges.

lipstick 2

At this point, as is the case so often with makeup, if you’re doing it right, it’ll look kinda weird…

2. Now drag the lipstick out to your natural lip line

lip brush

Using a lip brush loaded with the same red lipstick, fill in the edges around the area you applied from the bullet a moment ago, dragging some of the existing lipstick out while also painting all the way to the edge of your lip line. We’re doing this because the brush is more detailed than the lipstick bullet.

lip brush 2

Try to get that lip line smooth and even, but it doesn’t have to be perfect at this point.

3. Line your lips with a lip liner in a complementary color

red lip liner

Now set aside the lip brush, and grab a sharpened red lip liner (sharpen it first, because we want the point to be nice and sharp) in a color that complements your lipstick.

Take that lip liner, and start drawing a line right around the edge of your lip, following your natural lip line, and we have two reasons for this. First, we’re creating a boundary for our red lipstick outside of which we won’t go, and second, we’re also using this as an opportunity to tweak the shape of our lips, if need be, to make them look perfectly symmetrical. Like, one side of my lips is thinner than the other, so I slightly overdraw that side at this step to make my lips look even and full.

Next, with the same lip brush you used earlier, although this time without any extra product on it, gently merge the line you created with your lip pencil into the lipstick to soften the appearance of the lip liner.
[Continue reading…]

There are 24 comments on this post. Leave yours.

Categories: Lips, Loreal, MAC Makeup, Makeup Tips/How To

Fri-Yay Makeup Fun: Glossy Lids and Winged Liner

September 18th, 2015 by Karen 19 Comments

glossy-lids-winged-liner

Winged liner.

Sometimes I wanna wear it with eyeshadow; sometimes I wanna wear it with eye gloss.

Yeah, that’s right! Eye gloss — the super shiny stuff, which isn’t known for being eminently wearable, not with that glistening, glossy finish that gleams and beams, but I think it can look super cool when paired with something unexpected like winged liner.

gloss lids top

In this look, I love the contrast between the glossy, wet-looking lids and the crisp black liner. It’s like I just got back from charging the waves! Surfer girl meets sassy secretary. 🙂

gloss lids final

Make the red lip a matte, and you’ve got an unusual, interesting twist on a classic black winged liner-red lip combo.

glossy lids closeup

The best part of this look is that it’s easy to do, which for me makes it perfect for Fridays when my mind is on other things (like pumpkin spice lattes).

Starting with bare lids, just curl your lashes if you need to (mine are pin straight, so this is a must). Then draw your winged liner, and tight-line your upper water line.

Wait for the liner to dry, and then apply and pat a clear eye gloss on your lids from lash line to brow bone (I don’t go too far into the inner corner with the gloss; otherwise, it starts to look heavy and a little weird).

Finish by loading up your lashes with mascara.

curl lashes

winged liner
[Continue reading…]

There are 19 comments on this post. Leave yours.

Categories: Chanel, Makeup Tips/How To, Rouge Bunny Rouge, Tom Ford Beauty

What’s Your Basic Skin Care/Skin Prep/Makeup Process? Here’s Mine…

September 15th, 2015 by Karen 28 Comments

your basic skin care process

What’s your basic skin care/skin prep/makeup process? Here’s mine…

1. Hydrating mist all over my face

MAC Fix+ ($22) has been my long-time and still current jam. I almost always have a bottle with me, and I even bring one of these travel-sized one with me on trips.

But I’m eager to try Mario Badescu Facial Spray With Aloe, Herb and Rosewater. It’s only $7, so a third the price of Fix+, and my friend Kwmechelle (hey gurl, haaaaay!) swears by it. Right now it’s at the top of my never-ending list of things to get next time I visit Ulta.

2. Face cream (with a separate eye cream around my eyes)

Because I don’t usually start doing my makeup right after I wash my face and do my morning skin care, I usually take a few minutes to moisturize once more before putting on le face paint. I’ve been using Embroyolisse, which is available online at Sephora for $28, for my face and MAC Fast Response Eye Cream ($31) for my eyes.

3. Primer

I use one primer for my face — currently Make Up For Ever Step 1 Smoothing Primer ($36) — and a separate primer for my lids, and you can probably guess which one that is! 🙂 Yes, it’s NARS Pro-Longwear Smudge-Proof ($25).

As for under my eyes, I rarely apply primer under my eyes, but I know it’s a step that a lot of people do.

4. Color correcting around my face (if necessary)

I have a few spots of darker pigment around my left eye and the left side of my lip, which I sometimes color correct with either an orange primer ($36 Make Up For Ever Step 1 Skin Equalizer Radiant Primer Peach) or an orange concealer (The Burnt Coral side of $25 MAC Studio Conceal and Correct Duo in Rich Yellow/Burnt Coral).

*sigh!* It really does take a village…

5. Foundation or tinted moisturizer

Which one I use depends on what I’ll be doing that day and how my skin’s behaving, like whether it’s been more oily lately, or dry, or if there’s a pimple par-tay on my chin, but most of the time, if I have the time, I’ll use some kind of medium- or full-coverage serum foundation.

You probably already know this, but I really like Diorskin Nude Air in 40 Dore ($53) for full coverage, and now I’m also liking MAC Studio Waterweight in NC 42 ($33) for medium coverage.

Or, if time is of the essence and I barely have five minutes to go from zombie Karen to full-blooded, real-life Karen, I’ll wear a tinted moisturizer like Chanel Les Beiges All-In-One Healthy Glow Fluid SPF 15 in 40 ($45) instead.
[Continue reading…]

There are 28 comments on this post. Leave yours.

Categories: Just For Fun, Makeup, Makeup Tips/How To

  • « Go to Previous Page
  • Go to page 1
  • Interim pages omitted …
  • Go to page 28
  • Go to page 29
  • Go to page 30
  • Go to page 31
  • Go to page 32
  • Interim pages omitted …
  • Go to page 93
  • Go to Next Page »

Primary Sidebar

Welcome to Makeup and Beauty Blog

Welcome to Makeup and Beauty Blog! My name is Karen, and I’m a freelance writer obsessed with makeup.

Makeup and Beauty Blog features daily product reviews, makeup tips and beauty news — like an interactive version of a monthly print magazine, except with occasional pictures of my cat.

Recent Posts

Sundays With Tabs the Cat, Makeup and Beauty Blog Mascot, Vol. 878

Makeup and Beauty Blog Monday Poll, Vol. 894

Makeup and Beauty Blog Monday Poll, Vol. 893

Makeup and Beauty Blog Monday Poll, Vol. 892

Makeup and Beauty Blog Monday Poll, Vol. 891

/* real people should not fill this in and expect good things – do not remove this or risk form bot signups */

Social

  • Facebook
  • Instagram
  • Pinterest
  • Twitter
  • YouTube

Featured Posts

Sundays With Tabs the Cat, Makeup and Beauty Blog Mascot, Vol. 771

Lady Unicorn

Weird Things I Like to Do

brows fill out beforehand

Before You Pluck or Wax Your Brows, You Must Do This

current bare skin status

What’s One Thing That Drastically Changed Your Skin for the Better?

Copyright © 2025 Makeup and Beauty Blog. Get in touch.