• Skip to main content
  • Skip to primary sidebar

Makeup and Beauty Blog | Makeup Reviews, Swatches and How-To MakeupMakeup and Beauty Blog | Makeup Reviews, Swatches and How-To Makeup

A beauty blog blooming with fresh makeup reviews, swatches and beauty tips from your friendly neighborhood beauty addict

  • Home
  • About
    • About
    • Contact
    • FAQ (Frequently Asked Questions)
    • Advertising & Media
  • Categories
    • Product Reviews
    • Makeup
    • Skincare & Fragrance
    • Style & Fashion
    • Hair
    • Nails
    • Tips & Tutorials
    • Just for Fun
  • Brands
  • Store

Makeup Tips/How To

Beauty Basics: 3 Essential Things To Do When You’re Applying Powder Eyeshadow…

September 10th, 2015 by Karen 20 Comments

nars pro prime smudge proof top pic

1. Start with an eye primer

nars pro prime smudge proof 1

Aye, primer! And ahoy, matey! As any self-respectin’, makeup-lovin’ pirate be knowin’, ye should always start yer eye looks with a bit o’ eye primer fer the best eye looks, yargh!

OK, that was wackadoo. Sorry! But it’s about 93 degrees in my house right now, and I feel loopy.

No joke, though, eye primer is such a crucial step, and one I never skip, barring extenuating circumstances (like 10-minute makeup looks because I’m feeling lazy or I’m running way behind), when I wear powder eyeshadow.

Just like the kind of primer painters use, eye primer fills the little gaps on the surface of the skin, making lids nice and smooth, which in turn makes products layered on top of them last longer without settling into fine lines or applying unevenly on dry patches. Eye primers also keep your eye makeup from shifting around while intensifying powder shadow colors, which are all great things!

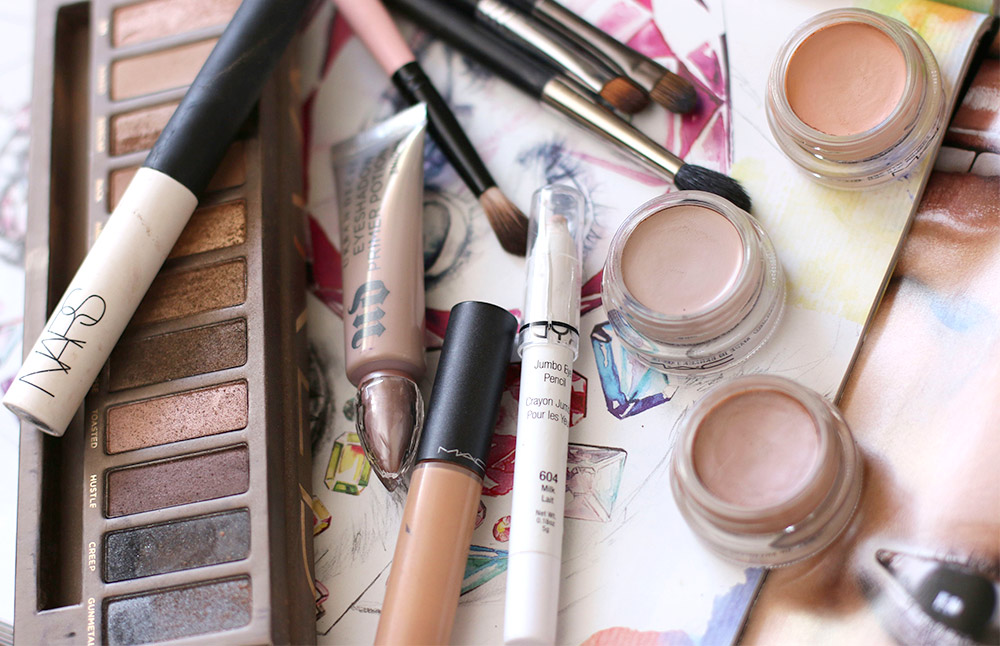
Most (but not all) eye primers have a creamy consistency similar to eye creams, and they come in lots of different kinds of packaging. Some come in a tube that looks like mascara and have a doe-foot applicator. Others come in squeeze tubes, and others come in pots.

They usually come in different shades, too, although some are un-tinted — with the idea for those being that they won’t interfere with any other colors you layer on top. Some lightly tinted varieties can also color correct discoloration on the lids, and those tinted ones aren’t supposed to interfere with whatever shadows you pop on top of them, but I find that they usually do tweak them a little.

I think un-tinted colorless primers are good choices for beginners because they can be used with a wide variety of looks, and my favorite, favorite, FAVORITE one of all time is NARS Pro-Prime Smudge-Proof (not just for beginners, but for anyone), which I know I mention every 10 or 15 minutes. 🙂 But I totally stand behind it. I try new primers all the time, and I have yet to find anything I like better.

A tube will last me about half a year. Your mileage may vary, but for what it’s worth, I wear a LOT of eye makeup.

2. Invest in some quality brushes
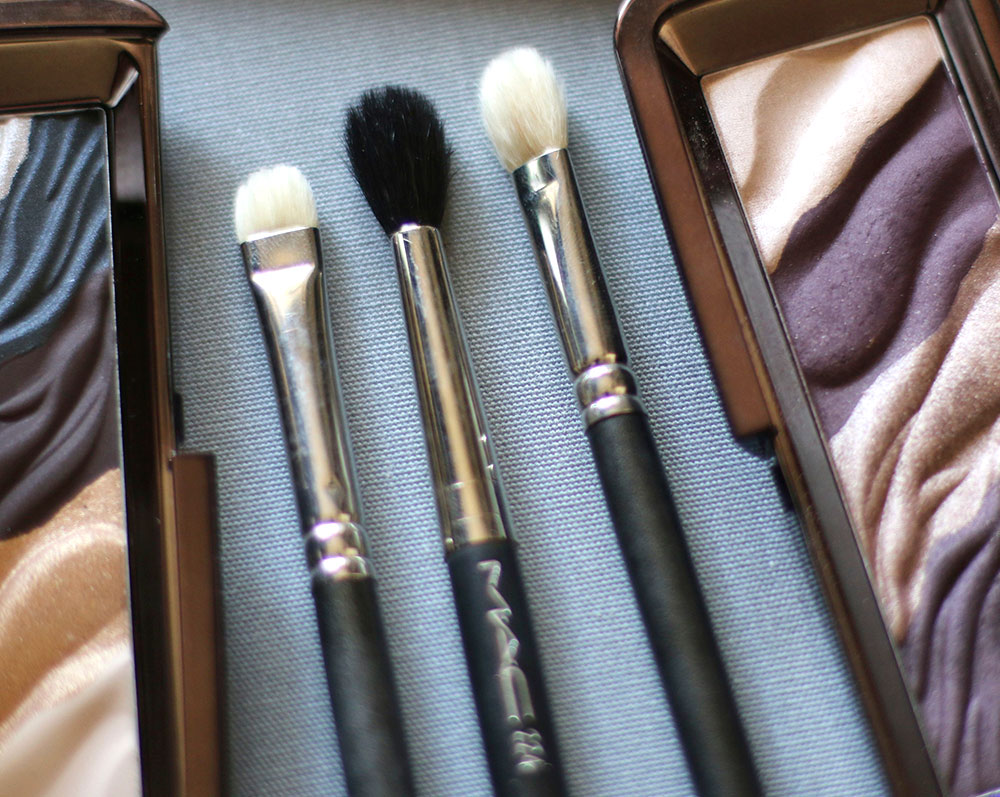
From the left: MAC 239, MAC 224 and MAC 217 brushes

[Continue reading…]

There are 20 comments on this post. Leave yours.

Categories: Eyes, Makeup Tips/How To

Use a Nude Lip Pencil First for More Symmetrical Lip Looks

September 8th, 2015 by Karen 10 Comments

nude lip liner for symmetry 3

I can haz symmetry?? Because I don’t haz it naturally. 🙂

I’ve read somewhere that it’s actually very common to have asymmetrical features, like in my case, one side of my lips is slightly thinner than the other, so when I do my lips, I cheat a little to make that side look just as full as the other.

I notice asymmetry a little more when I wear darker colors than when I wear nudes and neutrals, and I think it’s more obvious in pics than it is in real life.

nude lip liner for symmetry 2

For example, when I wear darker lip looks, with like dark wines, reds, browns and purples, I’ll start by lining my lips first with a nude lip pencil. I’ll sort of sketch out the shape, following my natural lip line on the fuller side of my lips, and then I’ll slightly overdraw the other side, the side that’s not as full, to make both sides match.

Then, I’ll trace over that nude lip line with a darker lip pencil that matches the dark color that I plan to wear.

nude lip liner for symmetry 3
[Continue reading…]

There are 10 comments on this post. Leave yours.

Categories: Lips, Makeup Tips/How To

For Smoldering Smoky Eyes, Always Conceal and/or Brighten Your Under-Eye Area

September 7th, 2015 by Karen 11 Comments

concealer smoky eyes

The last time I left the house wearing eyeshadow, mascara and liner, but WITHOUT under-eye concealer, was probably 1998. Even if you don’t feel like you need concealer because you don’t have dark circles, apply at least a little bit anyway (or an eye brightener, at the very least) when you’re doing smoky eyes, because smokey eyes are one of those looks that can look incomplete without some brightening/concealing under the eyes. It’s one of those little touches that pulls the whole look together.

It’s like getting all gussied up and putting on a cute outfit…but then leaving the house without shoes.

There’s also an annoying side effect of wearing dark colors like gray, black and brown on your lids and lower lash lines. They can make your eyes look just plain tired.

concealer smoky eyes

But a brighter under-eye area counteracts the effect, and it also adds some nice contrast. You’ve got the dark eyeshadow contrasting with the brighter concealer under your eyes, and that makes your smoky eyes look even smokier. 🙂

Latest food obsession: The acai bowl

nekter acai bowl
[Continue reading…]

There are 11 comments on this post. Leave yours.

Categories: Makeup Tips/How To

10-Minute Smoky Eye

September 7th, 2015 by Karen 22 Comments

10 minute smoky eye final look top

It is entirely possible to bang out a smoky eye in 10 minutes. Hand on heart, hair to the sky, I’m serious! — it’s totally true. And I know this because of a little something called “the disco nap.”

dis·co nap
/ˈdiskō nap/
informal
noun

  1. Sleeping when ya got something goin’ on later for which you need to get ready.
    “I was about to go to the club, but I needed a disco nap to feel refreshed.”

When I’m getting ready to go out with my friends, and I know it’s going to be a loooong night, I have very clear-cut priorities. I devote less time to my makeup so I can devote more time to my disco nap.

I know, sacrilege! — but you gotta do what you gotta do. I know myself well enough. If I can’t squeeze in at least a short nap before leaving the house, I’ll be dozing off in da club by 11, what-what!

10 minute smoky eye final look down

So my fallback look for late nights is this 10-minute smoky eye, and what I like most about it (other than the fact that I can crank it out pretty quickly) is that it doesn’t have to be perfect to still look pretty good. You don’t have to be perfectly detail oriented with the blending because it’s purposefully undone. In fact, the messier it is, the more ya look like a bad-@ss rock chick. Plus, if you are going somewhere for dancing, odds are the lights will be low anyway, so nobody’s really going to be able to tell if you’ve got like four colors transitioning into a gradient in your crease.

Save yourself the effort! — and spend less time doing your makeup, so you have more time to disco nap. 🙂 Zzzz…

10 minute smoky eye final look eye closeup

Now let’s get started, shall we? First things first, gotta get the gear.

What you’ll need…

10 minute smoky eye products-final

  1. A brow filler
  2. A matte brown cream shadow
  3. A black kohl pencil
  4. A shimmery black eyeshadow
  5. A matte brown eyeshadow
  6. A shimmery, peachy beige eyeshadow
  7. Under-eye concealer
  8. Mascara

Now for the step-by-step…

1. Fill in your brows

10 minute smoky eye brows

I like to start by doing my brows first because they’re sort of like my roadmap. Once they’re done, I think it’s easier to gauge how far I want to sweep my shadows out.

Also, particularly when doing smoky eyes, and this is doubly true when using black eyeshadow like we’re going to use here, I think it really helps to do your eyes first, then clean up any makeup that drops down under your eyes (because there will be some fallout, especially if you’re working quickly).

So set aside your base makeup for now. We’ll come back to it a little later.
[Continue reading…]

There are 22 comments on this post. Leave yours.

Categories: Eyes, Makeup Tips/How To

5 Lip Colors to Wear With Brown Smoky Eyes

September 4th, 2015 by Karen 15 Comments

From the left: MAC Cremesheen Lipstick in Creme D'Nude, MAC Amplified Lipstick In Fast Play,  MAC Amplified Lipstick in Brick-O-La,  MAC Satin Lipstick in Mocha and MAC Matte Lipstick in Lady Danger
From the left: MAC Cremesheen Lipstick in Creme D’Nude, MAC Amplified Lipstick In Fast Play, MAC Amplified Lipstick in Brick-O-La, MAC Satin Lipstick in Mocha and MAC Matte Lipstick in Lady Danger

Of all the many makeup machinations, styles and takes on smoky eyes (and there are A LOT of them; we’d seriously be here until next Tuesday if I tried to list them all), brown smoky eyes are among my favorites.

I know, so predictable. Homegirl loves brown, so of course she’d love brown smoky eyes, LOL! Yes, you have permission to laugh at me. It’s totally cool. We’re all friends here.

BUT YOU KNOW IT’S TRUE, THOUGH!

There are many legit reasons to love brown smoky eyes. One is their versatility in terms of what you can wear on your lips with ’em. Like, with green or blue smoky eyes, I feel like there aren’t as many lip colors you can wear with them, but brown smoky eyes go well with so many different shades! This is music to your ears, I bet, if you’re a lipstick hoarder like yours truly. 🙂

And what you choose to pair them with completely changes the vibe. Just for fun, here are five ideas for lip colors to wear with a brown smoky eye.

1. A nude beige

mac creme d nude lipstick
MAC Cremesheen Lipstick in Creme D’Nude ($17)

This one’s a classic smoky eye-lip pairing combo: the nude beige lip. The trick is to find something pale, but not so pale that you look like you’re under the weather. I like nude shades with a little bit of peach in them to warm things up, and an extra smooth formula, because some nudes look patchy on my dry, flaky lips.

Right now I’m all about MAC Cremesheen Lipstick in Creme D’Nude, a creamy, peachy nude beige.

Tom Ford’s Sable Smoke is another really good one.

2. A neutral pink

mac fast play lipstick
MAC Amplified Lipstick In Fast Play ($17)

You can’t go wrong with a neutral pink lip. They go with just about anything and work for day and night. You can also wear them with warm or cool-toned brown eyeshadows, and Fast Play by MAC is a current fave.

3. A berry

MAC Amplified Lipstick in Brick-O-La ($17)

If you like more color on your lips, a berry shade, like MAC Brick-O-La, will draw attention to yo’ pout but won’t take over your entire look.
[Continue reading…]

There are 15 comments on this post. Leave yours.

Categories: Lips, MAC Makeup, Makeup Tips/How To

A Smoky Eye Application Tip: Start Applying Your Eyeliner in the Middle of Your Lash Line

September 4th, 2015 by Karen 6 Comments

line-from center final

Here’s a tip I discovered recently, and it’s been very helpful! If you’re using pencil liner for smoky eyes (or just using pencil liner in general, really), start your application in the middle of your lash line. That way if you accidentally apply too much (she said, accidentally applying too much for probably the one millionth time!), all you have to do is drag the excess left or right.

Control! — it’s one of the toughest things about makeup for me. Controlling the product.

Of course, I probably have some minor control freak issues (more like definitely), so this could be a bigger issue for me than it is for most people, but I like to know that if something should go wrong, and Murphy’s Makeup Law says that if something can go wrong, 99% of the time it will, at least this way I can correct it.

I used to always start applying my pencil liner in the outer corner, and then when I’d accidentally apply too much, I’d turn it into improv winged liner, but when I start my liner in the center instead, it’s easier to control how much product ends up in the inner and outer corners.

Just a quick thing to try if you ever have a hard time with pencil liner.

Your friendly neighborhood beauty addict,

Karen

P.S. Totally not liner or smoky eye related AT ALL, but The Unauthorized Full House Story on Lifetime is REALLY GOOD (please don’t judge).

Well…good for a Lifetime movie, LOL! But this one isn’t good because it’s so bad that it’s good… It’s actually good! I think so. Even El Hub, who vigorously begs me to turn the channel whenever I start watching a Lifetime movie, could not look away!

Basically, it’s what you expect. It’s a dramatized behind-the-scenes look at Full House, which I watched and loved back when it was first on TV in the ’90s.

It’s not brain food or complicated like War and Peace, but if you’re in the mood for candy-coated sugary brainlessness, it’s satisfying. 🙂

There are 6 comments on this post. Leave yours.

Categories: Eyes, Makeup Tips/How To

Smudge Shadow Along Your Lower Lash Lines for More Balanced Smoky Eyes

September 4th, 2015 by Karen 11 Comments

smoky lower lash line
Before and after

Next time you do a smoky eye look, if you’re not doing it already, try smudging a little shadow along that lower lash line, babe. It’s a revelation! — especially when you do it with smoky eye looks.

If I were forced by a sorcerer stylist/cosmetics conjurer queen to wear just one type of eye look every day this winter and fall, I choose smoky eyes (but winged liner would come in a close second).

They’re my favorite eye look of all. You can go messy and grungy, super polished and perfect, soft and subtle, or dramatically diva with them, and they range from simple (a cream shadow with a smudgy kohl) to complicated (with hella shades in the crease and on the lid).

They’re very versatile and pulsate with personality, and I think they’re fun to do.

There’s usually a lot of stuff going on when it comes to smoky eyes, but some of the biggest bang comes from the subtlest touches. They’re the little things that can take your look from “pretty good” to “DAMN, GURL! Did you get your makeup done at the counter today!?” 🙂

One of those high-impact subtle touches: smudging shadow along your lower lash line.

In the before picture at the top, my lower lash line is bare. There is a little liner on my lower water line, but that’s it, other than concealer, and I think the eye looks slightly top heavy and unbalanced.

Not a lot though. It’s not a big deal, and I don’t think anybody is going to stop me on the street to shake the living daylights out of me and yell, “Excuse me, miss, but you need to fix that top smoky situation!!”

At least I hope not.

But compared to the after eye on the right, where I’ve smudged shadow under my lower lash line, I think that eye looks more balanced. The smoky effect envelopes the eyes, making it look larger, better balanced and more dramatic.

smoky lower lash line
[Continue reading…]

There are 11 comments on this post. Leave yours.

Categories: Eyes, Makeup Tips/How To

Why You Should Never Skip Eyeshadow Primer When Doing Smoky Eyes (Quick Tip)

September 3rd, 2015 by Karen 12 Comments

why you should never skip primer smoky eyes

Of course you can skip wearing eyeshadow primer when you’re doing smoky eyes, and if you do, the world as we know it will not fall apart.

EVERYTHING WILL BE OK, PEOPLE!

But I do think that primer is usually a good idea, especially when doing smoky eyes, because primer makes your lids smoother, which, in turn, makes your eyeshadow less patchy. Primer also extends the wear time of your eye makeup. Both are good things!

Since smoky eyes usually involve a lot of layering and blending — you do a little layering, then a bit of blending, more layering, more blending — and they’re a big part of the fun, you don’t want to be working *too* hard, you know? And that’s another way in which wearing primer can help, because it makes your life easier. By enriching the color of the eyeshadows you apply on top of it, primer makes those shadows more vibrant and more intense, which in turn equals less layering!

So, on top of all the other good things primer does, it also makes smoky eyes, as well as many other eye looks, easier and faster. That way you get to spend less time on your makeup, and more time harassing your cat. 🙂

Nowadays, there are many different kinds of eyeshadow primers out there and different ways to use non-primer products as improv primers. Classic eye primers that are dedicated to priming your lids are available from most of the big brands, and my favorite one for the past few years has been NARS Pro-Prime Smudge-Proof. I think it’s seriously the best one out there now, hands down, and I’ve yet to find one better, particularly for smoky eyes.

smoky-eye-closeup
[Continue reading…]

There are 12 comments on this post. Leave yours.

Categories: Eyes, Makeup Tips/How To

  • « Go to Previous Page
  • Go to page 1
  • Interim pages omitted …
  • Go to page 29
  • Go to page 30
  • Go to page 31
  • Go to page 32
  • Go to page 33
  • Interim pages omitted …
  • Go to page 93
  • Go to Next Page »

Primary Sidebar

Welcome to Makeup and Beauty Blog

Welcome to Makeup and Beauty Blog! My name is Karen, and I’m a freelance writer obsessed with makeup.

Makeup and Beauty Blog features daily product reviews, makeup tips and beauty news — like an interactive version of a monthly print magazine, except with occasional pictures of my cat.

Recent Posts

Sundays With Tabs the Cat, Makeup and Beauty Blog Mascot, Vol. 878

Makeup and Beauty Blog Monday Poll, Vol. 894

Makeup and Beauty Blog Monday Poll, Vol. 893

Makeup and Beauty Blog Monday Poll, Vol. 892

Makeup and Beauty Blog Monday Poll, Vol. 891

/* real people should not fill this in and expect good things – do not remove this or risk form bot signups */

Social

  • Facebook
  • Instagram
  • Pinterest
  • Twitter
  • YouTube

Featured Posts

Sundays With Tabs the Cat, Makeup and Beauty Blog Mascot, Vol. 771

Lady Unicorn

Weird Things I Like to Do

brows fill out beforehand

Before You Pluck or Wax Your Brows, You Must Do This

current bare skin status

What’s One Thing That Drastically Changed Your Skin for the Better?

Copyright © 2025 Makeup and Beauty Blog. Get in touch.